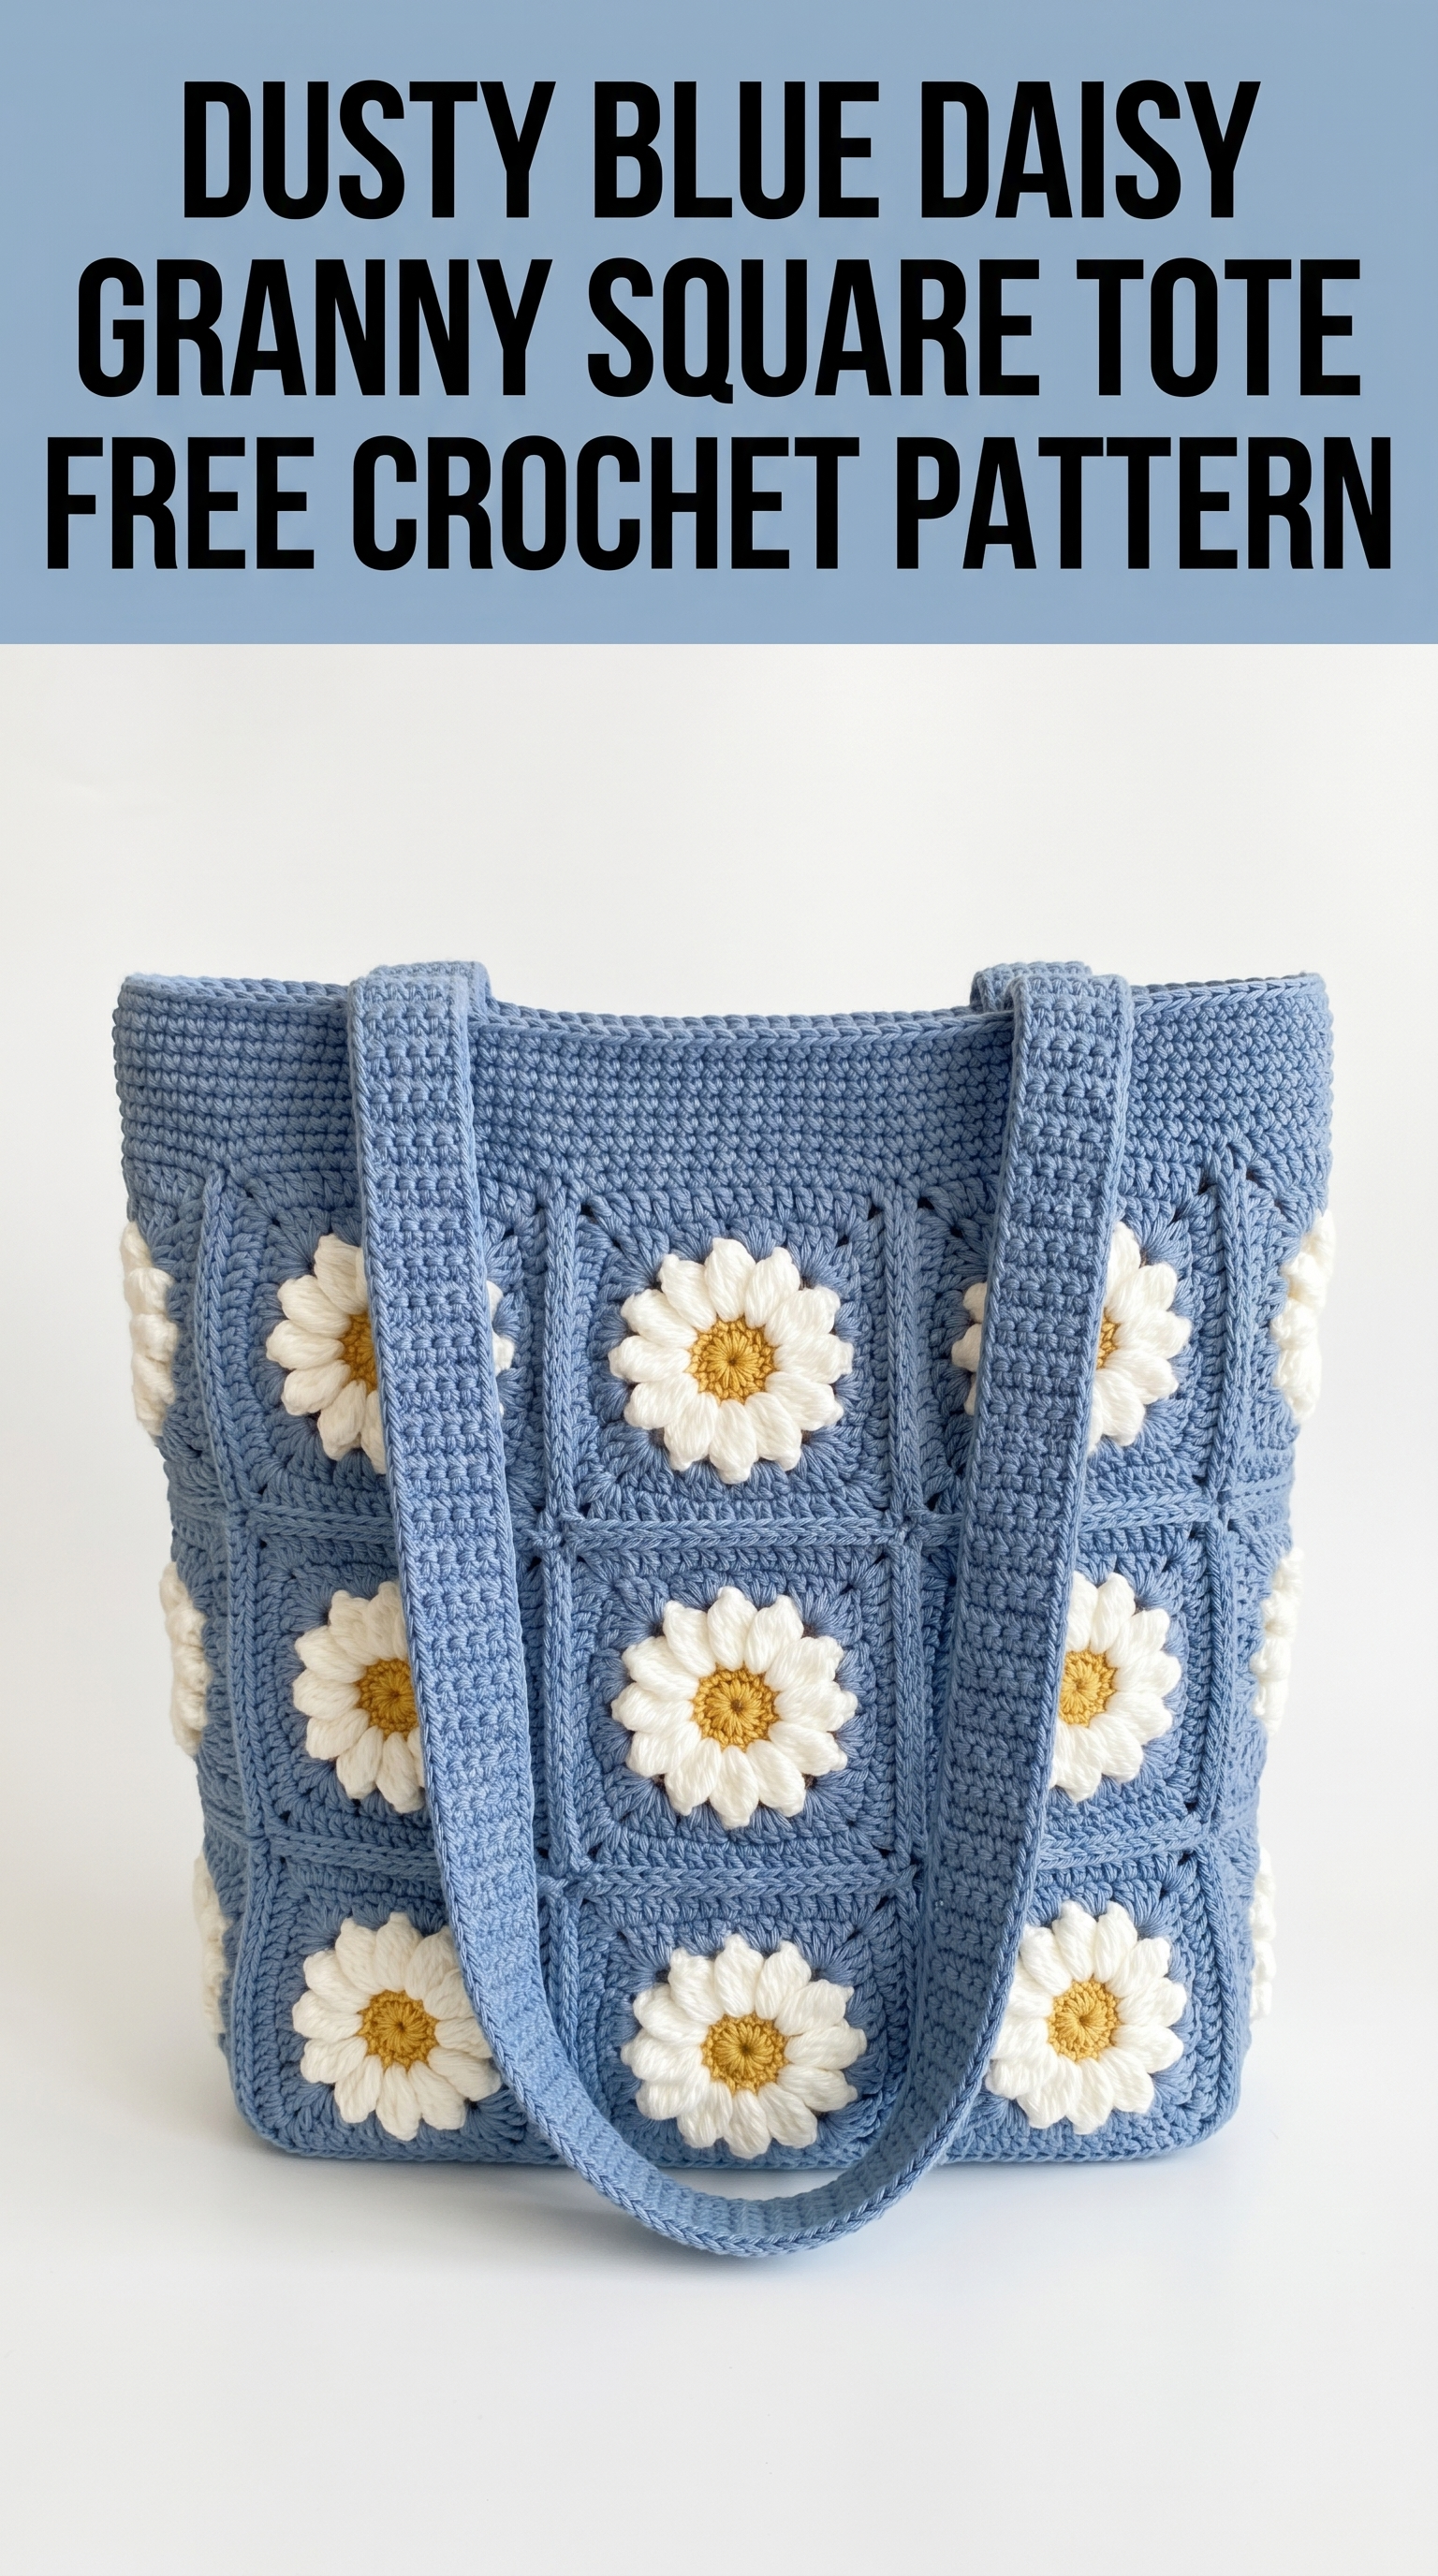
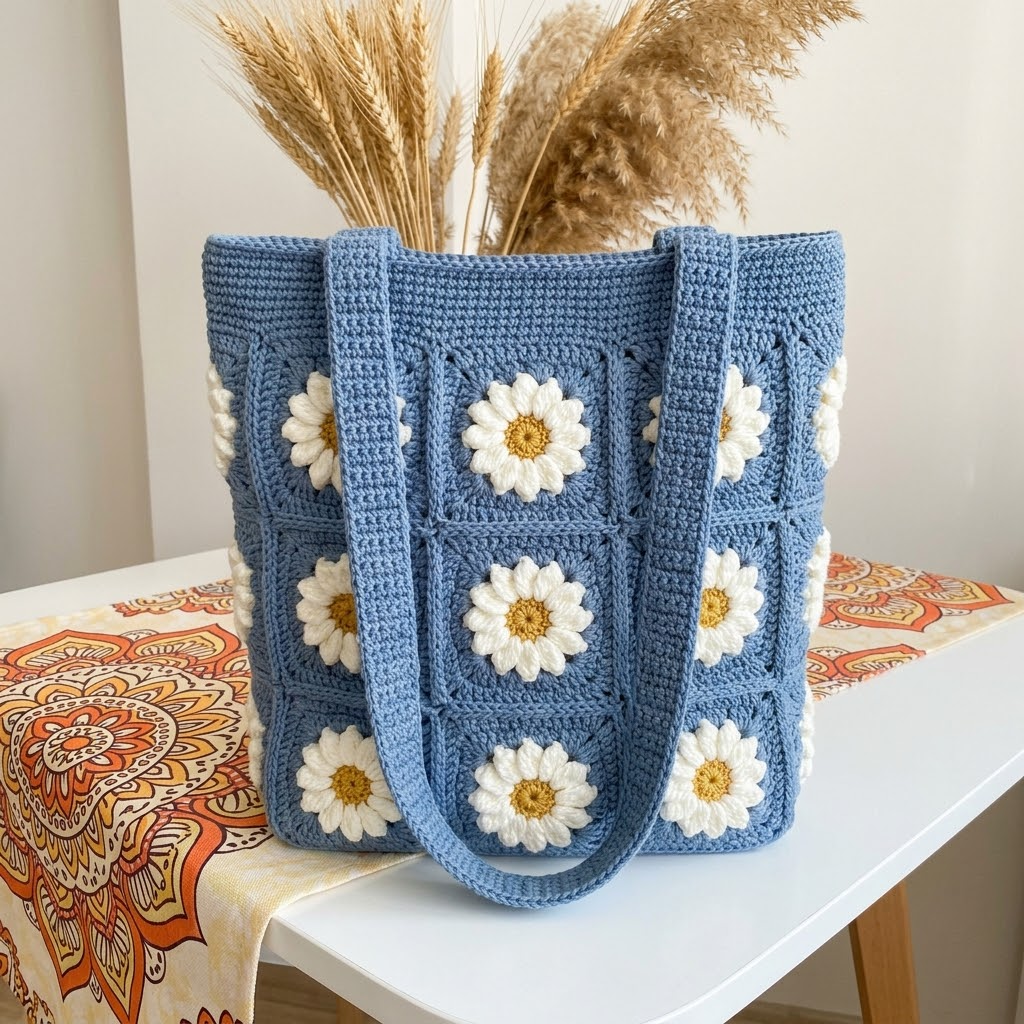
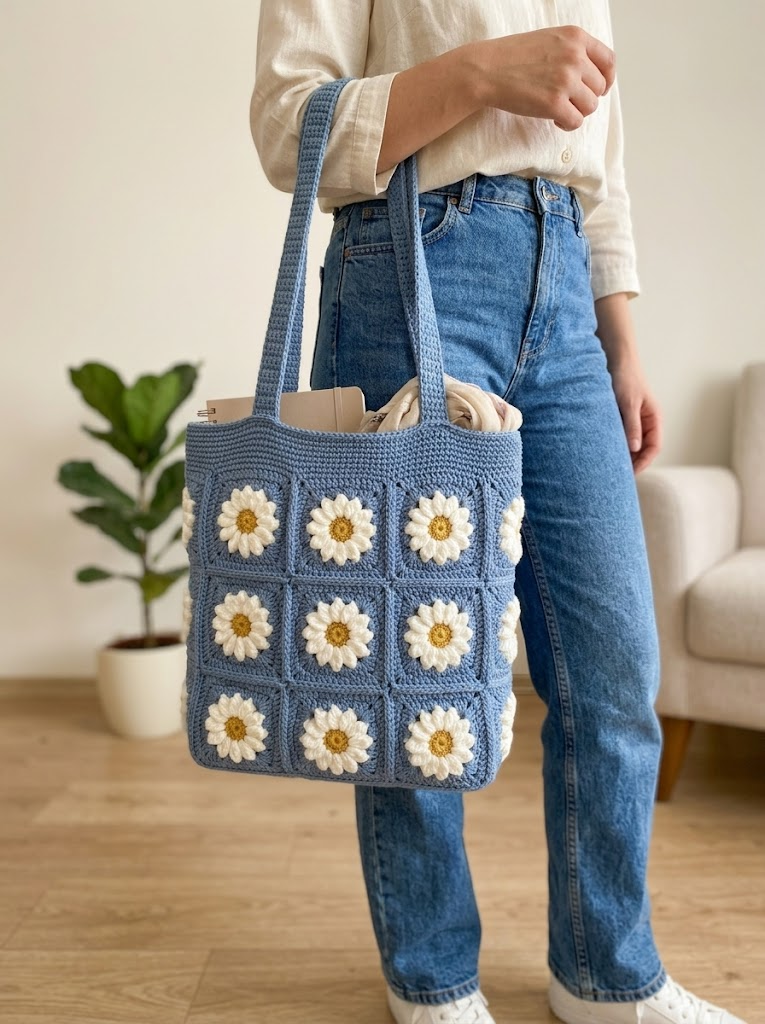
There’s something about a handmade tote that just feels *right*. This dusty blue daisy granny square tote combines everything I love about crochet. Classic granny squares. Cheerful dimensional flowers. A practical bag you’ll actually use every single day. And that soft blue background? It makes those white daisies absolutely pop.
I designed this crochet pattern to be approachable for confident beginners while still giving experienced crocheters a satisfying project. If you can make a basic granny square and work in the round, you can absolutely make this bag. I’ll walk you through every step.
Let’s get started.
Why You’ll Love This Daisy Granny Square Tote Crochet Pattern
This tote hits the sweet spot between pretty and practical. The construction uses individual daisy granny squares that you’ll join together, which means you can work on squares anywhere. Waiting room? Perfect. Road trip? Absolutely. The modular design also makes this a forgiving project. If one square doesn’t turn out quite right, you simply make another.
The finished bag measures approximately 13 inches wide by 14 inches tall, not including the straps. It’s roomy enough for groceries, books, a small blanket project, or beach day essentials. The sturdy construction holds its shape beautifully thanks to the dense stitch work in the background of each square.
Those raised daisy petals aren’t just decorative. They add wonderful texture and make this tote instantly recognizable as handmade in the best way possible.
Materials You’ll Need
Yarn:
I recommend 100% cotton yarn or a cotton blend for this project. Cotton gives the bag structure, wears well, and shows stitch definition beautifully. Something like Drops Paris, Paintbox Cotton Aran, or Lion Brand 24/7 Cotton works wonderfully.
Hook:
Notions:
Gauge
Work one complete daisy granny square. Your finished square should measure approximately 4 inches by 4 inches after blocking.
Gauge matters here because it affects both the finished bag size and how sturdy your tote will be. If your squares are too loose, the bag will stretch and lose shape when filled. Too tight, and the fabric becomes stiff and difficult to work with.
Don’t skip the gauge square. I know, I know. But trust me on this one.
Abbreviations and Stitch Definitions
Let me break down every stitch you’ll use in this crochet tutorial. Even if you know these, a quick refresher never hurts.
ch = chain: Wrap yarn over hook, pull through loop on hook. The foundation of almost everything in crochet.
sl st = slip stitch: Insert hook, yarn over, pull through both the stitch and the loop on your hook in one motion. Used for joining and moving across stitches invisibly.
sc = single crochet: Insert hook, yarn over, pull up a loop (two loops on hook), yarn over, pull through both loops. A short, dense stitch.
dc = double crochet: Yarn over, insert hook, yarn over, pull up a loop (three loops on hook), yarn over, pull through two loops, yarn over, pull through remaining two loops. Taller than single crochet, creates the classic granny square look.
hdc = half double crochet: Yarn over, insert hook, yarn over, pull up a loop (three loops on hook), yarn over, pull through all three loops at once. Height falls between sc and dc.
puff st = puff stitch: A cluster of half double crochets worked into the same stitch or space, then closed at the top. Creates a puffy, raised texture. For this pattern: yarn over, insert hook, pull up a loop, (yarn over, insert hook in same space, pull up a loop) 3 more times, yarn over, pull through all 9 loops on hook, ch 1 to secure.
ch-sp = chain space: The gap created by a chain in the previous row or round. You’ll work into these spaces, not into the chain stitches themselves.
Skill Level
Confident Beginner to Intermediate
You should be comfortable with:
If puff stitches are new to you, don’t worry. I’ll walk you through them step by step. They look impressive but become intuitive quickly.
The Daisy Granny Square Pattern
You’ll need 18 squares total for the main body of this tote: 9 for the front and 9 for the back. If you want daisy squares on the straps as well, you’ll need 2 additional squares per strap, so 22 squares total.
Round 1: The Flower Center
With Color B (mustard gold) and your 5.0mm hook, create a magic ring.
Work into the magic ring: ch 1 (does not count as a stitch), 8 sc into the ring. (8 sc)
Pull the magic ring closed. Join with a sl st to the first sc.
Stitch count: 8 sc
If magic rings intimidate you, here’s an alternative: ch 4, sl st to the first ch to form a ring, then work your 8 sc into the center of that ring. Either method works perfectly.
Round 2: The Puff Stitch Petals
Change to Color A (white).
Ch 2 (counts as first hdc). Work 3 more hdc into the same stitch, yarn over and pull through all loops to close, ch 1 to secure. You’ve just made your first puff stitch petal.
*Skip the next sc*, work 1 puff stitch into the following sc, ch 1.
Repeat around, skipping every other sc and placing a puff stitch in the remaining stitches.
You should have 4 puff stitch petals with ch-1 spaces between them. Join with a sl st to the top of the first puff stitch.
This is where the daisy magic happens. Those puffy petals should sit up proudly from the fabric.
Round 3: Building the Petals
Still using Color A (white).
Sl st into the ch-1 space. Ch 2, work 3 hdc into the same space, close into a puff stitch, ch 1 to secure.
Work 1 puff stitch into the top of the next puff stitch from Round 2. Ch 1.
Work 1 puff stitch into the next ch-1 space. Ch 1.
Continue this pattern around: puff in space, ch 1, puff in top of puff, ch 1.
You should now have 8 puff stitch petals arranged in a flower shape. Join with a sl st.
Stitch count: 8 puff stitches
Take a moment to admire your daisy. Looking good, right?
Round 4: Transitioning to the Square
Change to Main Color (dusty blue).
This round transitions from the circular flower to the square shape. Pay attention to placement here.
Sl st into the first ch-1 space. Ch 3 (counts as dc throughout).
Work 2 dc into the same space, ch 2, 3 dc into the same space. This creates your first corner.
*Skip the next puff stitch*, 3 dc into the next ch-1 space. This is a side cluster.
*Skip the next puff stitch*, work (3 dc, ch 2, 3 dc) into the next ch-1 space. Second corner made.
Continue around: skip puff, 3 dc in space, skip puff, corner cluster.
Join with a sl st to the top of the beginning ch-3.
Stitch count: 4 corners (each 3 dc, ch-2, 3 dc) plus 4 side clusters (each 3 dc)
Round 5: Growing the Square
Still using Main Color.
Sl st across to the first corner ch-2 space. Ch 3.
Work (2 dc, ch 2, 3 dc) into the corner space. This creates a traditional granny corner.
*3 dc into each ch-1 space* between clusters along the side.
Work corner into corner ch-2 space.
Continue around, placing 3 dc clusters in every side space and corners in every corner space.
Join with a sl st.
Round 6: Final Square Round
Repeat Round 5.
Your square should now have 3 clusters on each side between corners, plus the corner clusters themselves.
Fasten off. Weave in your ends.
Finished square should measure approximately 4 inches.
Putting Your Tote Together
Once you have all 18 (or 22) squares completed and ends woven in, it’s time for the fun part: assembly.
Blocking (Highly Recommended)
Wet block or steam block your squares before joining. Pin them out to 4 inches square and let dry completely. This evens out your stitches and makes joining so much easier. Blocked squares also create a more polished finished bag.
Layout
Arrange your squares in a 3 wide by 3 tall grid for the front panel. Repeat for the back panel. Play with orientation until you’re happy with how the daisies face.
Joining Method: Slip Stitch Join
Hold two squares together with wrong sides facing (so the seam shows on the outside for a decorative look) or right sides facing (for a hidden seam).
Using Main Color, join yarn in a corner space.
Working through both layers: sl st through each stitch across.
I prefer the whip stitch method for joining granny squares because it’s fast and creates a flat seam. Thread your yarn needle with Main Color, and stitch through the back loops of each square, moving along the edge.
Join squares into strips first (3 squares per strip), then join the strips together to form each panel.
Joining Front to Back
Place your front and back panels together with wrong sides facing. Using Main Color, sc around three sides (both sides and the bottom), working through both layers.
Leave the top open, obviously.
Work 3 sc into each corner for smooth turns.
The Straps
These straps are worked separately, then attached to the bag. They’re simple but sturdy.
Make 2.
With Main Color, ch 9.
Row 1: Sc in the 2nd ch from hook and in each ch across. (8 sc) Ch 1, turn.
Row 2: Sc in each sc across. (8 sc) Ch 1, turn.
Repeat Row 2 until your strap measures approximately 22 inches long, or your desired length.
Fasten off, leaving a long tail for sewing.
Attaching the Straps
Position straps on the front and back panels, placing them about one square width in from each side edge.
Using your yarn needle and the long tail, whip stitch the straps securely to the bag. Go over the attachment point several times for durability. This bag will carry weight, so reinforce well.
Top Border (Optional but Recommended)
For a polished finish, work a border around the top opening.
Join Main Color at a side seam.
Round 1: Sc evenly around the entire top edge, including across the strap attachments. Join with a sl st. (approximately 100-120 sc depending on your gauge)
Round 2: Ch 1, sc in each sc around. Join.
Round 3: Repeat Round 2.
Fasten off and weave in ends.
This border reinforces the top edge and gives the bag a finished look.
Tips for Success
On color changes: When changing colors, complete the last yarn over of the final stitch with your new color. This creates crisp color transitions.
On puff stitches: Keep your tension loose when pulling up loops for puff stitches. Tight tension makes pulling through all those loops difficult and frustrating.
On yarn amounts: Buy all your main color from the same dye lot. The blue background is consistent across all squares, and dye lot variations will show.
On lining: Consider adding a fabric lining for extra durability and to prevent items from poking through. A simple drawstring or snap closure works beautifully too.
Customization Ideas
This step by step crochet tutorial gives you the base pattern, but make it yours.
Wrapping Up Your Daisy Granny Square Tote
You did it. Or you’re about to do it, and I’m already proud of you.
This daisy granny square tote crochet pattern combines traditional granny square techniques with sweet dimensional flowers for a bag that’s both beautiful and genuinely useful. Every time you grab it heading out the door, you’ll remember the hours of happy stitching that went into making it.
Take your time with the puff stitches. Be patient during assembly. And definitely block those squares. The finished result is absolutely worth every stitch.
Thank you so much for choosing this pattern for your next project. I’d truly love to see your finished tote. Tag me on Instagram or share your photos in our Facebook group. There’s nothing better than seeing these designs come to life in your hands and your color choices.
Happy crocheting, friend. You’ve got this.
