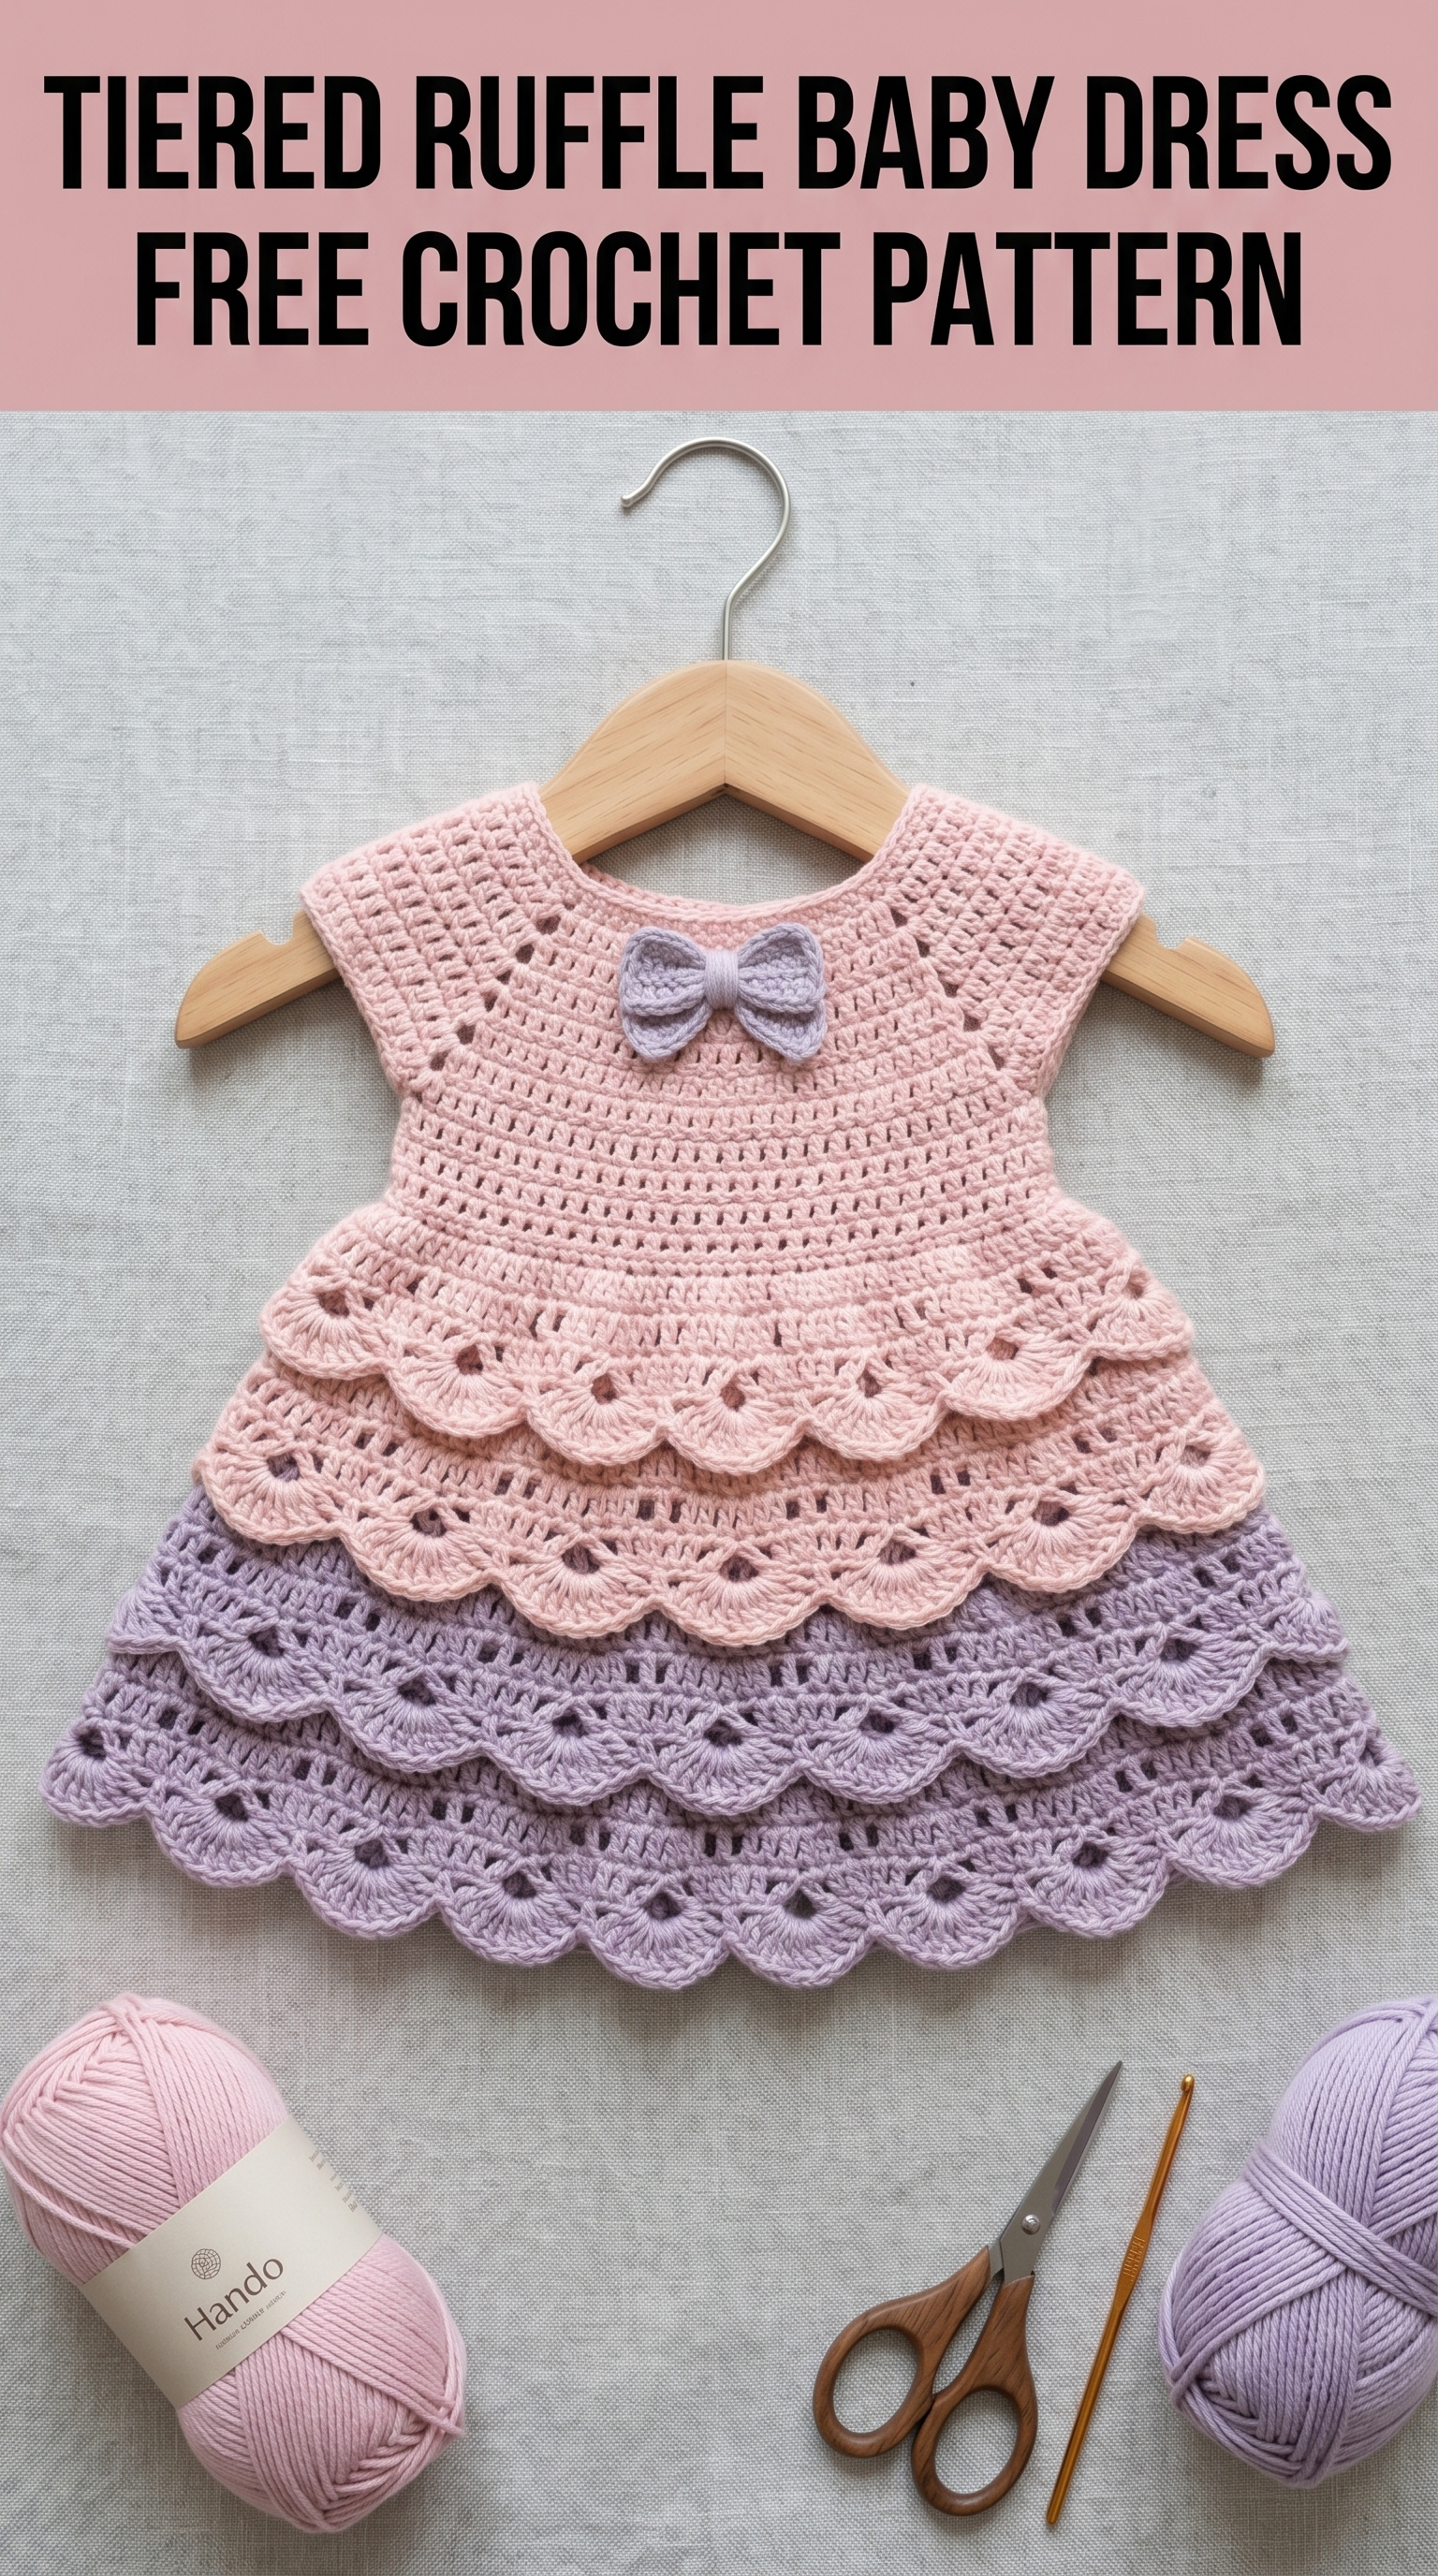
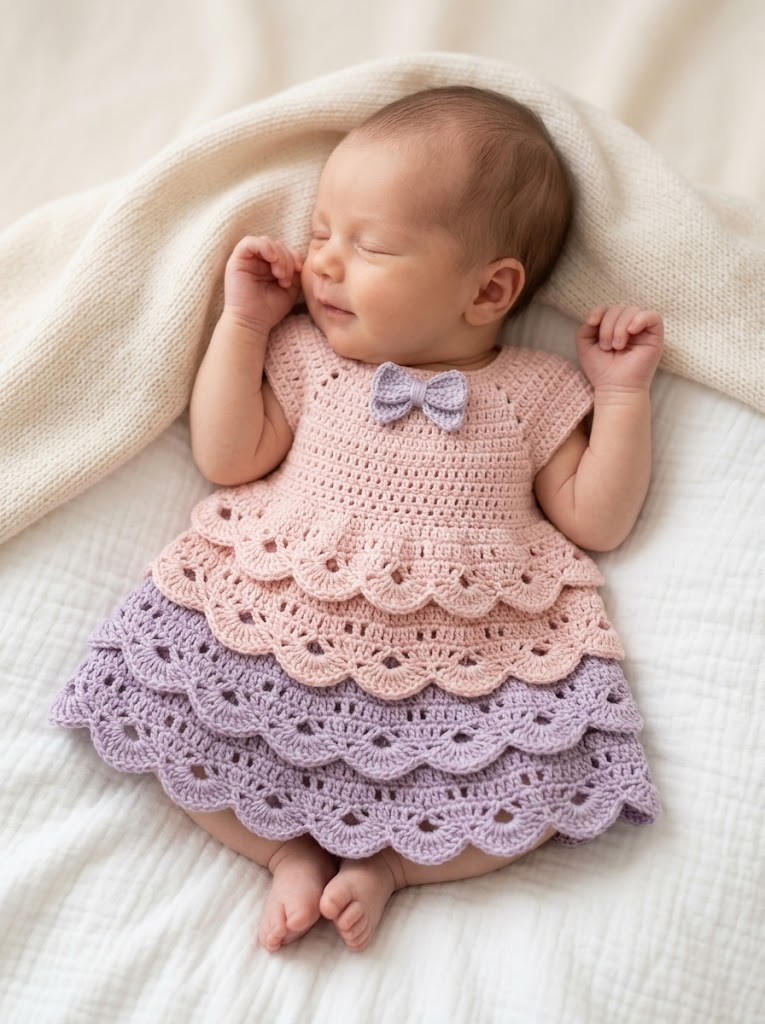
There is something absolutely magical about crocheting tiny garments. This tiered ruffle baby dress has been living in my head rent-free since I finished the last stitch. The soft pink bodice flows into those dreamy lavender ruffled tiers, and that sweet little bow at the neckline? Pure perfection.
I designed this crochet pattern with intermediate crocheters in mind. If you can work basic stitches in the round and follow a simple shell pattern, you can absolutely make this dress. The construction is more straightforward than it looks. Promise.
Let me walk you through everything you need to recreate this sweet little dress from scratch.
Why This Tiered Baby Dress Pattern Works So Well
The secret to this dress is the layered construction. Each ruffle tier sits on top of the next, creating that beautiful cascading effect without adding bulk. The bodice uses a clean combination of double crochet rows with eyelet details for breathability. Perfect for warm weather or layered over a onesie.
The shell stitch pattern on the skirt tiers creates those gorgeous scalloped edges naturally. No separate edging required. The shells fan out as you work down, giving each tier slightly more fullness than the one above.
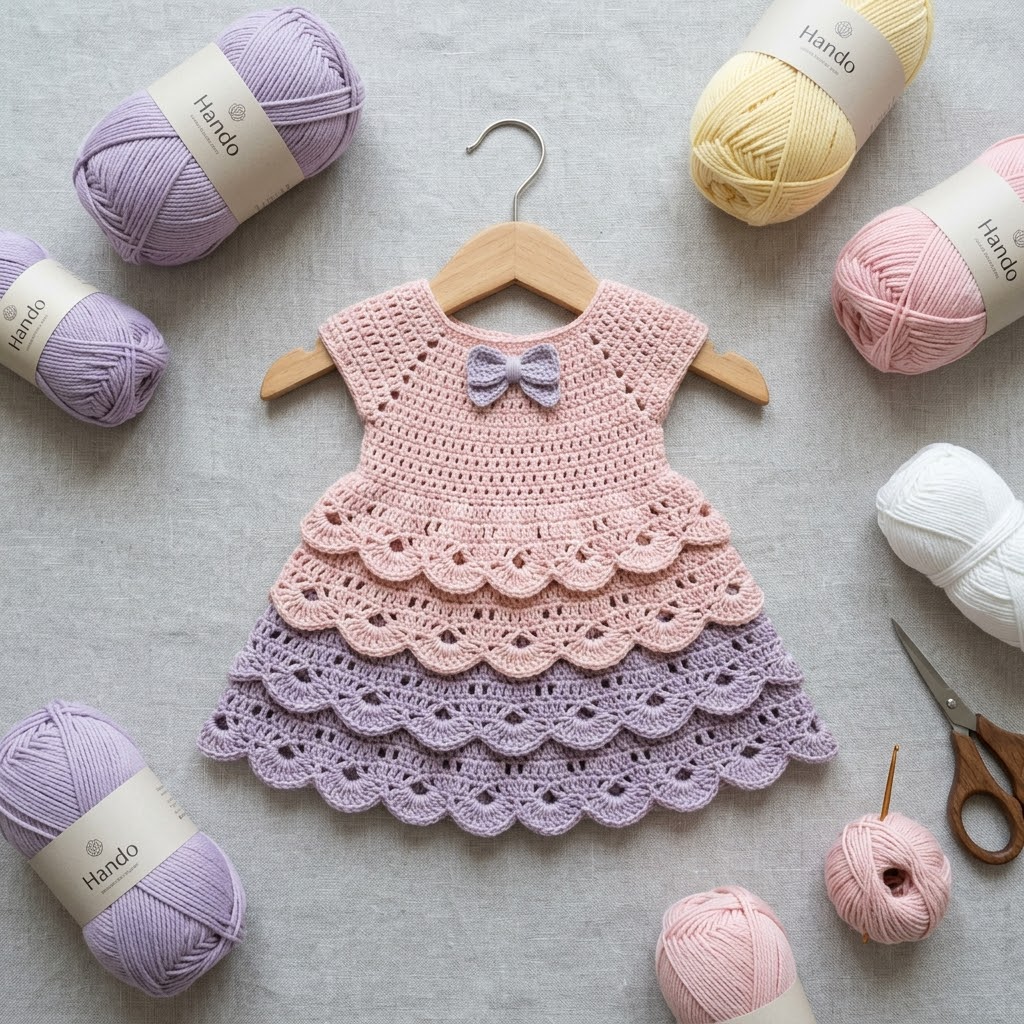
I chose a DK weight cotton blend yarn for this project. Cotton keeps baby cool and washes beautifully. The slight synthetic blend helps the stitches stay defined and prevents that limp drape pure cotton sometimes gives.
Skill Level
Intermediate. You should be comfortable with:
If you have made a baby hat or simple top before, you can handle this crochet tutorial.
Finished Measurements
This pattern is written for size 3 to 6 months.
Gauge: 18 stitches and 10 rows = 4 inches in double crochet using a 4.0mm hook. Check your gauge before starting the bodice.
Materials Needed
Yarn:
The yarn shown appears to be Hando brand in a smooth, tightly spun cotton or cotton acrylic blend. Any DK weight yarn with good stitch definition will work. Avoid anything too fuzzy or splitty.
Hook:
Notions:
Abbreviations and Stitch Definitions
Let me define every stitch you will need. Read through these before starting so nothing catches you off guard.
ch = chain. Wrap yarn over hook, pull through loop on hook. This creates the foundation and turning chains.
sl st = slip stitch. Insert hook, yarn over, pull through both loops on hook. Used to join rounds.
sc = single crochet. Insert hook, yarn over, pull up a loop (2 loops on hook), yarn over, pull through both loops. A short, tight stitch.
dc = double crochet. Yarn over, insert hook, yarn over, pull up a loop (3 loops on hook), yarn over, pull through 2 loops, yarn over, pull through remaining 2 loops. Creates a taller stitch with nice drape.
hdc = half double crochet. Yarn over, insert hook, yarn over, pull up a loop (3 loops on hook), yarn over, pull through all 3 loops at once. Height falls between sc and dc.
sk = skip. Miss the indicated stitch and work into the next one.
shell = work 5 dc into the same stitch or space. This creates that fan shape for the ruffles.
ch-sp = chain space. The gap created by a chain in the previous row. Work into the space, not the chain itself.
Pattern Notes Before You Begin
This dress is worked top down in joined rounds. The bodice is worked first as a flat piece, then joined to work in the round for the skirt.
Turning chains: The ch-3 at the beginning of dc rows counts as the first dc unless noted otherwise.
Color changes: When switching from pink to lavender on the skirt, change colors on the last yarn over of the joining slip stitch. This keeps the color change neat.
The bow is worked separately and sewn on at the end. You can skip it entirely or substitute a ribbon bow if preferred.
Step by Step Crochet Pattern
Part 1: The Yoke
The yoke creates the neckline and shoulder shaping. We work flat first, then join.
With MC and 4.0mm hook:
Foundation Row: Ch 51.
Row 1: Dc in 4th ch from hook and in each ch across. Turn. (48 dc)
Row 2: Ch 3 (counts as dc), dc in next 6 dc, ch 1, sk 1, dc in next 6 dc, ch 1, sk 1, dc in next 18 dc, ch 1, sk 1, dc in next 6 dc, ch 1, sk 1, dc in last 7 dc. Turn. (44 dc, 4 ch-1 spaces)
*The ch-1 spaces mark your raglan increase points.*
Row 3: Ch 3, dc in each dc to first ch-sp, (2 dc, ch 1, 2 dc) in ch-sp, *dc in each dc to next ch-sp, (2 dc, ch 1, 2 dc) in ch-sp*, repeat from * twice more, dc in each dc to end. Turn. (60 dc, 4 ch-1 spaces)
Row 4: Repeat Row 3. (76 dc, 4 ch-1 spaces)
Row 5: Repeat Row 3. (92 dc, 4 ch-1 spaces)
Row 6: Repeat Row 3. (108 dc, 4 ch-1 spaces)
At this point, your yoke should measure approximately 2.5 inches from the foundation chain.
Part 2: Divide for Bodice
Now we separate the sleeves from the body.
Row 7: Ch 3, dc in next 13 dc (front section), ch 4, sk next 22 sts (this is the first sleeve), dc in next 34 dc (back section), ch 4, sk next 22 sts (second sleeve), dc in last 14 dc. Turn. (64 dc, 8 ch)
Row 8: Ch 3, dc in each dc and each ch around. At the end of this row, join with sl st to top of ch-3 to begin working in the round. (72 dc)
*Place a stitch marker at the join. This marks the center back.*
Part 3: Bodice in the Round
Now we work the bodice as a tube.
Round 1: Ch 3, dc in each st around, join with sl st to top of ch-3. (72 dc)
Round 2: Ch 3, dc in next 3 dc, ch 1, sk 1, *dc in next 5 dc, ch 1, sk 1*, repeat from * around to last dc, dc in last dc, join. (60 dc, 12 ch-1 spaces)
*This creates the eyelet row you see on the bodice. It adds a delicate touch and helps with breathability.*
Round 3: Ch 3, dc in each dc and each ch-sp around, join. (72 dc)
Round 4: Ch 3, dc in each st around, join. (72 dc)
Round 5: Repeat Round 4. (72 dc)
Round 6: Ch 3, *dc in next 5 dc, 2 dc in next dc*, repeat from * around, join. (84 dc)
*This increase round adds fullness for the transition to the skirt.*
The bodice should measure approximately 4.5 inches from shoulder to current round.
Part 4: First Ruffle Tier (Pink)
Here is where the magic happens. Each tier is worked into a previous round, creating layers.
Round 1: Ch 3, dc in next dc, *sk 2, shell in next dc, sk 2, dc in next 2 dc*, repeat from * around, adjusting as needed to end the round cleanly, join.
Round 2: Ch 3, *shell in center dc of shell below, dc in sp between shells*, repeat from * around, join.
Round 3: Repeat Round 2.
Round 4: Ch 3, *shell in center dc of shell below, dc in space between shells, ch 1*, repeat from * around, join.
Round 5: Repeat Round 4.
At the end of Round 5, do not fasten off. We will work the foundation for the next tier.
Part 5: Second Ruffle Tier (Lavender)
Setup Round: Working in front loops only of Round 6 of the bodice (the round just before the first ruffle started), join CC with sl st. Ch 3, dc in each st around, join. (84 dc)
*This creates a new base round that sits behind the first ruffle.*
Now repeat the shell pattern:
Round 1: Ch 3, dc in next dc, *sk 2, shell in next dc, sk 2, dc in next 2 dc*, repeat from * around, join.
Rounds 2 through 6: Continue working shell pattern as established, adding ch-1 spaces on Rounds 4, 5, and 6 to increase fullness.
Round 7: Ch 1, sc in each dc, 2 sc in center dc of each shell, sl st to join. Fasten off.
This final sc round creates the finished scalloped edge you see in the photo.
Part 6: The Bow
With CC and 3.5mm hook:
Ch 21.
Row 1: Sc in 2nd ch from hook and each ch across. Turn. (20 sc)
Rows 2 through 6: Ch 1, sc in each sc across. Turn. (20 sc)
Fasten off, leaving a long tail.
Center wrap: Ch 8. Sc in 2nd ch from hook and next 6 ch. Fasten off.
Fold the rectangle in half lengthwise to create the bow shape. Wrap the small strip around the center tightly and sew in place on the back. Attach to the center front neckline with a few secure stitches.
Finishing Your Baby Dress
Weave in all ends carefully. For baby items, I always weave ends in at least two directions so nothing pokes out after washing.
Block the dress gently by laying flat and steaming or misting with water. Shape the ruffles so they fan out nicely.
If you want a back closure, add a small button loop at the top of the center back and sew on a matching button. Alternatively, a small snap works perfectly and sits flatter against baby’s skin.
Tips for Success
Struggling with the ruffle tiers? Work slowly on the setup round. Finding those front loops from several rounds back can feel awkward. Use a stitch marker to hold your place.
Shells not lining up? Count your stitches after each round. The shells should stack directly on top of each other.
Want a longer dress? Add one or two more rounds to each ruffle tier before moving to the next.
Making a different size? Adjust your foundation chain by multiples of 6 and add or subtract one repeat row on the yoke.
Wrapping Up This Tiered Ruffle Baby Dress Crochet Pattern
I truly hope you love making this dress as much as I did. There is something so satisfying about watching those ruffles build up, layer by layer. The finished dress looks far more complicated than it actually is. That is my favorite kind of project.
Thank you so much for choosing to make this pattern. I appreciate you being here more than you know.
When you finish your dress, I would absolutely love to see it. Tag me on Instagram or share a photo in my Facebook group. Seeing your creations genuinely makes my day.
Happy crocheting, friend. You have got this.
