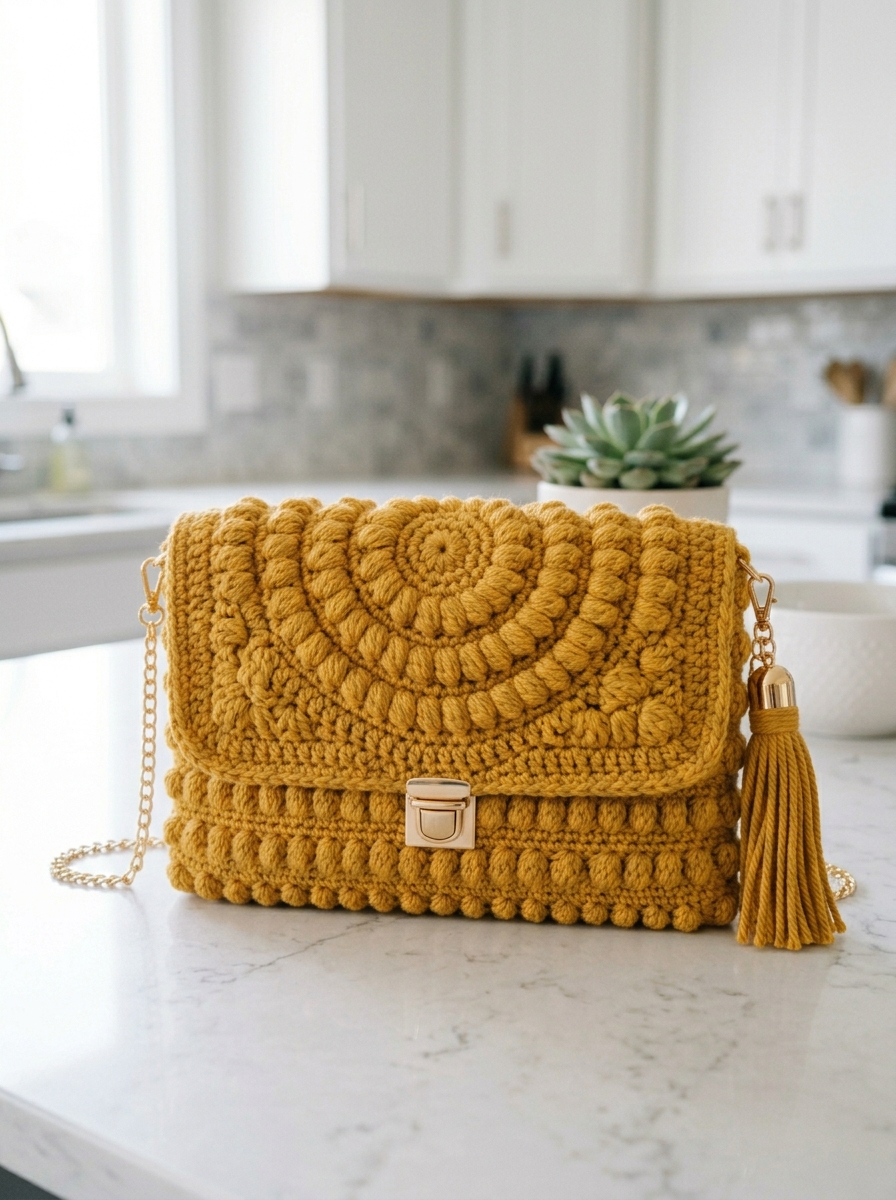
This gorgeous clutch bag is about to become your new favorite accessory. I designed this Mustard Yellow Boho Spiral Clutch to look like something you would find in a high-end boutique, but you can make it yourself with basic crochet skills and a weekend of relaxed stitching. The stunning spiral flap design looks incredibly intricate, but I promise it is easier than it appears.

If you can work single crochet, double crochet, and bobble stitches, you have everything you need to create this beauty. The construction is straightforward: a rectangular body, a separately made spiral flap, and some simple finishing. Let me walk you through every step of this crochet pattern.
Why You Will Love This Crochet Pattern
This clutch hits all the right notes. The textured bobble stitches around the body give it that boho vibe we all love. The spiral medallion flap is the showstopper, featuring concentric circles of bobbles that radiate outward like a sunburst. And those gold hardware details? Chef’s kiss.
The finished bag measures approximately 10 inches wide by 6 inches tall when closed. It is the perfect size for your phone, cards, keys, and lipstick. Wear it as a clutch for a night out or add the chain strap for hands-free convenience.
This step by step crochet tutorial will guide you through creating every component. Even if you have never made a bag before, the instructions break everything down into manageable pieces.
Materials You Will Need
Gather these supplies before you start. Having everything ready makes the process so much smoother.
Yarn:
- Approximately 250 yards of worsted weight yarn (weight category 4)
- I recommend a cotton or cotton blend for structure and stitch definition
- The sample uses a rich mustard gold color
Hook:
- 5.0mm (H/8) crochet hook for the main body
- 4.5mm (G/6) crochet hook for the spiral flap (optional, for tighter tension)
Notions:
- Yarn needle for weaving ends
- Stitch markers (at least 4)
- Push lock clasp (also called a tuck lock or thumb lock closure)
- Two D-rings for strap attachment
- Chain strap with lobster clasps (approximately 45 inches)
- Tassel charm (optional but adorable)
- Fabric for lining (optional)
- Fabric glue or needle and thread for lining attachment
Gauge
Gauge matters for bags. You want a tight, sturdy fabric that will not stretch out of shape.
16 stitches and 18 rows = 4 inches in single crochet using 5.0mm hook.
Take time to check your gauge. If your swatch is too loose, go down a hook size. A loose gauge means a floppy bag that will not hold its shape.
Abbreviations and Stitch Glossary
Let me explain every stitch before we begin. No confusion allowed.
Ch = Chain: Yarn over, pull through loop on hook. This creates the foundation for your work.
Sl st = Slip stitch: Insert hook, yarn over, pull through both loops at once. Used for joining and invisible movement.
Sc = Single crochet: Insert hook, yarn over, pull up a loop (2 loops on hook), yarn over, pull through both loops. A short, tight stitch.
Hdc = Half double crochet: Yarn over, insert hook, yarn over, pull up a loop (3 loops on hook), yarn over, pull through all 3 loops. Medium height stitch.
Dc = Double crochet: Yarn over, insert hook, yarn over, pull up a loop, (yarn over, pull through 2 loops) twice. Taller stitch with nice drape.
Bob = Bobble stitch: Work 5 double crochets into the same stitch, but do not complete them. Stop each dc when you have 2 loops remaining. You will have 6 loops on your hook. Yarn over and pull through all 6 loops at once. This creates a puffy dimensional cluster that pops to the front of your work.
Inc = Increase: Work 2 stitches into the same stitch.
Skill Level
Intermediate beginner to intermediate. If you have completed a few projects and feel comfortable with basic stitches, you can absolutely make this clutch. The bobble stitch might be new to you, but I will explain it thoroughly.
The spiral construction looks fancy but follows a logical pattern of increases. Trust the process.
Pattern Notes Before You Begin
Read these tips first. They will save you frustration later.
1. The bobbles pop to the back of your work. When working bobbles, make sure the puffy part faces the right side. You will be working with the wrong side facing you for those rows.
2. Count your stitches. Seriously. Count after every row for the first few rows until you get the rhythm.
3. The flap is worked separately and sewn on at the end. This makes construction much easier than working it attached.
4. Block your pieces before assembly. A light steam block helps everything lay flat and look professional.
The Crochet Pattern: Step by Step Instructions
Part 1: The Clutch Body (Front and Back Panels Worked Together)
We are working in rows, back and forth, to create a flat rectangular piece that will fold into the bag body.
Foundation Row: Ch 41.
Row 1 (RS): Sc in 2nd ch from hook and in each ch across. (40 sc)
Row 2: Ch 1, turn. Sc in each st across. (40 sc)
Row 3: Ch 1, turn. Sc in first st, *Bob in next st, sc in next st* repeat from * across, ending with sc in last st. (40 sts total: 20 sc, 19 bobbles, 1 sc)
Row 4: Ch 1, turn. Sc in each st across, including the top of each bobble. (40 sc)
Row 5: Ch 1, turn. Sc in each st across. (40 sc)
Row 6: Ch 1, turn. Sc in first 2 sts, *Bob in next st, sc in next st* repeat from * to last st, sc in last st. (40 sts)
This offsets your bobbles, creating that beautiful staggered texture you see in the photo.
Rows 7-8: Ch 1, turn. Sc in each st across. (40 sc)
Repeat Rows 3-8 for the bobble pattern section. Continue until your piece measures approximately 5 inches from the foundation. This is the back panel of your clutch.
Plain Section (For the fold area):
Next 4 Rows: Ch 1, turn. Sc in each st across. (40 sc)
This creates a clean fold line where the bag will bend.
Front Panel Section:
Repeat the bobble pattern (Rows 3-8) until the front panel matches the back panel length, approximately 5 inches.
Top Edge Finishing:
Work 2 more rows of sc to create a clean edge.
Fasten off and weave in ends.
Total body piece should measure approximately 10 inches wide by 12 inches tall when laid flat (this includes both panels plus the fold area).
Part 2: The Spiral Flap
This is the magical part. The spiral medallion is worked in the round from the center outward.
Magic Ring: Create a magic ring (also called adjustable ring). If you prefer, ch 4 and sl st to first ch to form a ring.
Round 1: Ch 1, work 8 sc into the ring. Sl st to first sc to join. (8 sc)
Round 2: Ch 1, 2 sc in each st around. Sl st to join. (16 sc)
Round 3: Ch 1, *sc in next st, 2 sc in next st* repeat around. Sl st to join. (24 sc)
Round 4: Ch 1, *sc in next 2 sts, Bob in next st* repeat around. Sl st to join. (24 sts: 16 sc, 8 bobbles)
Push your bobbles to the right side as you work. They should pop outward.
Round 5: Ch 1, *sc in next 2 sts, 2 sc in next st* repeat around. Sl st to join. (32 sc)
Round 6: Ch 1, sc in each st around. Sl st to join. (32 sc)
Round 7: Ch 1, *sc in next 3 sts, Bob in next st* repeat around. Sl st to join. (32 sts)
Round 8: Ch 1, *sc in next 3 sts, 2 sc in next st* repeat around. Sl st to join. (40 sc)
Round 9: Ch 1, sc in each st around. Sl st to join. (40 sc)
Round 10: Ch 1, *sc in next st, Bob in next st* repeat around. Sl st to join. (40 sts)
Round 11: Ch 1, *sc in next 4 sts, 2 sc in next st* repeat around. Sl st to join. (48 sc)
Round 12: Ch 1, sc in each st around. Sl st to join. (48 sc)
Round 13: Ch 1, *sc in next 2 sts, Bob in next st, sc in next 3 sts* repeat around. Sl st to join. (48 sts)
Round 14: Ch 1, *sc in next 5 sts, 2 sc in next st* repeat around. Sl st to join. (56 sc)
Rounds 15-16: Ch 1, sc in each st around. Sl st to join. (56 sc)
Round 17 (Final Bobble Round): Ch 1, *sc in next st, Bob in next st* repeat around. Sl st to join. (56 sts)
Round 18 (Border): Ch 1, sc in each st around. Sl st to join. (56 sc)
Fasten off, leaving a long tail for sewing.
Your spiral medallion should measure approximately 6 to 7 inches in diameter.
Part 3: The Flap Base
The spiral medallion needs a backing piece to create the structured flap shape.
Row 1: Ch 41. Sc in 2nd ch from hook and each ch across. (40 sc)
Rows 2-18: Ch 1, turn. Sc in each st across. (40 sc)
This creates a solid rectangle measuring approximately 10 inches by 4.5 inches.
Shaping the Curved Edge:
We will now shape the bottom of the flap to be slightly rounded.
Row 19: Ch 1, turn. Sc2tog (single crochet decrease: insert hook in first st, pull up loop, insert hook in next st, pull up loop, yarn over, pull through all 3 loops), sc across to last 2 sts, sc2tog. (38 sc)
Row 20: Ch 1, turn. Sc in each st across. (38 sc)
Row 21: Ch 1, turn. Sc2tog, sc across to last 2 sts, sc2tog. (36 sc)
Row 22: Ch 1, turn. Sc in each st across. (36 sc)
Continue decreasing every other row until you reach 28 sts or until the curve looks natural.
Fasten off.
Part 4: Assembly
Now we put it all together. Take your time here.
Step 1: Attach the Spiral to the Flap Base
Lay the flap base flat, wrong side up. Center the spiral medallion on top, right side up. The spiral should overlap the curved edge beautifully.
Using your yarn needle and the long tail from the spiral, whip stitch the outer edge of the spiral to the flap base. Catch only the back loops of the spiral and the fabric of the base so your stitches remain invisible from the front.
Step 2: Fold and Shape the Body
Fold your body piece in thirds. The bottom third folds up to meet the middle (this creates the front pocket). The top third is where the flap will attach, but leave that open for now.
Step 3: Sew the Side Seams
Using mattress stitch or whip stitch, sew the side seams of the body closed. Start from the fold and work up to the top of the front panel. Leave the top open.
Step 4: Attach the Flap
Position the flap base along the back top edge of the clutch, overlapping by about 1 inch. The spiral should drape beautifully over the front.
Whip stitch the flap to the back panel securely.
Step 5: Add Hardware
Push lock clasp: Position the clasp centered on the front panel, about 1 inch down from the fold line. Mark the placement, cut a small slit, and follow the clasp manufacturer’s instructions for installation.
D-rings: Sew small loops of chain or crochet tabs to each side seam to hold D-rings for the chain strap.
Chain strap: Attach using lobster clasps through the D-rings.
Tassel: Hook the tassel charm onto one D-ring for extra boho flair.
Optional: Adding a Lining
A fabric lining makes your clutch look professional and protects the interior. Cut your lining fabric slightly smaller than your bag dimensions. Fold the raw edges under and use fabric glue or hand stitch to secure it inside the bag.
This is totally optional. The clutch works beautifully without lining too.
Styling Your Finished Clutch
This boho spiral clutch crochet pattern creates a versatile accessory. Pair it with a flowy maxi dress for a summer festival or throw it over jeans and a blouse for brunch. The mustard yellow color works beautifully with neutrals, denim, rust, olive, and cream.
Want to make more? Try ivory for weddings, black for evening events, or sage green for a modern twist.
Final Thoughts
You made it to the end. I am so proud of you for taking on this crochet pattern. The Mustard Yellow Boho Spiral Clutch is a stunning statement piece that showcases your skills beautifully.
This beginner friendly crochet tutorial breaks down what looks like a complex design into totally doable steps. The spiral medallion alone makes a gorgeous coaster or applique if you want to practice before committing to the full bag.
Thank you so much for choosing this pattern. I genuinely hope you love making it as much as I loved designing it.
When you finish your clutch, please tag me on Instagram or share in my Facebook group. I absolutely love seeing your creations, and you never know, your version might inspire someone else to try it too.
Happy crocheting, friend. You have got this.
