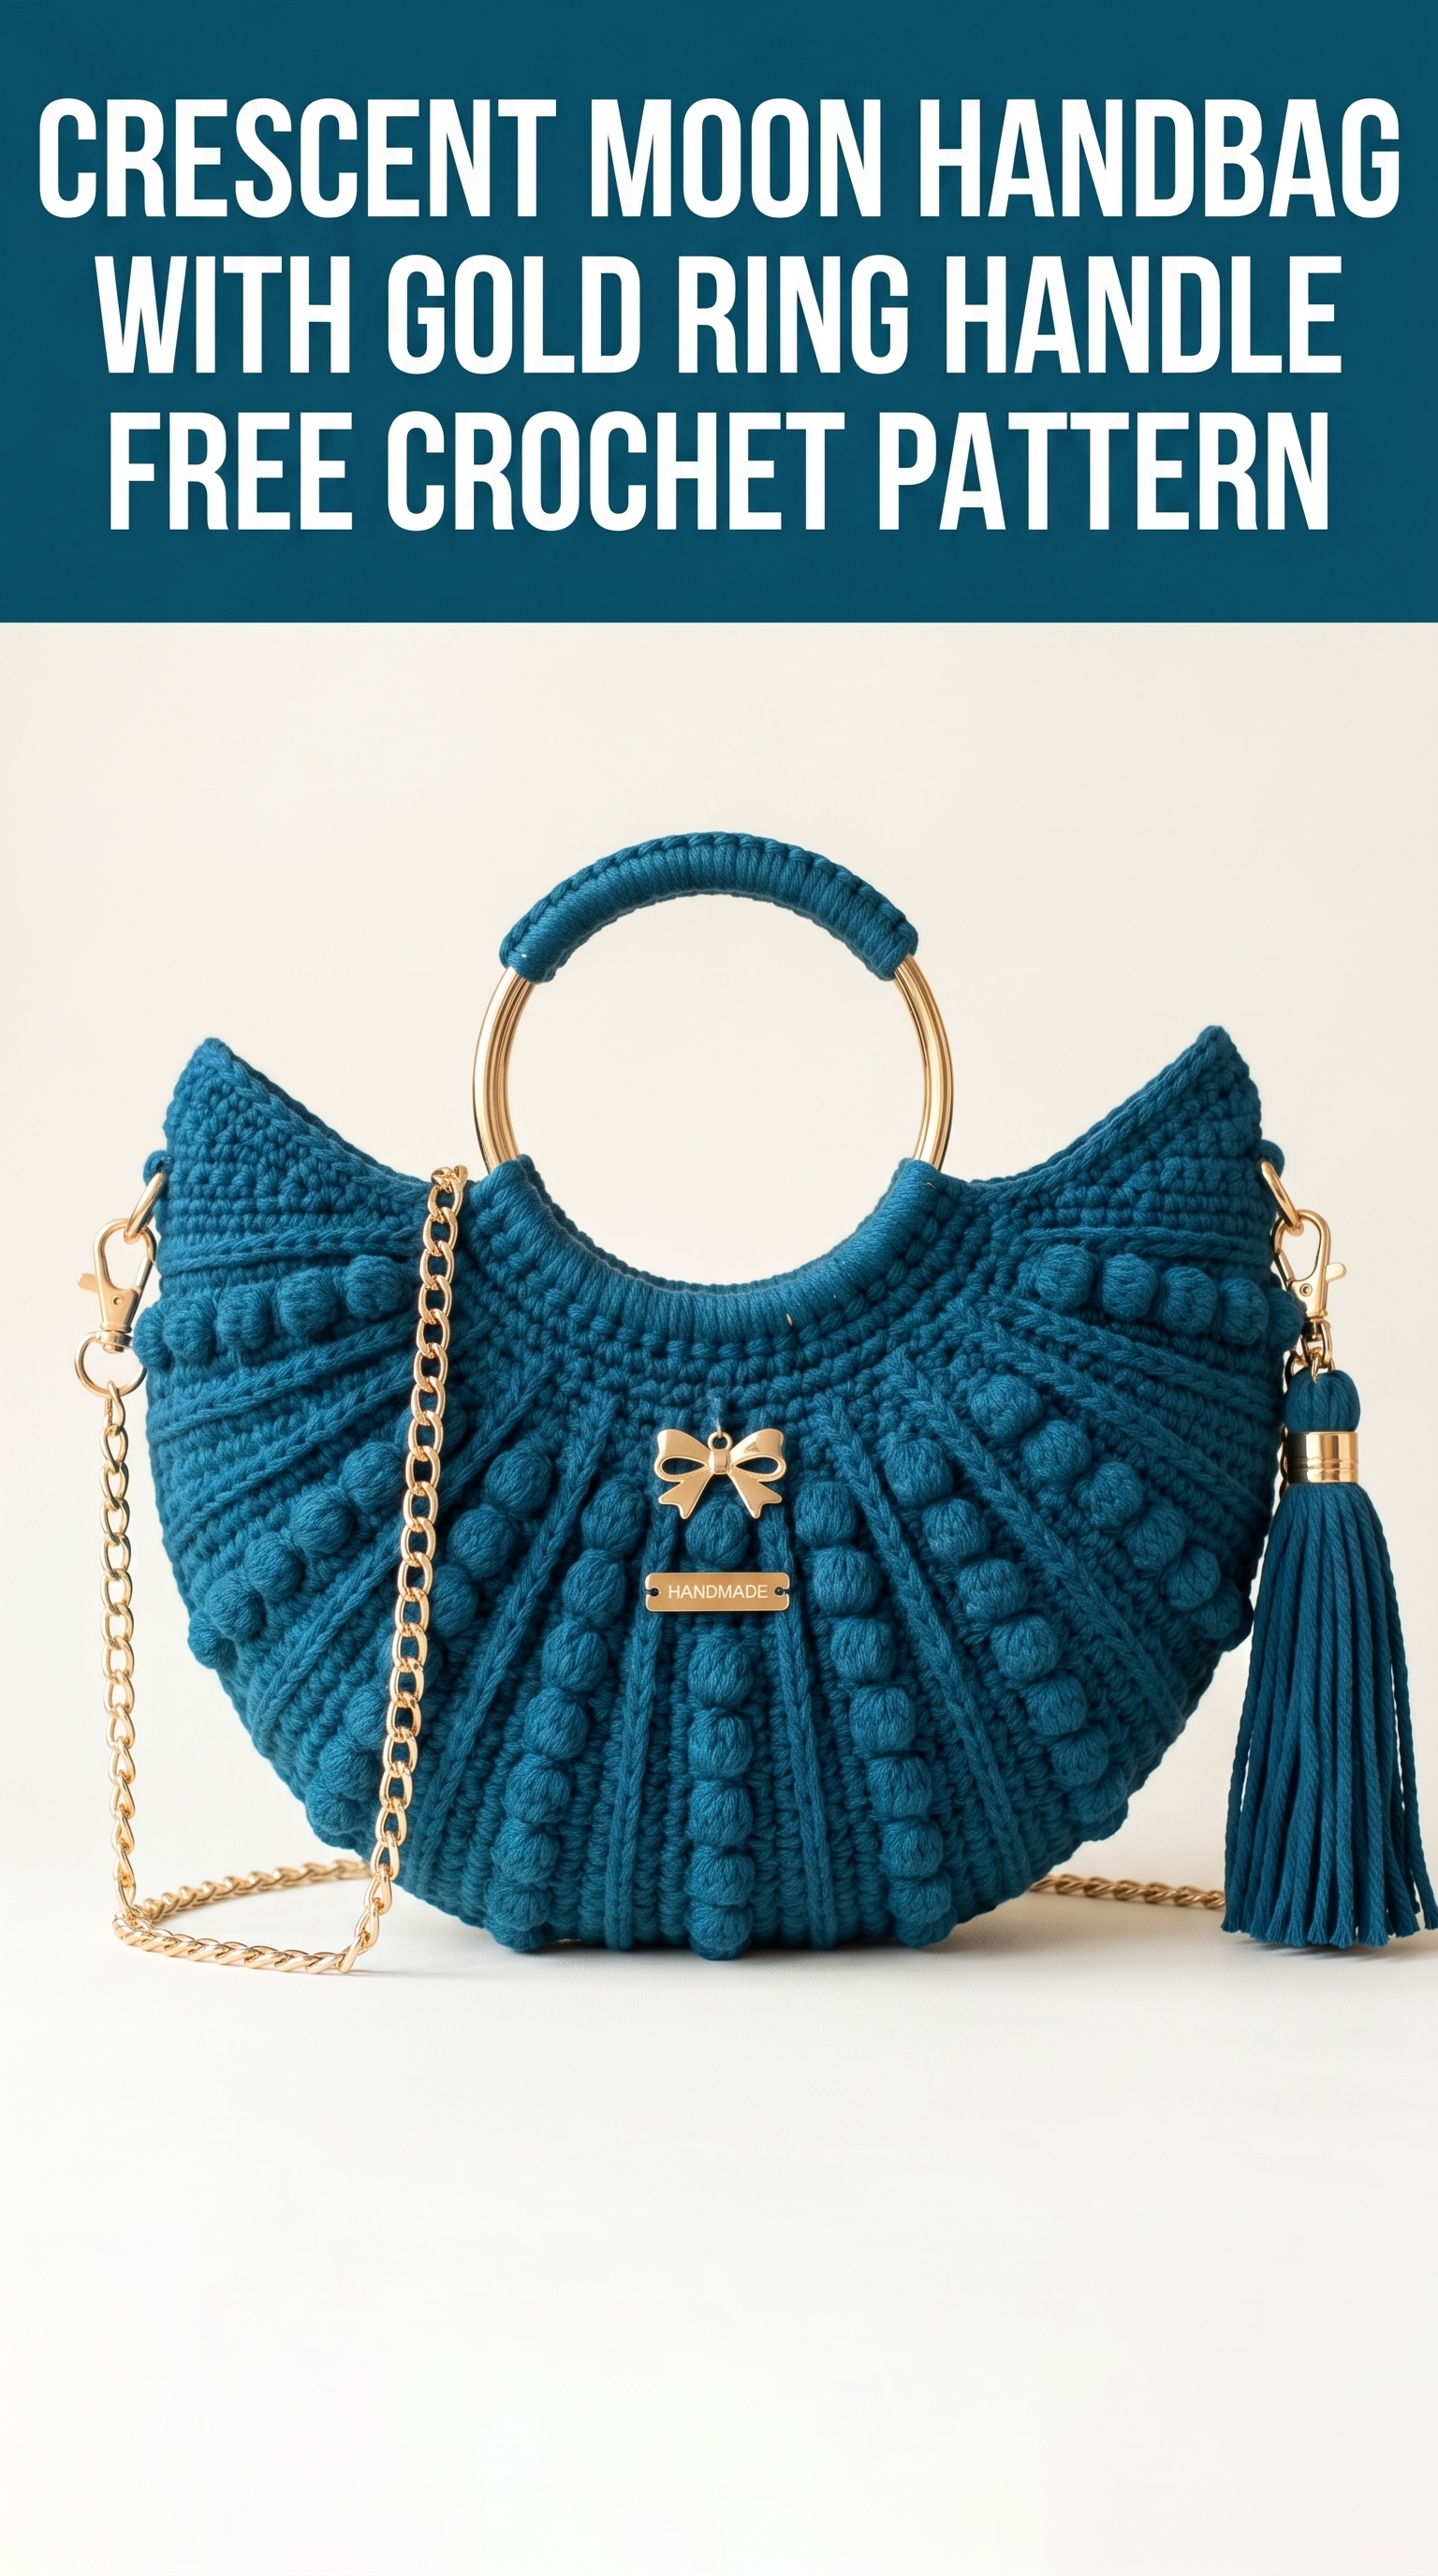
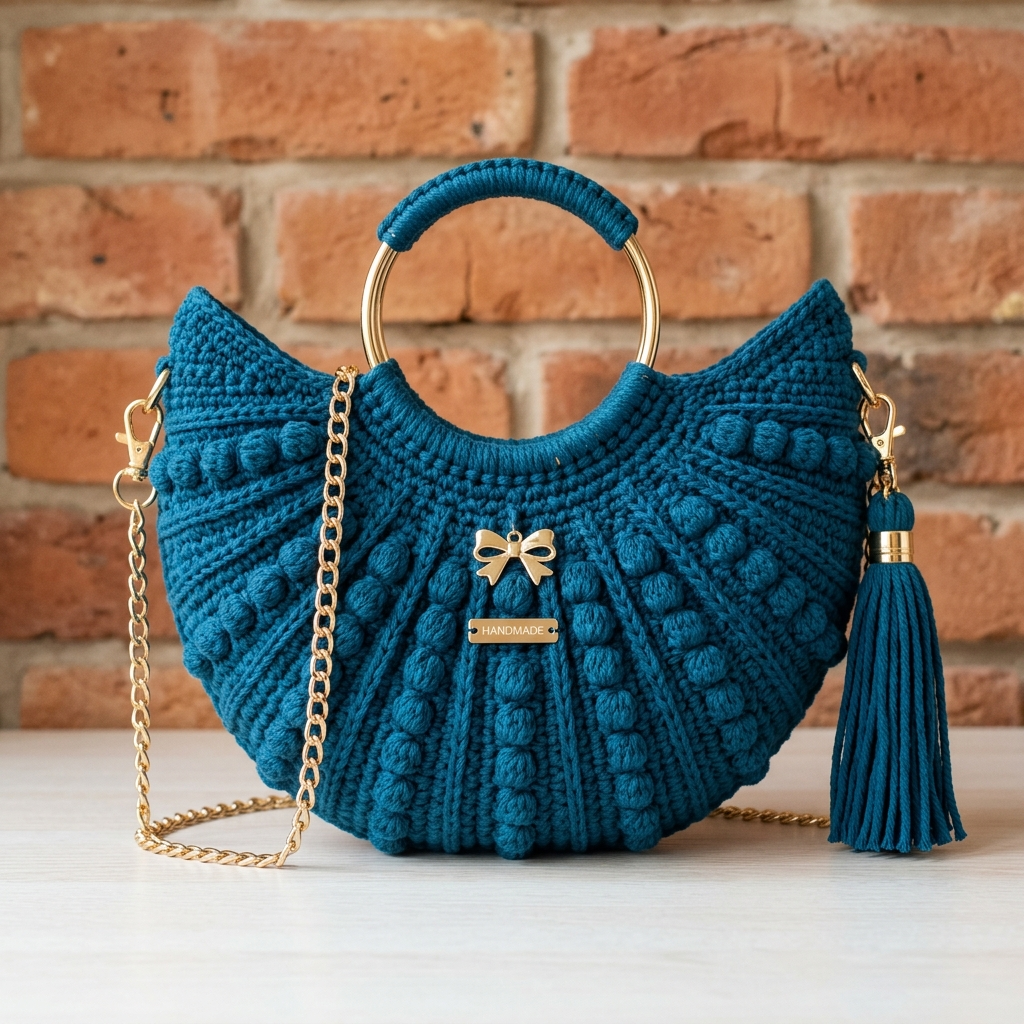
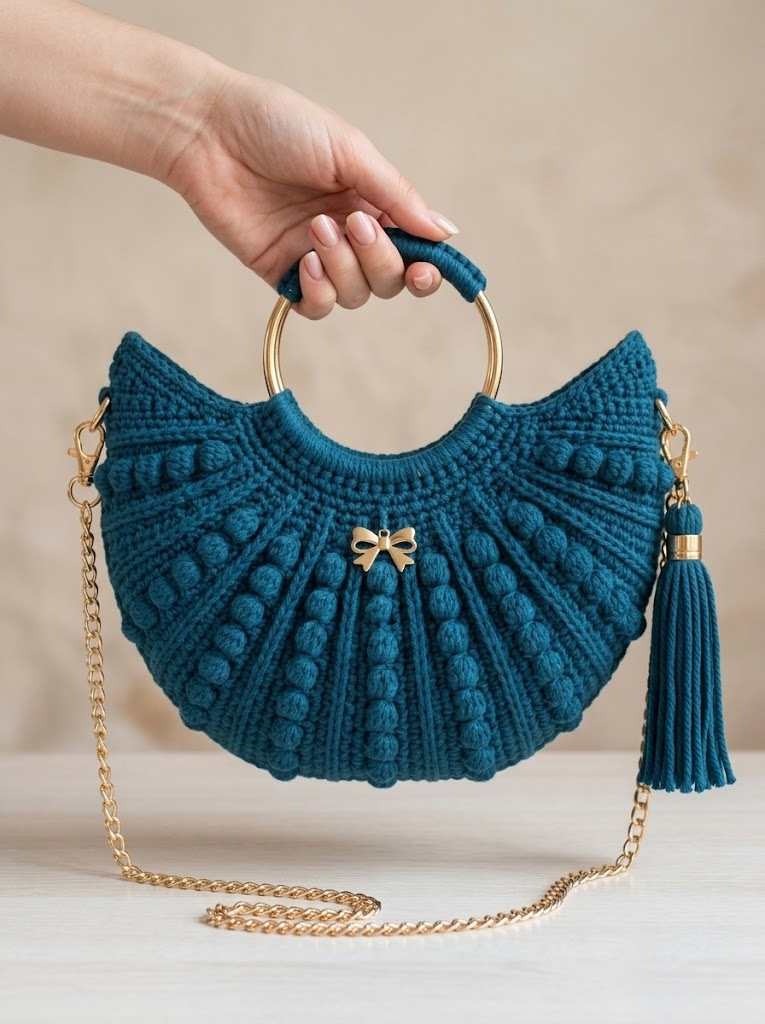
This stunning crescent moon handbag is absolutely one of my favorite makes this year. The gorgeous teal blue color, those satisfying bobble stitches running in vertical lines, and the luxurious gold hardware all come together into something that looks store-bought but feels completely handmade. I designed this bag to be a showstopper. And honestly, it is.
If you can work single crochet and have made a bobble stitch before, you can absolutely make this bag. The shape looks complicated but it is really just two identical panels joined together. Promise.
Let me walk you through everything you need to recreate this crescent moon crochet handbag pattern from start to finish.
Why This Crochet Handbag Pattern Works So Well
The crescent or half-moon shape has been trending in fashion accessories for a few seasons now. This crochet version gives you that modern silhouette with beautiful handmade texture.
The bobble stitches create those raised dots you see running in vertical lines down the bag. They push to the front of the fabric and give incredible dimension. The ribbed sections between the bobble columns add structure and help the bag keep its shape.
The gold ring handle wrapped in matching yarn is such an elegant touch. It transforms the whole piece from craft project to designer-looking accessory. Add the chain strap and tassel, and you have a bag worthy of any special occasion.
Materials You Will Need
Yarn:
Hook:
Hardware:
Notions:
Skill Level and Techniques
This step by step crochet tutorial is rated intermediate. You should be comfortable with:
If bobble stitches are new to you, practice on a swatch first. They eat up more yarn than regular stitches and create a tighter fabric. That is exactly what we want for a sturdy bag.
Abbreviations and Stitch Definitions
Let me define every stitch before we start. No surprises.
ch — chain: wrap yarn over hook, pull through loop on hook
sl st — slip stitch: insert hook, yarn over, pull through stitch and loop on hook in one motion
sc — single crochet: insert hook, yarn over, pull up a loop (2 loops on hook), yarn over, pull through both loops
sc2tog — single crochet two together (decrease): insert hook in first stitch, pull up loop, insert hook in next stitch, pull up loop (3 loops on hook), yarn over, pull through all 3 loops
bob — bobble stitch: yarn over, insert hook, pull up loop, yarn over, pull through 2 loops. Repeat this 4 more times in the same stitch (6 loops on hook). Yarn over and pull through all 6 loops. Push the bobble to the front of work.
FLO — front loop only: work into only the front loop of the stitch
BLO — back loop only: work into only the back loop of the stitch
Gauge
14 sc and 16 rows = 4 inches in single crochet
Gauge matters here because it affects your final bag size and how well the panels fit together. Take time to check yours.
Finished Dimensions
Crescent Moon Handbag Crochet Pattern Instructions
You will make two identical panels and join them. Each panel uses a combination of single crochet, bobble stitches, and ribbed sections to create that textured look.
Panel One (Make 2)
Foundation and Bottom Curve
Row 1: Ch 6. Sc in 2nd ch from hook and in each ch across. Turn. (5 sc)
Row 2: Ch 1. 2 sc in first st, sc in next 3 sts, 2 sc in last st. Turn. (7 sc)
Row 3: Ch 1. 2 sc in first st, sc across to last st, 2 sc in last st. Turn. (9 sc)
Rows 4 through 12: Repeat Row 3, increasing 2 stitches every row. (27 sc at end of Row 12)
Rows 13 through 18: Continue increasing pattern. (39 sc at end of Row 18)
You now have the bottom curved section complete. The fabric should gently curve from the increases.
Bobble Section
This is where the magic happens. The bobble stitches are placed in vertical columns with single crochet ribbing between them.
Row 19: Ch 1. Sc in first 2 sts, *bob in next st, sc in next 3 sts.* Repeat from * across, ending with sc in last 2 sts. Turn. (39 sts, 9 bobbles)
Row 20: Ch 1. Working in BLO, sc in each st across. Turn. (39 sc)
Row 21: Ch 1. Sc in each st across. Turn. (39 sc)
Row 22: Ch 1. Working in BLO, sc in each st across. Turn. (39 sc)
Row 23: Ch 1. Sc in first 2 sts, *bob in next st, sc in next 3 sts.* Repeat from * across, ending with sc in last 2 sts. Turn. (39 sts, 9 bobbles)
Rows 24 through 26: Repeat Rows 20 through 22.
Row 27: Repeat Row 23 (bobble row).
Rows 28 through 30: Repeat Rows 20 through 22.
Row 31: Repeat Row 23 (bobble row).
You should now have 4 rows of bobbles with ribbed sections between them. The bobbles should stack vertically in neat columns.
Upper Shaping
Now we decrease to create the curved top edge and the pointed side corners.
Row 32: Ch 1. Working in BLO, sc in each st across. Turn. (39 sc)
Row 33: Ch 1. Sc2tog, sc across to last 2 sts, sc2tog. Turn. (37 sc)
Row 34: Ch 1. Working in BLO, sc in each st across. Turn. (37 sc)
Row 35: Ch 1. Sc2tog, sc in next st, *bob in next st, sc in next 3 sts.* Repeat from * to last 4 sts, bob in next st, sc in next st, sc2tog. Turn. (35 sts)
Rows 36 through 38: Continue decreasing 2 stitches per right side row while maintaining the bobble pattern. (31 sts at end of Row 38)
Rows 39 through 44: Continue shaping, working bobble rows every 4th row. Decrease at each edge on alternating rows. (23 sts at end of Row 44)
Top Edge Band
Rows 45 through 50: Ch 1. Sc in each st across. Turn. Work 6 rows even without increases or decreases for the top band.
Row 51: Ch 1. Working in BLO only, sc across for a ribbed effect. Turn.
Row 52: Repeat Row 51.
Fasten off and weave in ends.
Make a second panel identical to the first.
Joining the Panels
Place both panels together with wrong sides facing. The bobbles should face outward on both sides.
Using a yarn needle and matching yarn, whipstitch the panels together along the curved bottom edge and up both sides. Leave the top edge open.
Alternatively, you can single crochet the edges together for a more decorative join. Insert your hook through both layers and sc evenly around the curved edge.
Ring Handle Attachment
Wrapping the Ring:
Cut a length of yarn approximately 3 yards long. Starting at one end of the ring where it will meet the bag, wrap the yarn tightly around the metal. Keep wraps close together with no gaps. Continue until you have covered the top third of the ring (the visible portion).
Secure the beginning and ending tails by tucking them under the wraps or using a tiny dot of fabric glue.
Attaching to Bag:
Position the wrapped ring at the center top of your bag. The unwrapped portions will sit inside the bag opening.
Using matching yarn, stitch the ring securely to the top edge band. Make multiple passes through the fabric and around the ring for a strong hold.
Side D-Ring Attachments
At each pointed side corner, attach a D-ring connector using a small crocheted loop or a fabric tab.
Crocheted Loop Method:
Ch 10. Sl st to form a ring. Sc around the chain 15 times. Fasten off.
Thread this loop through the D-ring and sew both ends to the inside of the bag at the side point.
Clip your chain strap to the D-rings.
Making the Tassel
Cut 40 strands of yarn, each 10 inches long. Fold them in half over a separate strand. Tie tightly just below the fold to create the tassel head.
Wrap more yarn around the head about half an inch down and secure. Trim the bottom evenly.
Attach to one D-ring with the gold cap hardware or a simple yarn loop.
Optional Lining
For a truly professional finish, I recommend adding a fabric lining. Cut two pieces of cotton fabric using your crochet panel as a template, adding half inch seam allowance.
Sew the lining pieces together, leaving the top open. Insert into the bag with wrong sides together. Hand stitch the lining to the top edge band.
Tips for Success
Bobble tension: Keep your bobbles firm but not painfully tight. They should puff out nicely without pulling the surrounding fabric.
Blocking: Steam blocking helps even out your stitches and makes joining easier. Do this before sewing the panels together.
Hardware: Search for purse hardware at craft stores or online. You can also find complete handbag hardware kits that include matching pieces.
Color choices: This pattern looks stunning in solid colors that let the texture shine. Deep jewel tones, neutrals, or pastry shades all work beautifully.
Styling Your Crescent Moon Handbag
This bag is perfect for special occasions, date nights, or whenever you want to feel a little fancy. The gold hardware dresses it up while the handmade texture keeps it interesting.
Pair it with a simple outfit and let the bag be the statement piece. Or match your yarn color to a favorite dress for a coordinated look.
The chain strap makes it easy to wear crossbody for hands-free convenience. Or carry it by the ring handle for a more elegant presentation.
Wrapping Up This Crochet Handbag Pattern
I really hope you love making this crescent moon handbag crochet pattern as much as I loved designing it. There is something so satisfying about creating an accessory that looks this polished.
Take your time with the bobble sections. They are the star of this project and worth doing carefully. And please, do not skip the lining. It makes such a difference in how the bag feels and functions.
Thank you so much for choosing this pattern. Your support means the world to me.
When you finish your bag, I would absolutely love to see it! Tag me on Instagram or share in my Facebook group. Seeing your makes is honestly the best part of my day.
Happy hooking, friend. You have got this.
*Pin this crescent moon handbag crochet pattern for later and share with your crafty friends!*
