
This crossbody pouch uses 16 daisy granny squares joined into a tube with a solid base and zipper closure. You will work basic double crochet stitches, chain stitches, and slip stitches. The finished bag measures 9 × 6.5 × 3 inches.
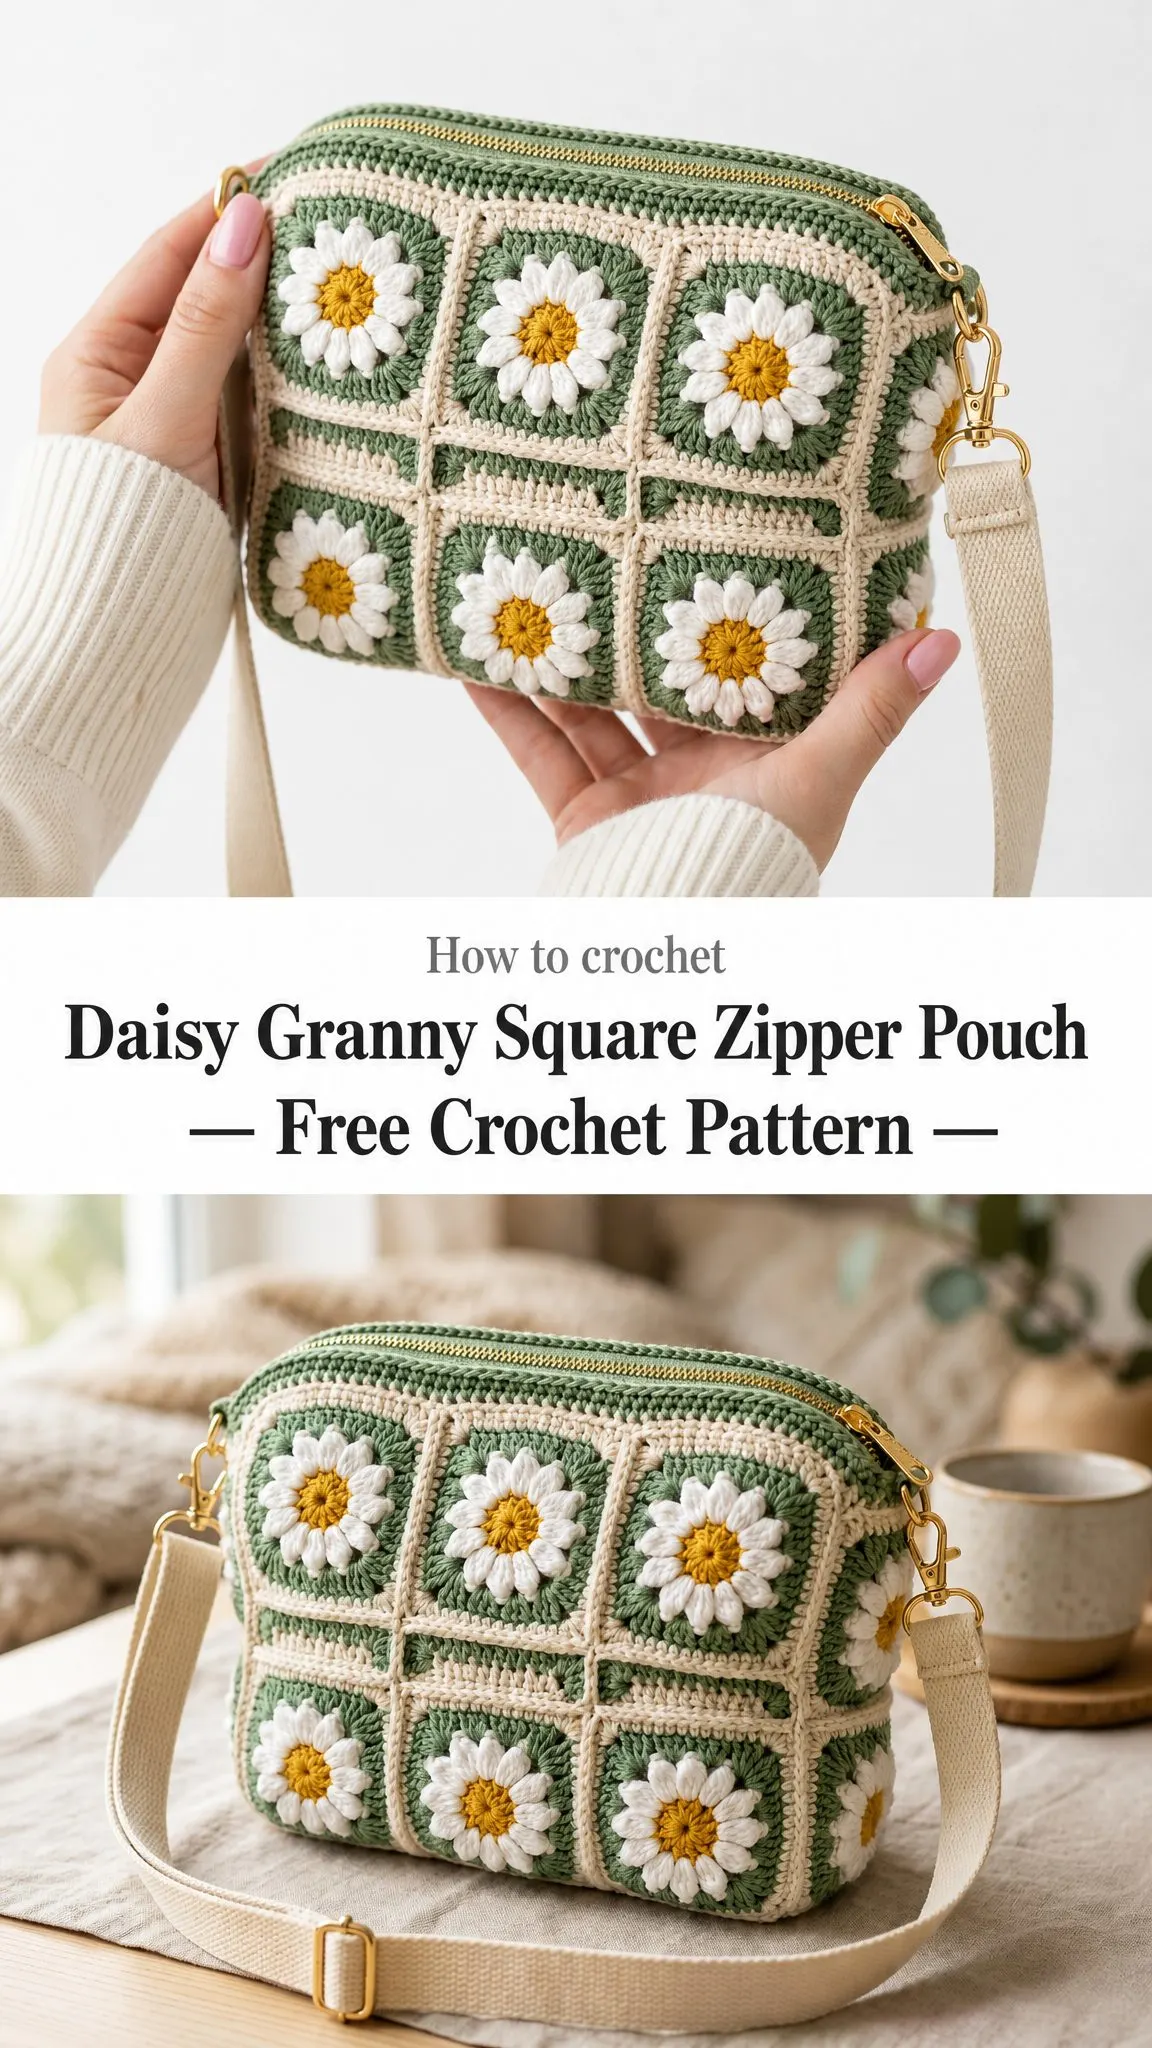
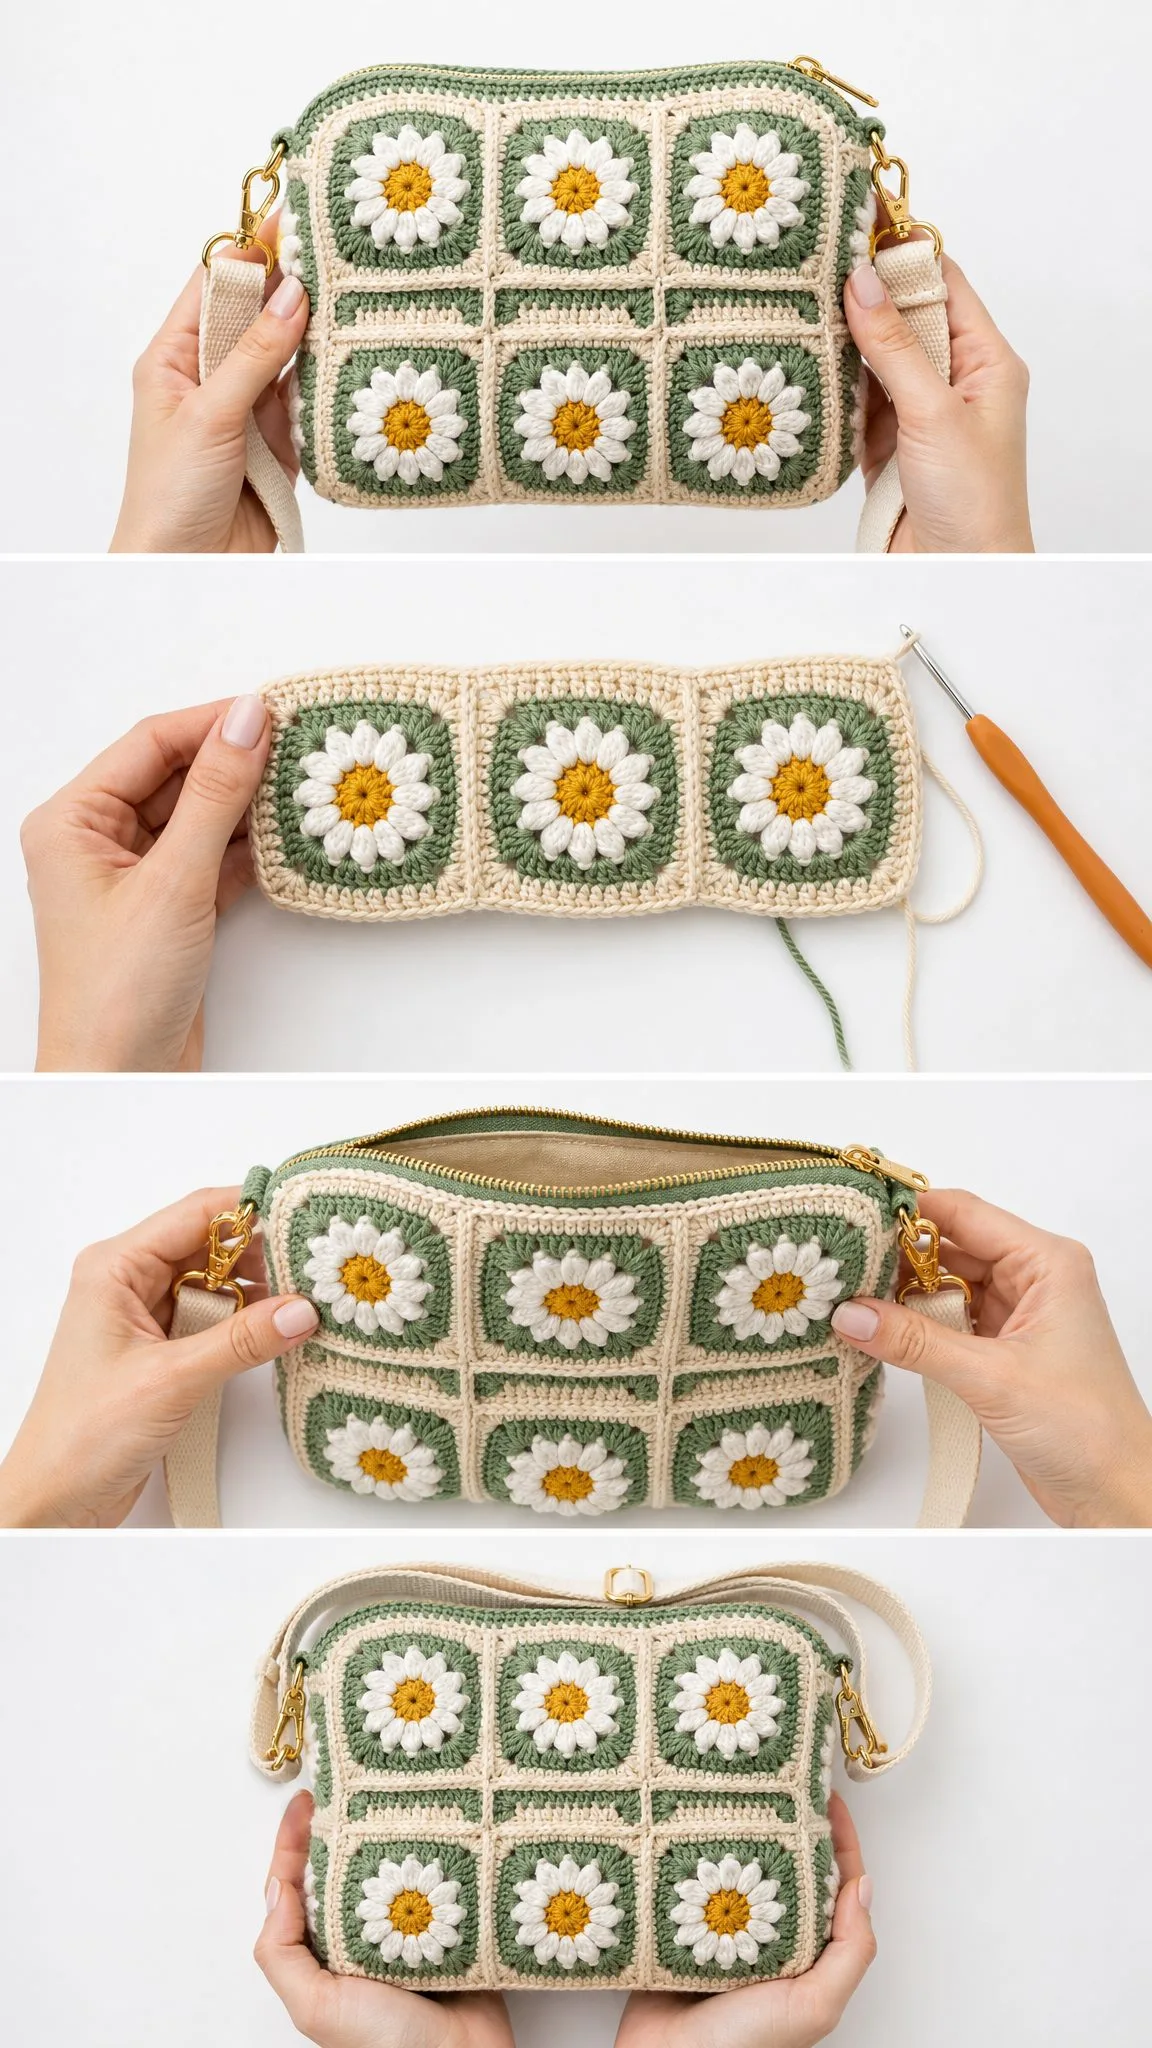
The construction is straightforward. Make the squares, join them into panels, attach the base, add a top edge, and sew in the zipper. Each square takes about 15 minutes once you get the rhythm down.
If you can make a granny square and sew a straight seam, you can make this bag. The daisy petals look fancy but they are just chains and double crochets worked in a simple repeat.
Why You Will Love This Pattern
The daisy granny square design gives this pouch a vintage cottage feel that works year round. The sage green background with cream borders and white petals creates a fresh, garden inspired look that goes with everything from jeans to sundresses.
Each square is only 3 inches, so this project travels well. Toss a few squares in your purse and work on them during lunch breaks or waiting rooms. Before you know it, you will have all 16 ready to join.
The adjustable crossbody strap means you can wear this hands free, which makes it perfect for farmers markets, festivals, or running errands when you need your phone and wallet close but do not want to carry a full purse.
Materials You Will Need
Yarn: DK weight or light worsted cotton yarn in four colors
Recommended Yarn Brands:
Hook: 4.0 mm (US G/6) crochet hook
Notions:
Gauge
16 double crochet stitches × 8 rows = 4 inches (10 cm) with a 4.0 mm hook
One finished daisy square should measure 3 inches (7.5 cm) square.
Gauge is not critical for fit since this is a bag rather than a garment, but matching it will keep your finished size close to the sample. If your square comes out larger, try a smaller hook. If it comes out smaller, try a larger hook.
Abbreviations
If you are working from UK terms, simply substitute the bracketed terms throughout the pattern. The stitch heights are the same, only the names differ.
Special Stitches
Magic Ring (MR): An adjustable starting loop. Wrap yarn around your fingers to form a ring, insert your hook, pull up a loop, and chain to secure. Work your stitches into this ring, then pull the tail to close the center hole completely.
Daisy Petal: Chain 3, work a double crochet in the same stitch, chain 3, then slip stitch in the next stitch. This creates one pointed petal that is anchored across two stitches.
Corner: Work (2 dc, ch 2, 2 dc) all into the same corner space. This creates the characteristic granny square corner bump.
Pattern Notes Before You Begin
The starting chain 3 at the beginning of a round counts as the first double crochet unless the pattern tells you otherwise.
The petals from Round 2 will sit in front of your work. When you work Round 3, you will crochet behind these petals into the Round 2 anchor points, then fold the petals forward so they pop out nicely.
Weave in your ends as you change colors. This saves you a long finishing session at the end and keeps the inside of your bag neat.
If you prefer a calmer look, you can make a few squares in solid green without the daisy for the side panels. The pictured pouch uses daisies all around.
A fabric lining is optional but gives the finished pouch extra body and a clean professional inside.
How to Make the Daisy Square
Make 16 squares total. Each square works up in four quick rounds.
Round 1 (Yellow, Color D)
Make a magic ring. Chain 3 (this counts as your first double crochet). Work 11 double crochet stitches into the ring for a total of 12 dc counting your starting chain.
Join with a slip stitch to the top of your chain 3. Pull the magic ring tail tight to close the center hole completely. Fasten off and weave in the yellow tail.
Stitch count: 12 dc
Round 2 (White, Color C)
Join your white yarn in any stitch from Round 1.
In each stitch around, work one petal as follows: chain 3, double crochet in the same stitch, chain 3, slip stitch in the next stitch.
You will create 12 petals total working around the circle. Join to the base of your first petal with a slip stitch. Fasten off.
Stitch count: 12 petals
Round 3 (Green, Color A)
Fold all of your white petals forward toward you so they sit in front of your work.
Join your green yarn in any Round 2 anchor point. You will be working into the 12 anchor points that are behind the petals.
You need to place a corner in 4 evenly spaced points around the circle. This means every 3rd anchor point gets a corner.
In each corner point: Work (2 dc, ch 2, 2 dc) all in the same anchor point.
In each of the other 8 points: Work 2 dc.
Join with a slip stitch to the top of your first stitch. Do not fasten off if continuing with green, or fasten off if switching to cream for Round 4.
Stitch count: 32 dc plus 4 corner ch-2 spaces
Round 4 (Cream, Color B)
Join your cream yarn in any corner chain 2 space.
Chain 3 (counts as first dc), then work (dc, ch 2, 2 dc) in the same corner space.
Work double crochet in each dc across to the next corner, then work (2 dc, ch 2, 2 dc) in the corner space.
Repeat from * around all four sides. Join with a slip stitch to the top of your chain 3. Fasten off.
Stitch count: 48 dc plus 4 corner ch-2 spaces, which is 12 dc per side
The even count of 12 stitches per side is what makes the squares line up perfectly when you join them together.
How Many Squares to Make
The pouch body is a tube that is two squares tall and eight squares around, plus a solid base at the bottom.
Front panel: 6 daisy squares arranged 3 wide × 2 tall
Back panel: 6 daisy squares arranged 3 wide × 2 tall
Side panels: 4 daisy squares total, with each side being 1 wide × 2 tall
Total squares needed: 16 daisy squares
Base: 1 solid green panel (instructions below)
Blocking Your Squares
Lightly steam or wet block all 16 squares to exactly 3 inches before joining. Even squares make a crisp professional looking pouch and make the zipper installation much easier.
To wet block, soak your squares in cool water, gently squeeze out excess moisture in a towel, pin each square to blocking mats or a towel, and let them dry completely.
To steam block, hover your iron or steamer about an inch above each square and let the steam relax the stitches. Gently pat into shape and let cool.
How to Join the Panels
Join all pieces using cream (Color B) with either a flat whip stitch through the back loops only, or use slip stitches to join for a raised seam like the sample shows.
The matching 12 dc sides line up stitch for stitch, which makes joining straightforward.
Step 1: Join Front and Back Panels
Lay out the front panel: 3 squares across in a row, then 2 rows down.
Join the squares of each row side by side first. Then join the two rows together.
Repeat this process for the back panel.
You now have 2 panels with 6 squares each.
Step 2: Join Side Panels
Join each side panel into a 1 × 2 column, stacking 2 squares vertically.
You now have 2 side columns with 2 squares each.
Step 3: Join All Panels Into a Tube
Join the four pieces into a ring in this order going around the pouch: front, then side, then back, then side.
You now have a tube that is 8 squares around and 2 squares tall, with openings at both the top and bottom.
Tip: Keep all daisies facing the same direction and all seam ridges on the same side as you join. This keeps the inside tidy and the outside even.
How to Make the Solid Base
Work the base in green (Color A).
Row 1: Chain 37. Double crochet in the 3rd chain from hook and in each chain across. (36 dc)
Rows 2 through 6: Chain 2 (this does not count as a stitch), turn your work, double crochet in each dc across. (36 dc)
This creates a panel approximately 9 × 3 inches (23 × 7.5 cm).
Whip stitch the base to the bottom opening of the tube, easing to fit as needed. The base is now joined.
How to Work the Top Edge
Work the top edge in green (Color A).
Round 1: Join your yarn at the top opening. Single crochet evenly around all 8 squares. (96 sc)
Round 2: Chain 1, single crochet in each single crochet around, join with a slip stitch. (96 sc)
Fasten off and weave in ends.
How to Set In the Zipper
Open your zipper completely.
Pin one zipper tape behind the front top edge of the pouch. Pin the other tape behind the back top edge. Tuck the metal ends of the zipper just inside the side seams so they do not show.
Using a sewing needle and matching thread, backstitch each zipper tape in place by hand. Keep your stitches close to the crochet edge so they stay hidden from the outside.
Optional: For an extra clean finish, work a row of single crochet stitches through both the crochet fabric and the zipper tape together.
How to Make the Clasp Tabs
Make 2 tabs in green (Color A).
Row 1: Chain 7. Single crochet in the 2nd chain from hook and in each chain across. (6 sc)
Rows 2 through 6: Chain 1, turn, single crochet in each sc across. (6 sc)
Fasten off leaving a long tail for sewing.
Thread each tab through a D-ring. Fold the tab in half around the D-ring. Stitch the tab securely into a top side seam of your pouch.
Clip a swivel snap hook to each D-ring.
You now have 2 tabs attached.
Strap Options
Cotton Webbing Strap (shown in photos): Run a 1 inch wide cotton webbing strap through the slider hardware. Clip both ends to the swivel hooks on your bag. Adjust the slider to your preferred length.
Crocheted Strap: Chain 7. Single crochet in the 2nd chain from hook and across for 6 sc. Work in rows of single crochet until the strap measures about 44 inches (112 cm) or your desired length. Work one round of single crochet edging all around the entire strap. Stitch the ends directly to the clasp tabs.
Finishing Your Pouch
Weave in any remaining yarn ends throughout the bag.
Steam the whole pouch lightly and let it dry standing upright to help set its shape.
Optional Lining: If adding a fabric lining, cut your cotton fabric to match the inside dimensions of the bag plus seam allowance. Fold and press the seam allowances. Hand stitch the lining in place just below the zipper using a slip stitch or whip stitch.
Care Instructions
Hand wash your pouch in cool water with mild soap. Avoid wringing the crochet as this can distort the stitches.
Press out water by rolling the bag in a clean towel. Reshape flat or stuff with tissue paper and let dry completely.
Keep the zipper closed when washing so it maintains its straight line.
A quick steam between uses refreshes the squares and keeps your bag looking crisp.
Size Variations
Bigger Tote: Add a column to both front and back panels so each measures 4 × 2 squares. Add one more square to each side panel. Lengthen the base to 48 dc and use a 12 to 14 inch zipper.
Mini Pouch: Reduce to 2 × 2 squares for front and back with single squares on each side. Shorten the base to 24 dc and use a 7 inch zipper.
Taller Bag: Add a third row of squares all around the bag and use a longer zipper.
Yarn Swap: A finer cotton on a 3.0 mm hook shrinks every square proportionally for a daintier bag.
Whenever you change the square count, keep front and back equal and make the base width equal to your front width so everything still squares up properly.
Skill Level and Time Estimate
This pattern is rated intermediate but confident beginners are welcome to try it. If you have made granny squares before and can sew a basic seam, you have all the skills you need.
Expect the project to take between 10 and 14 hours total. The squares work up quickly once you memorize the pattern, and joining goes faster than you might think.
I hope you love making this daisy pouch as much as I enjoyed designing it. If you make one, I would absolutely love to see it! Save this pattern to your Pinterest boards so you can find it when you are ready to start, and please leave a comment below to share your finished bag or ask any questions. Happy stitching!
