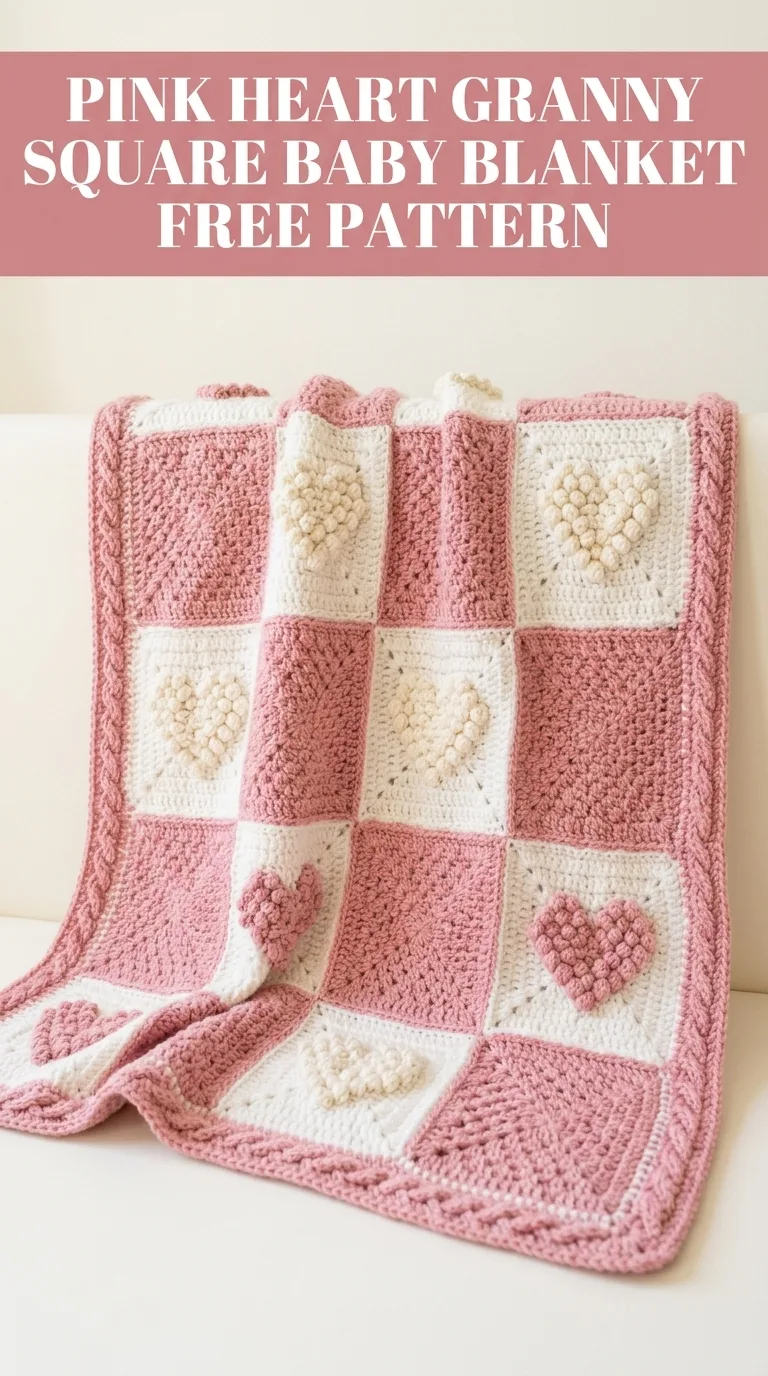
Soft pink yarn, puffy textured hearts, and the classic checkerboard charm of granny squares come together in this baby blanket that practically begs to be gifted at the next shower on your calendar. I designed this blanket to showcase bobble stitch hearts as the star feature, set against alternating dusty rose and cream squares that create visual interest without overwhelming the eye. The braided cable border frames everything beautifully.
If you can make a basic granny square and work a bobble stitch, you can absolutely make this blanket. The construction is simple since you work individual squares and then join them together. This approach makes the project wonderfully portable. Toss a few squares in your bag and crochet during lunch breaks, waiting rooms, or lazy evenings on the couch.
Let me walk you through everything you need to create this heirloom piece from start to finish.
Why This Baby Blanket Pattern Works So Well
This pink heart granny square baby blanket crochet pattern combines three elements that make it special. First, the bobble stitch hearts add dimensional texture that babies love to touch and explore. Second, the checkerboard arrangement of pink and cream squares creates a timeless aesthetic that works in any nursery. Third, the cable style border elevates the entire piece from simple to stunning.
The finished blanket measures approximately 30 inches by 36 inches, which is perfect for strollers, car seats, and tummy time. You will make 12 squares total arranged in a 3 by 4 grid.
I should mention that while this pattern looks impressive, intermediate crocheters will find it very approachable. Beginners who have made a few granny squares and want to level up their skills will do great here too. The bobble stitch takes a bit of practice, but I will explain it thoroughly.
Materials You Will Need
Yarn:
I recommend a soft acrylic or acrylic blend yarn for baby blankets. Look for yarn labeled machine washable since parents will thank you endlessly for this practical choice. Brands like Caron Simply Soft, Red Heart Soft, or Lion Brand Vanna’s Choice work beautifully.
Hook:
Notions:
Gauge:
One completed square should measure approximately 6 inches by 6 inches after blocking. Check your gauge with the first square you make. If your square is too large, go down a hook size. If too small, go up a hook size.
Stitch Abbreviations and Definitions
Before we dive into the step by step instructions, let me define every stitch you will use in this crochet tutorial.
Ch = Chain: Yarn over, pull through loop on hook. This creates the foundation for most crochet work.
Sl st = Slip stitch: Insert hook, yarn over, pull through both the stitch and the loop on your hook in one motion. Used for joining and moving across stitches invisibly.
Sc = Single crochet: Insert hook into stitch, yarn over and pull up a loop (2 loops on hook), yarn over and pull through both loops. The shortest basic stitch.
Dc = Double crochet: Yarn over, insert hook into stitch, yarn over and pull up a loop (3 loops on hook), yarn over and pull through 2 loops, yarn over and pull through remaining 2 loops. Creates a taller stitch with nice drape.
Bobble = Bobble stitch: Work 5 double crochets into the same stitch but stop each one before the final yarn over. You will have 6 loops on your hook. Yarn over and pull through all 6 loops at once. This creates a puffy dimensional bump on the right side of your work.
FPdc = Front post double crochet: Yarn over, insert hook from front to back to front around the post (vertical part) of the stitch in the row below, complete as a regular double crochet. Creates raised texture.
BPdc = Back post double crochet: Yarn over, insert hook from back to front to back around the post of the stitch below, complete as a regular double crochet. Creates recessed texture.
How to Crochet the Plain Granny Squares
You will make 6 plain granny squares, 3 in Color A (dusty rose) and 3 in Color B (cream).
Round 1: With chosen color, ch 4. Sl st to first ch to form a ring. Ch 3 (counts as first dc here and throughout), work 2 dc into ring, ch 2, *3 dc into ring, ch 2* repeat 3 more times. Sl st to top of beginning ch 3 to join. (12 dc, 4 ch-2 corner spaces)
Round 2: Sl st across to first corner ch-2 space. Ch 3, 2 dc in same corner space, ch 2, 3 dc in same corner space (first corner made). *Ch 1, skip to next corner space, work (3 dc, ch 2, 3 dc) in corner space* repeat around. Ch 1, sl st to top of beginning ch 3. (24 dc, 4 ch-2 corners, 4 ch-1 spaces)
Round 3: Sl st to corner space. Ch 3, 2 dc in corner, ch 2, 3 dc in same corner. *Ch 1, 3 dc in next ch-1 space, ch 1, (3 dc, ch 2, 3 dc) in corner space* repeat around. End with ch 1, sl st to join. (36 dc, 4 corners, 8 ch-1 spaces)
Round 4: Sl st to corner. Ch 3, 2 dc in corner, ch 2, 3 dc in same corner. *Ch 1, 3 dc in next ch-1 space* across side, ch 1, corner cluster in next corner space. Repeat around all sides. Sl st to join. Fasten off. (48 dc, 4 corners, 12 ch-1 spaces)
Weave in ends. Your square should measure approximately 6 inches.
How to Crochet the Heart Granny Squares
These squares feature the beautiful bobble stitch hearts that make this blanket so special. You will make 6 heart squares total. Make 3 with Color B background and Color A hearts, and 3 with Color A background and Color B hearts.
The heart is worked in rows first, then you will build the granny square around it.
Heart Center (worked in rows):
Row 1: With heart color, ch 2. Work 3 sc in 2nd ch from hook. Ch 1, turn. (3 sc)
Row 2: 2 sc in first st, sc in next st, 2 sc in last st. Ch 1, turn. (5 sc)
Row 3: 2 sc in first st, sc across to last st, 2 sc in last st. Ch 1, turn. (7 sc)
Row 4: Sc in first 3 sts, bobble in next st (this is the center heart bump), sc in last 3 sts. Ch 1, turn. (6 sc, 1 bobble)
Row 5: Sc2tog, sc in next 3 sts, sc2tog. Ch 1, turn. (5 sc)
Row 6: Sc2tog, sc in next st, sc2tog. (3 sc)
Do not fasten off. You will now work the granny square border around this heart shape.
Building the Square Around the Heart:
Round 1: Ch 1, work sc evenly around entire heart shape, placing 3 sc in each corner point and working approximately 18 to 20 sc per side. Adjust as needed to keep work flat. Sl st to first sc. Change to background color.
Round 2: With background color, ch 3. Work in granny square pattern, placing (3 dc, ch 2, 3 dc) clusters in the 4 corners and (3 dc, ch 1) groups along the sides. Space your clusters evenly. Sl st to join.
Rounds 3 and 4: Continue granny square pattern as written for plain squares until your heart square matches the size of your plain squares (approximately 6 inches).
Fasten off and weave in ends.
Tip for beginners: The transition from heart to granny square can feel tricky. Take your time on Round 1 around the heart. If your square looks a bit wonky, blocking will fix most issues.
Arranging and Joining Your Squares
Lay out your 12 completed squares in a 3 by 4 grid, alternating colors in a checkerboard pattern. Place heart squares so the hearts all face the same direction.
Suggested Layout (top to bottom, left to right):
Joining Method (Slip Stitch Join):
Hold two squares with right sides together. Working through both layers, sl st through the back loops only across the edge. This creates a nearly invisible seam on the right side and a subtle ridge on the wrong side.
Join squares into strips first (3 squares per strip), then join the 4 strips together.
Alternative: If you prefer, use a whip stitch or mattress stitch join. Any method that keeps seams flat works well.
Adding the Cable Border
The braided cable border gives this blanket its polished finished look. It uses front post and back post double crochet stitches to create the raised texture.
Round 1 (Foundation): Join Color A in any corner. Ch 1, work sc evenly around entire blanket, placing 3 sc in each corner. Work approximately 3 sc per inch along sides. Sl st to join. Count your stitches and adjust to ensure you have an even number on each side.
Round 2: Ch 3, dc in each st around, working 3 dc in each corner stitch. Sl st to join.
Rounds 3 through 5 (Cable Pattern):
Round 3: Ch 2, *FPdc around next st, BPdc around next st* repeat around, working (FPdc, dc, FPdc) in corners. Sl st to join.
Round 4: Ch 2, *BPdc around next FPdc, FPdc around next BPdc* (this crosses the cables). Continue pattern around. Sl st to join.
Round 5: Repeat Round 3.
Round 6 (Finishing): Ch 1, sc in each st around, 3 sc in corners. Sl st to join. Fasten off.
Weave in all remaining ends securely.
Finishing Your Baby Blanket
For the best results, wet block your finished blanket. Soak it in lukewarm water with a splash of wool wash or gentle detergent for about 15 minutes. Gently squeeze out excess water (never wring), roll in a clean towel to remove more moisture, then pin flat to blocking mats. Allow to dry completely.
Blocking evens out your stitches, helps squares lie flat, and gives the blanket a professional polished look.
Pattern Notes and Tips for Success
This beginner friendly crochet pattern comes together smoothly when you keep a few things in mind.
Work loosely on the bobble stitches. Tight tension makes bobbles difficult to form and can pucker your fabric.
Count your stitches at the end of every round. Granny squares are forgiving, but catching mistakes early saves frustration.
Use stitch markers in your corner spaces to keep track of where you are.
Join yarn neatly by leaving 6 inch tails and weaving them in the direction of your stitches for invisible ends.
Make one test square first in each style before committing to all 12. This lets you check gauge and practice the techniques without pressure.
Make This Blanket Your Own
Want to customize this pink heart granny square baby blanket? Here are some ideas.
Change the colors entirely. Blue and white for a baby boy, rainbow hearts on cream for a gender neutral option, or pastels throughout for a softer look.
Add more squares for a larger blanket. A 4 by 5 grid creates a generous 40 by 30 inch blanket.
Skip the hearts entirely and make all plain granny squares if you want a quicker project.
Replace the cable border with a simple shell stitch border or even a basic single crochet edge.

Wrapping Up This Crochet Project
You now have everything you need to create this beautiful pink heart granny square baby blanket crochet pattern from scratch. The combination of classic granny squares, textured bobble hearts, and that gorgeous cable border makes this a gift that will be treasured for years. New parents will appreciate the soft washable yarn, and you will love how the portable squares fit your busy life.
I hope you enjoy every stitch of this project as much as I enjoyed designing it. Thank you for trusting me with your crafting time. It truly means so much.
If you make this blanket, I would absolutely love to see it. Tag me on Instagram or share a photo in our Facebook group. Seeing your finished projects is the best part of sharing patterns.
This pattern is one you will want to come back to again and again, so go ahead and pin it to your favorite Pinterest board for safekeeping. And if you make this sweet blanket, please drop a comment below. I read every single one, and nothing makes my day quite like hearing that a pattern brought you joy.
