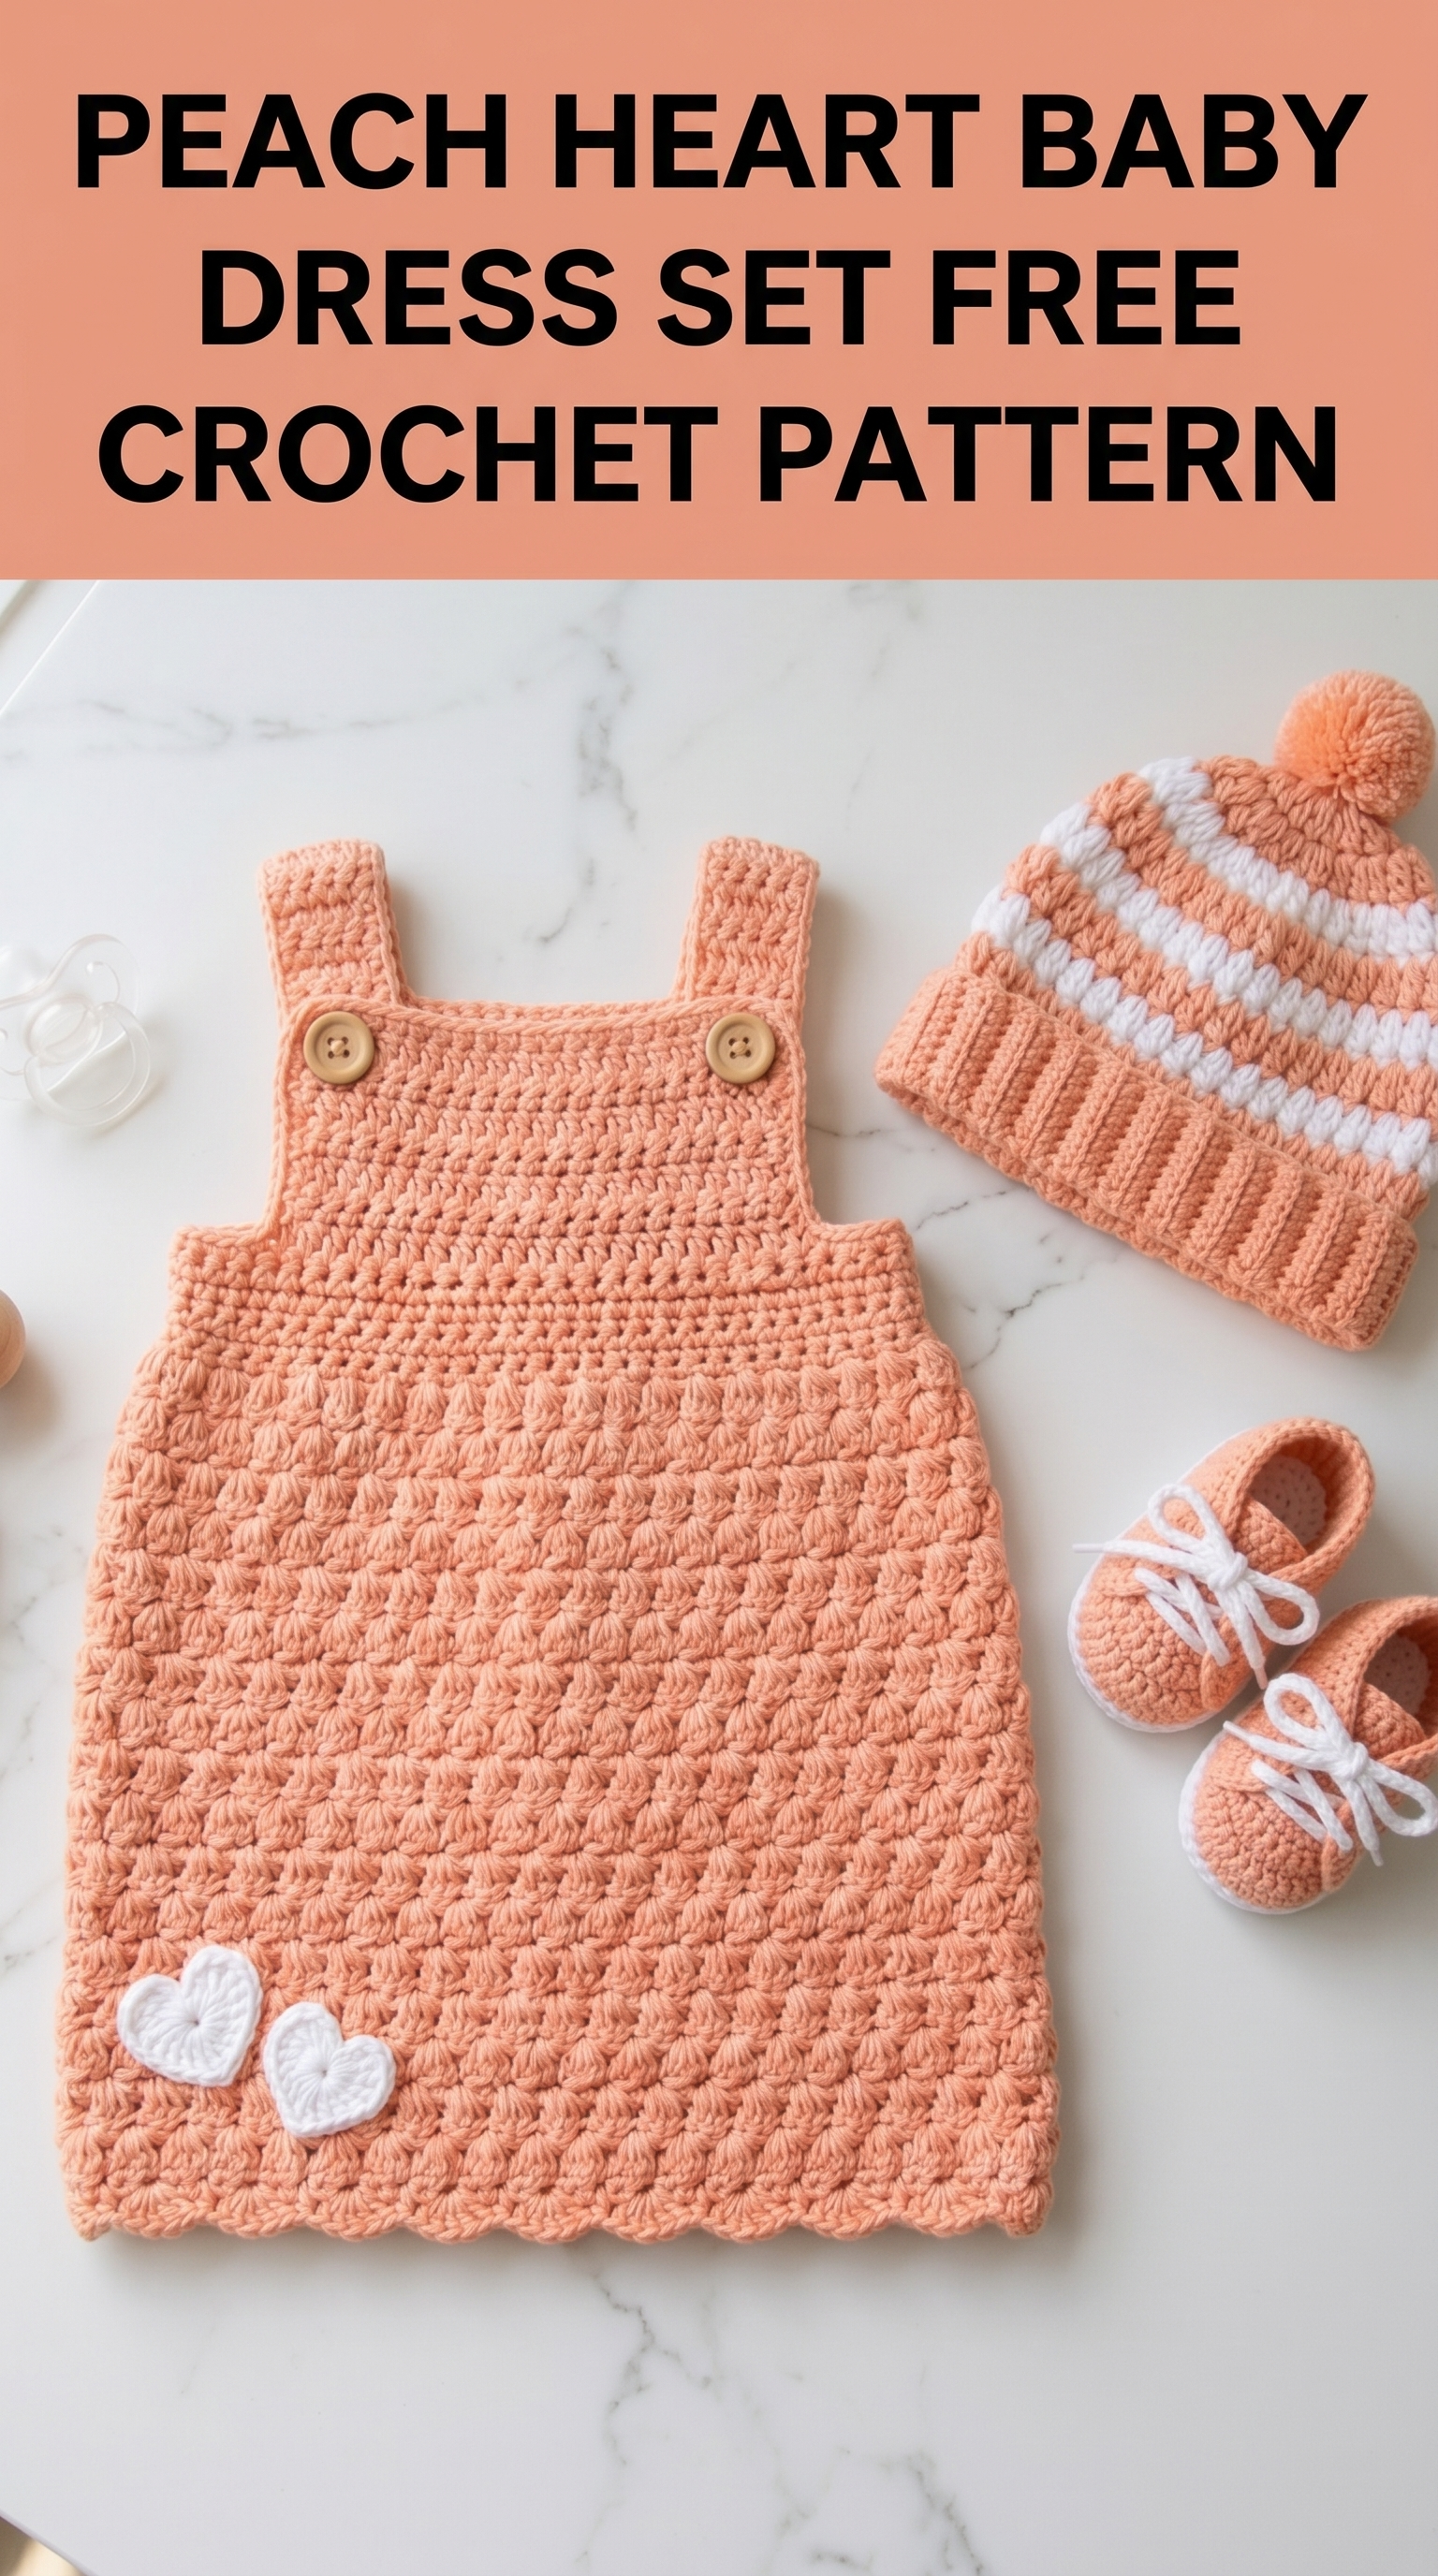
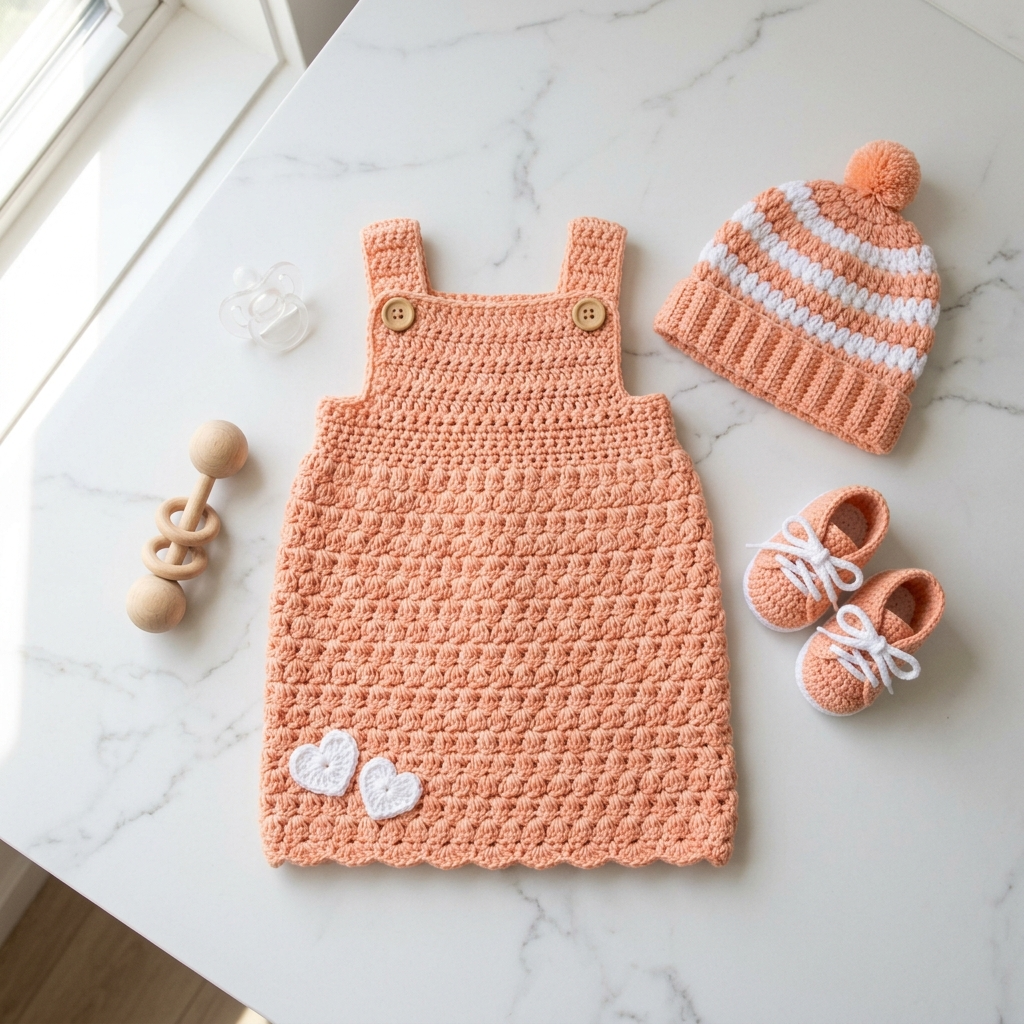
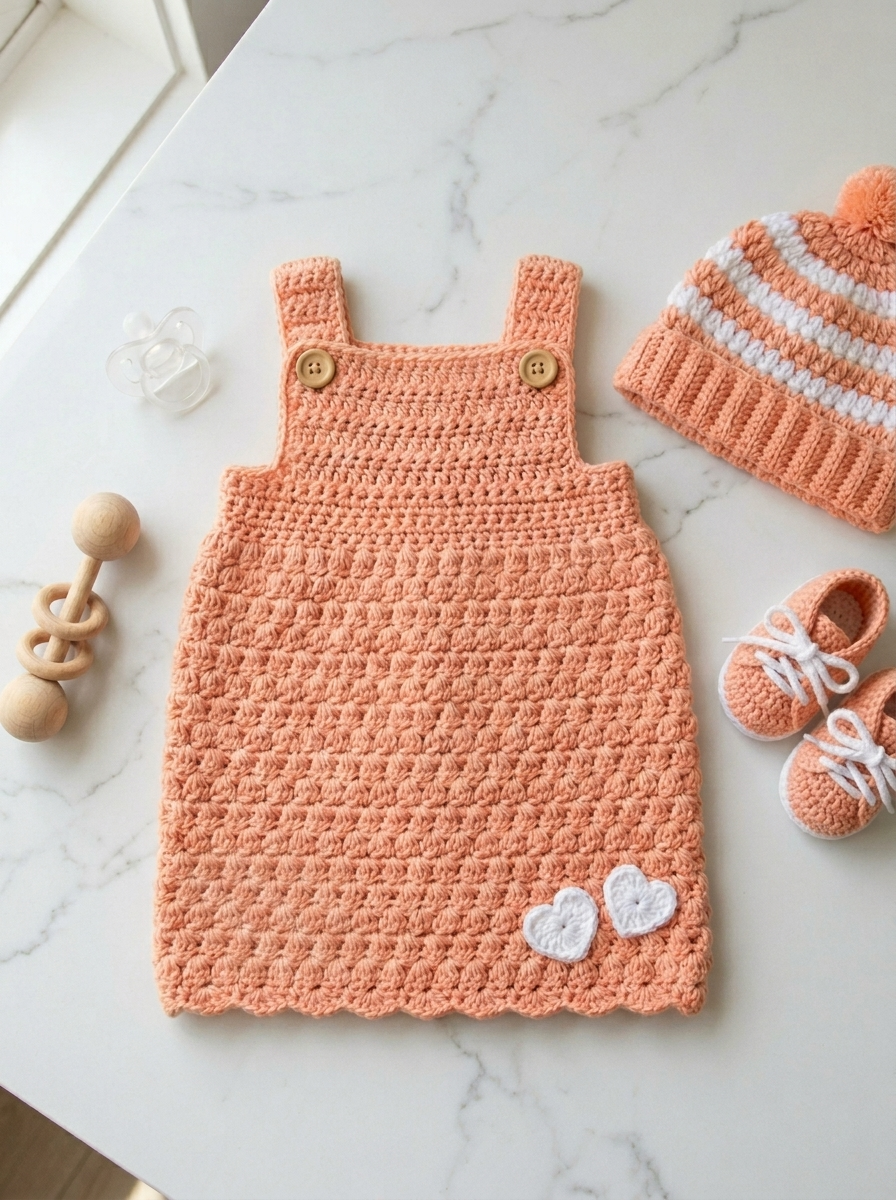
There is something magical about crocheting for babies. Everything stays tiny, works up fast, and looks absolutely adorable when finished. This peach heart baby dress set includes a sweet pinafore dress with heart appliqués, a striped pompom beanie, and the cutest little booties you have ever seen. I designed this beginner friendly crochet pattern to give you a complete outfit that works beautifully for baby showers, newborn photos, or everyday wear.
Do not let the matching set intimidate you. If you can work basic stitches in rows and rounds, you can absolutely make this. I will walk you through every single step.
Why This Crochet Pattern Works So Well
I wanted to create a baby dress crochet tutorial that felt achievable without looking basic. The pinafore style means no complicated armhole shaping. The textured body uses a simple repeat that looks impressive but only requires stitches you already know. Those sweet heart appliqués? They take maybe ten minutes each and transform the whole piece.
The peach and white color combination gives this set a modern feel while staying soft and baby appropriate. You could easily swap colors to match a nursery theme or make it in classic pastels.
Skill level: Confident beginner to intermediate
Finished sizes:
Materials You Will Need
Gathering your supplies before you start makes the whole process smoother. Here is everything you need for this step by step crochet pattern:
Yarn:
I recommend a soft acrylic blend or cotton blend for baby items. Look for yarns labeled “baby” or “soft” on the label. They wash well and feel gentle against sensitive skin.
Hook:
Notions:
Gauge: 14 stitches and 16 rows equals 4 inches in single crochet using 5.0 mm hook. Check your gauge before starting. This matters for fit.
Stitch Abbreviations and Definitions
Let me define every stitch you will use. Even if you know these, a quick refresher never hurts.
Ch — Chain: Yarn over, pull through loop on hook. This creates your foundation and turning chains.
Sl st — Slip stitch: Insert hook, yarn over, pull through both loops at once. Used for joining and invisible movement.
Sc — Single crochet: Insert hook, yarn over, pull up a loop (2 loops on hook), yarn over, pull through both loops. The shortest basic stitch.
Hdc — Half double crochet: Yarn over, insert hook, yarn over, pull up a loop (3 loops on hook), yarn over, pull through all 3 loops. Slightly taller than single crochet.
Dc — Double crochet: Yarn over, insert hook, yarn over, pull up a loop (3 loops on hook), yarn over, pull through 2 loops, yarn over, pull through remaining 2 loops. Creates nice drape.
Sc2tog — Single crochet two together (decrease): Insert hook in next stitch, pull up a loop, insert hook in following stitch, pull up a loop (3 loops on hook), yarn over, pull through all 3. Reduces your stitch count by one.
BLO — Back loop only: Work into only the back loop of the stitch instead of both loops. Creates a ridge texture.
Magic ring — Adjustable starting loop that closes completely. If you prefer, you can substitute ch 4 and sl st to join.
The Pinafore Dress Pattern
This dress works from the bottom hem upward in one piece, then splits for the front and back bodice. The construction keeps seaming minimal.
Skirt Section
With 5.0 mm hook and MC, ch 73.
Row 1: Sc in 2nd ch from hook and in each ch across, turn. (72 sts)
Row 2: Ch 1, sc in first st, *skip 2 sts, 5 dc in next st (shell made), skip 2 sts, sc in next st* repeat from * across, turn. (12 shells)
Row 3: Ch 3 (counts as dc), 2 dc in first st, *sc in center dc of shell, 5 dc in next sc* repeat from * ending with 3 dc in last st, turn. (11 full shells, 2 half shells)
Row 4: Ch 1, sc in first st, *5 dc in next sc, sc in center dc of shell* repeat from * across, turn. (12 shells)
Repeat Rows 3 and 4 until skirt measures approximately 7 inches from beginning, ending with Row 4. You should have around 18 to 20 rows total depending on your gauge.
Transition Row: Ch 1, sc evenly across the top of the shell row, working approximately 72 sc. Turn. (72 sts)
This transition row flattens the shell texture and prepares for the bodice.
Bodice Section
Row 1: Ch 1, sc in each st across, turn. (72 sts)
Row 2: Ch 1, sc in BLO of each st across, turn. (72 sts)
Row 3: Ch 1, sc in both loops of each st across, turn. (72 sts)
Repeat Rows 2 and 3 for a total of 8 bodice rows. The BLO rows create subtle horizontal ridges that you can see in the finished piece.
Divide for Armholes
Now we split the work into front and back sections.
Front Panel:
Row 1: Ch 1, sc in first 30 sts, turn. Leave remaining sts unworked. (30 sts)
Row 2: Ch 1, sc2tog, sc across to last 2 sts, sc2tog, turn. (28 sts)
Row 3: Ch 1, sc in each st across, turn. (28 sts)
Rows 4 to 8: Repeat Row 3. (28 sts)
Fasten off.
Back Panel:
Skip center 12 sts for armhole. Join MC to next st.
Row 1: Ch 1, sc in same st and in next 29 sts, turn. (30 sts)
Row 2: Ch 1, sc2tog, sc across to last 2 sts, sc2tog, turn. (28 sts)
Rows 3 to 8: Ch 1, sc in each st across, turn. (28 sts)
Fasten off.
Shoulder Straps (Make 2)
With MC and 5.0 mm hook, ch 31.
Row 1: Sc in 2nd ch from hook and each ch across, turn. (30 sts)
Rows 2 to 4: Ch 1, sc in each st across, turn. (30 sts)
Fasten off leaving a long tail for sewing.
Attach straps to back corners of bodice with yarn needle. Position buttons on front bodice where straps will connect. The buttons are decorative here since the straps will be sewn in place, but you can create buttonholes if you prefer adjustability.
Armhole and Neckline Edging
Join MC at underarm. Sc evenly around entire armhole opening, working approximately 24 to 28 sc. Sl st to join. Fasten off.
Repeat for second armhole.
For neckline, join MC at back corner, sc evenly across back neck, down strap, across front neck, up second strap, and across to starting point. Sl st to join. Fasten off.
Heart Appliqués (Make 2)
These little hearts add so much personality. They work up in about five minutes each.
With CC and 4.0 mm hook, make a magic ring.
Round 1: Ch 2, work 2 hdc in ring, 3 dc in ring, ch 1, 1 tr in ring (this creates the bottom point), ch 1, 3 dc in ring, 2 hdc in ring, ch 2, sl st to ring. Pull ring closed tightly.
Fasten off leaving a 12 inch tail.
The heart will look a bit wonky at first. Gently shape it with your fingers. The ch 2 at each side creates the rounded top lobes while the treble crochet forms the point.
Sew hearts to lower corner of dress front using the photo as placement guide. I placed mine slightly overlapping for a sweet clustered look.
Striped Pompom Beanie Pattern
This hat uses a classic top down construction with alternating stripes.
With MC and 5.0 mm hook, make a magic ring.
Round 1: Ch 1, 6 sc in ring, sl st to join. (6 sts)
Round 2: Ch 1, 2 sc in each st around, sl st to join. (12 sts)
Round 3: Ch 1, *sc in next st, 2 sc in next st* repeat around, sl st to join. (18 sts)
Round 4: Ch 1, *sc in next 2 sts, 2 sc in next st* repeat around, sl st to join. (24 sts)
Round 5: Ch 1, *sc in next 3 sts, 2 sc in next st* repeat around, sl st to join. (30 sts)
Round 6: Ch 1, *sc in next 4 sts, 2 sc in next st* repeat around, sl st to join. (36 sts)
Round 7: Ch 1, *sc in next 5 sts, 2 sc in next st* repeat around, sl st to join. (42 sts)
Continue increasing pattern until you reach 54 sts (approximately 4.5 inches diameter).
Even Rounds: Work even in sc, changing colors every 2 rounds to create stripes.
Color sequence: 2 rounds MC, 2 rounds CC. Repeat until hat measures 4.5 inches from crown.
Ribbed Brim
Change to working in rows for the ribbed section.
Row 1: Ch 7, sc in 2nd ch from hook and each ch across, sl st to next 2 sts of hat body, turn. (6 sts in rib)
Row 2: Skip sl sts, sc in BLO across rib, turn. (6 sts)
Row 3: Ch 1, sc in BLO across, sl st to next 2 sts of hat body, turn.
Repeat Rows 2 and 3 around entire hat opening. Sew first and last rib rows together.
Pompom
Wind MC yarn around a 3 inch piece of cardboard approximately 80 times. Slide off carefully, tie tightly in center with separate strand. Cut loops on both sides. Trim to round shape and fluff. Sew to top of hat.
Baby Booties Pattern (Make 2)
These booties feature a simple sole worked in rounds, then sides and upper worked from there.
Sole
With MC and 5.0 mm hook, ch 9.
Round 1: Sc in 2nd ch from hook, sc in next 6 ch, 3 sc in last ch. Working along opposite side of chain, sc in next 6 sts, 2 sc in last st, sl st to join. (18 sts)
Round 2: Ch 1, 2 sc in first st, sc in next 6 sts, 2 sc in each of next 3 sts, sc in next 6 sts, 2 sc in each of last 2 sts, sl st to join. (24 sts)
Round 3: Ch 1, sc in first st, 2 sc in next st, sc in next 6 sts, *sc in next st, 2 sc in next st* 3 times, sc in next 6 sts, *sc in next st, 2 sc in next st* twice, sl st to join. (30 sts)
Sides
Rounds 4 to 6: Ch 1, sc in BLO around, sl st to join. (30 sts)
Working in BLO creates the angled transition from sole to sides.
Toe Shaping
Round 7: Ch 1, sc in first 10 sts, sc2tog 5 times, sc in remaining 10 sts, sl st to join. (25 sts)
Round 8: Ch 1, sc in first 10 sts, sc2tog 3 times (working across decreased section), sc in remaining 9 sts, sl st to join. (22 sts)
Cuff
Rounds 9 to 11: Ch 1, sc around, sl st to join. (22 sts)
Fasten off.
Laces (Make 2)
With CC, ch 60. Fasten off. Weave through round 9 starting at center front, lacing in and out every 2 stitches. Tie in bow.
Finishing Your Baby Dress Set
Weave in all ends using your yarn needle. For baby items, I weave through at least 2 inches and then back in the opposite direction. Little fingers love to find and pull loose ends.
Block gently if needed. Lay pieces flat on a towel, spritz with water, and pat into shape. Let dry completely.
Wash before gifting. A gentle cycle with baby detergent removes any residual dust and softens the fabric beautifully.
Tips for Success
If your shells look uneven: Count your stitches after every row. Each shell should have exactly 5 dc, and each sc should fall in the center dc of the previous shell.
If your hat is too big or small: Adjust by adding or removing increase rounds. Each round adds approximately 0.75 inches to diameter.
If your booties are different sizes: Use stitch markers to track your rounds. It is surprisingly easy to lose count.
For color changes: Carry the unused color loosely along the wrong side when working stripes, or cut and rejoin for cleaner results.
Make It Your Own
This crochet pattern adapts beautifully to personal preferences. Try these variations:
Wrapping Up This Crochet Tutorial
You now have everything needed to create this adorable peach heart baby dress set from start to finish. The pinafore dress, striped beanie, and sweet booties work together perfectly but also stand alone as individual projects.
I genuinely hope this how to crochet guide gives you confidence to dive in. Baby projects are so satisfying because you see progress quickly and the finished pieces are impossibly cute.
Thank you so much for choosing this pattern and trusting me to guide you through it. When you finish your set, I would absolutely love to see it. Tag me on Instagram or share in my Facebook group. Seeing your makes honestly brightens my whole day.
Happy crocheting, friend. You have got this.
