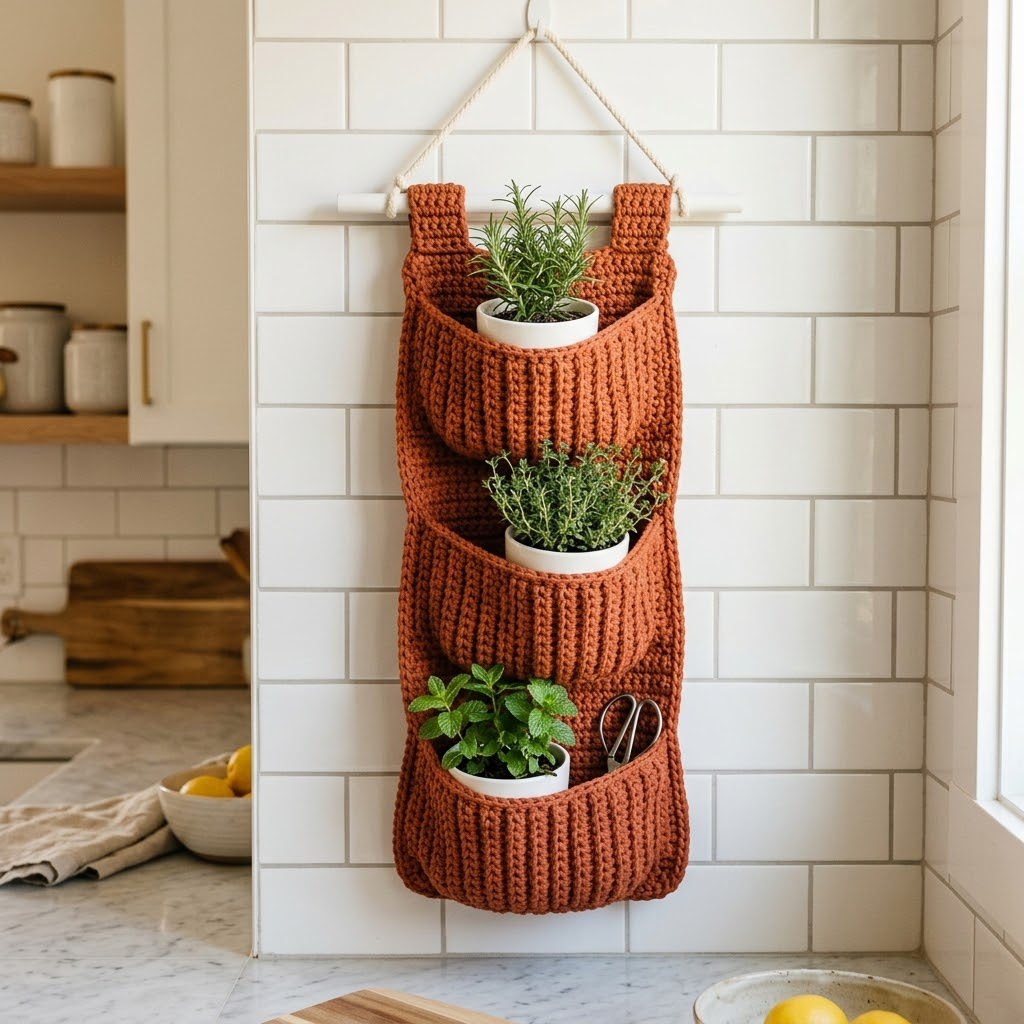
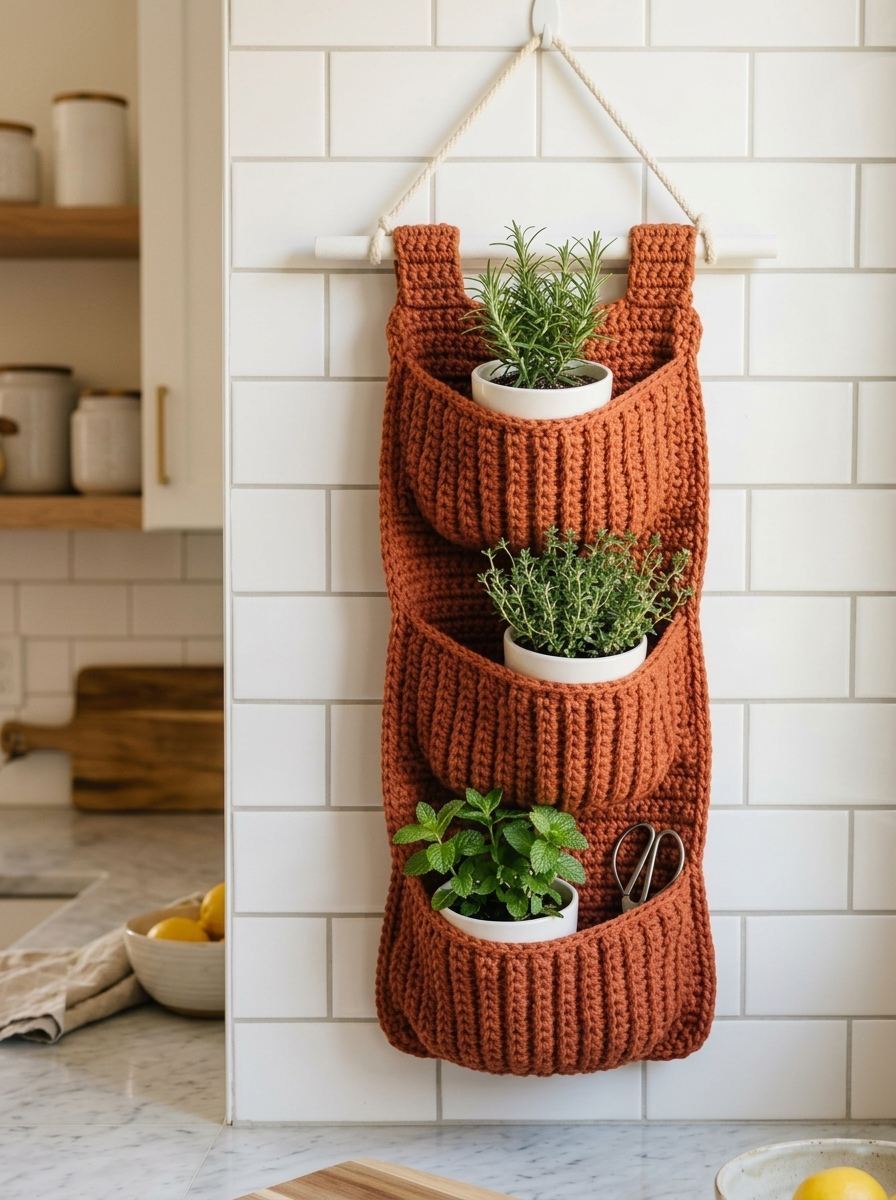
If you have been looking for a practical way to bring warmth and organization into your kitchen, this hanging wall basket is exactly what you need. I designed this crochet pattern after struggling to find counter space for my potted herbs. Now they hang beautifully on my wall, always within reach when I am cooking.
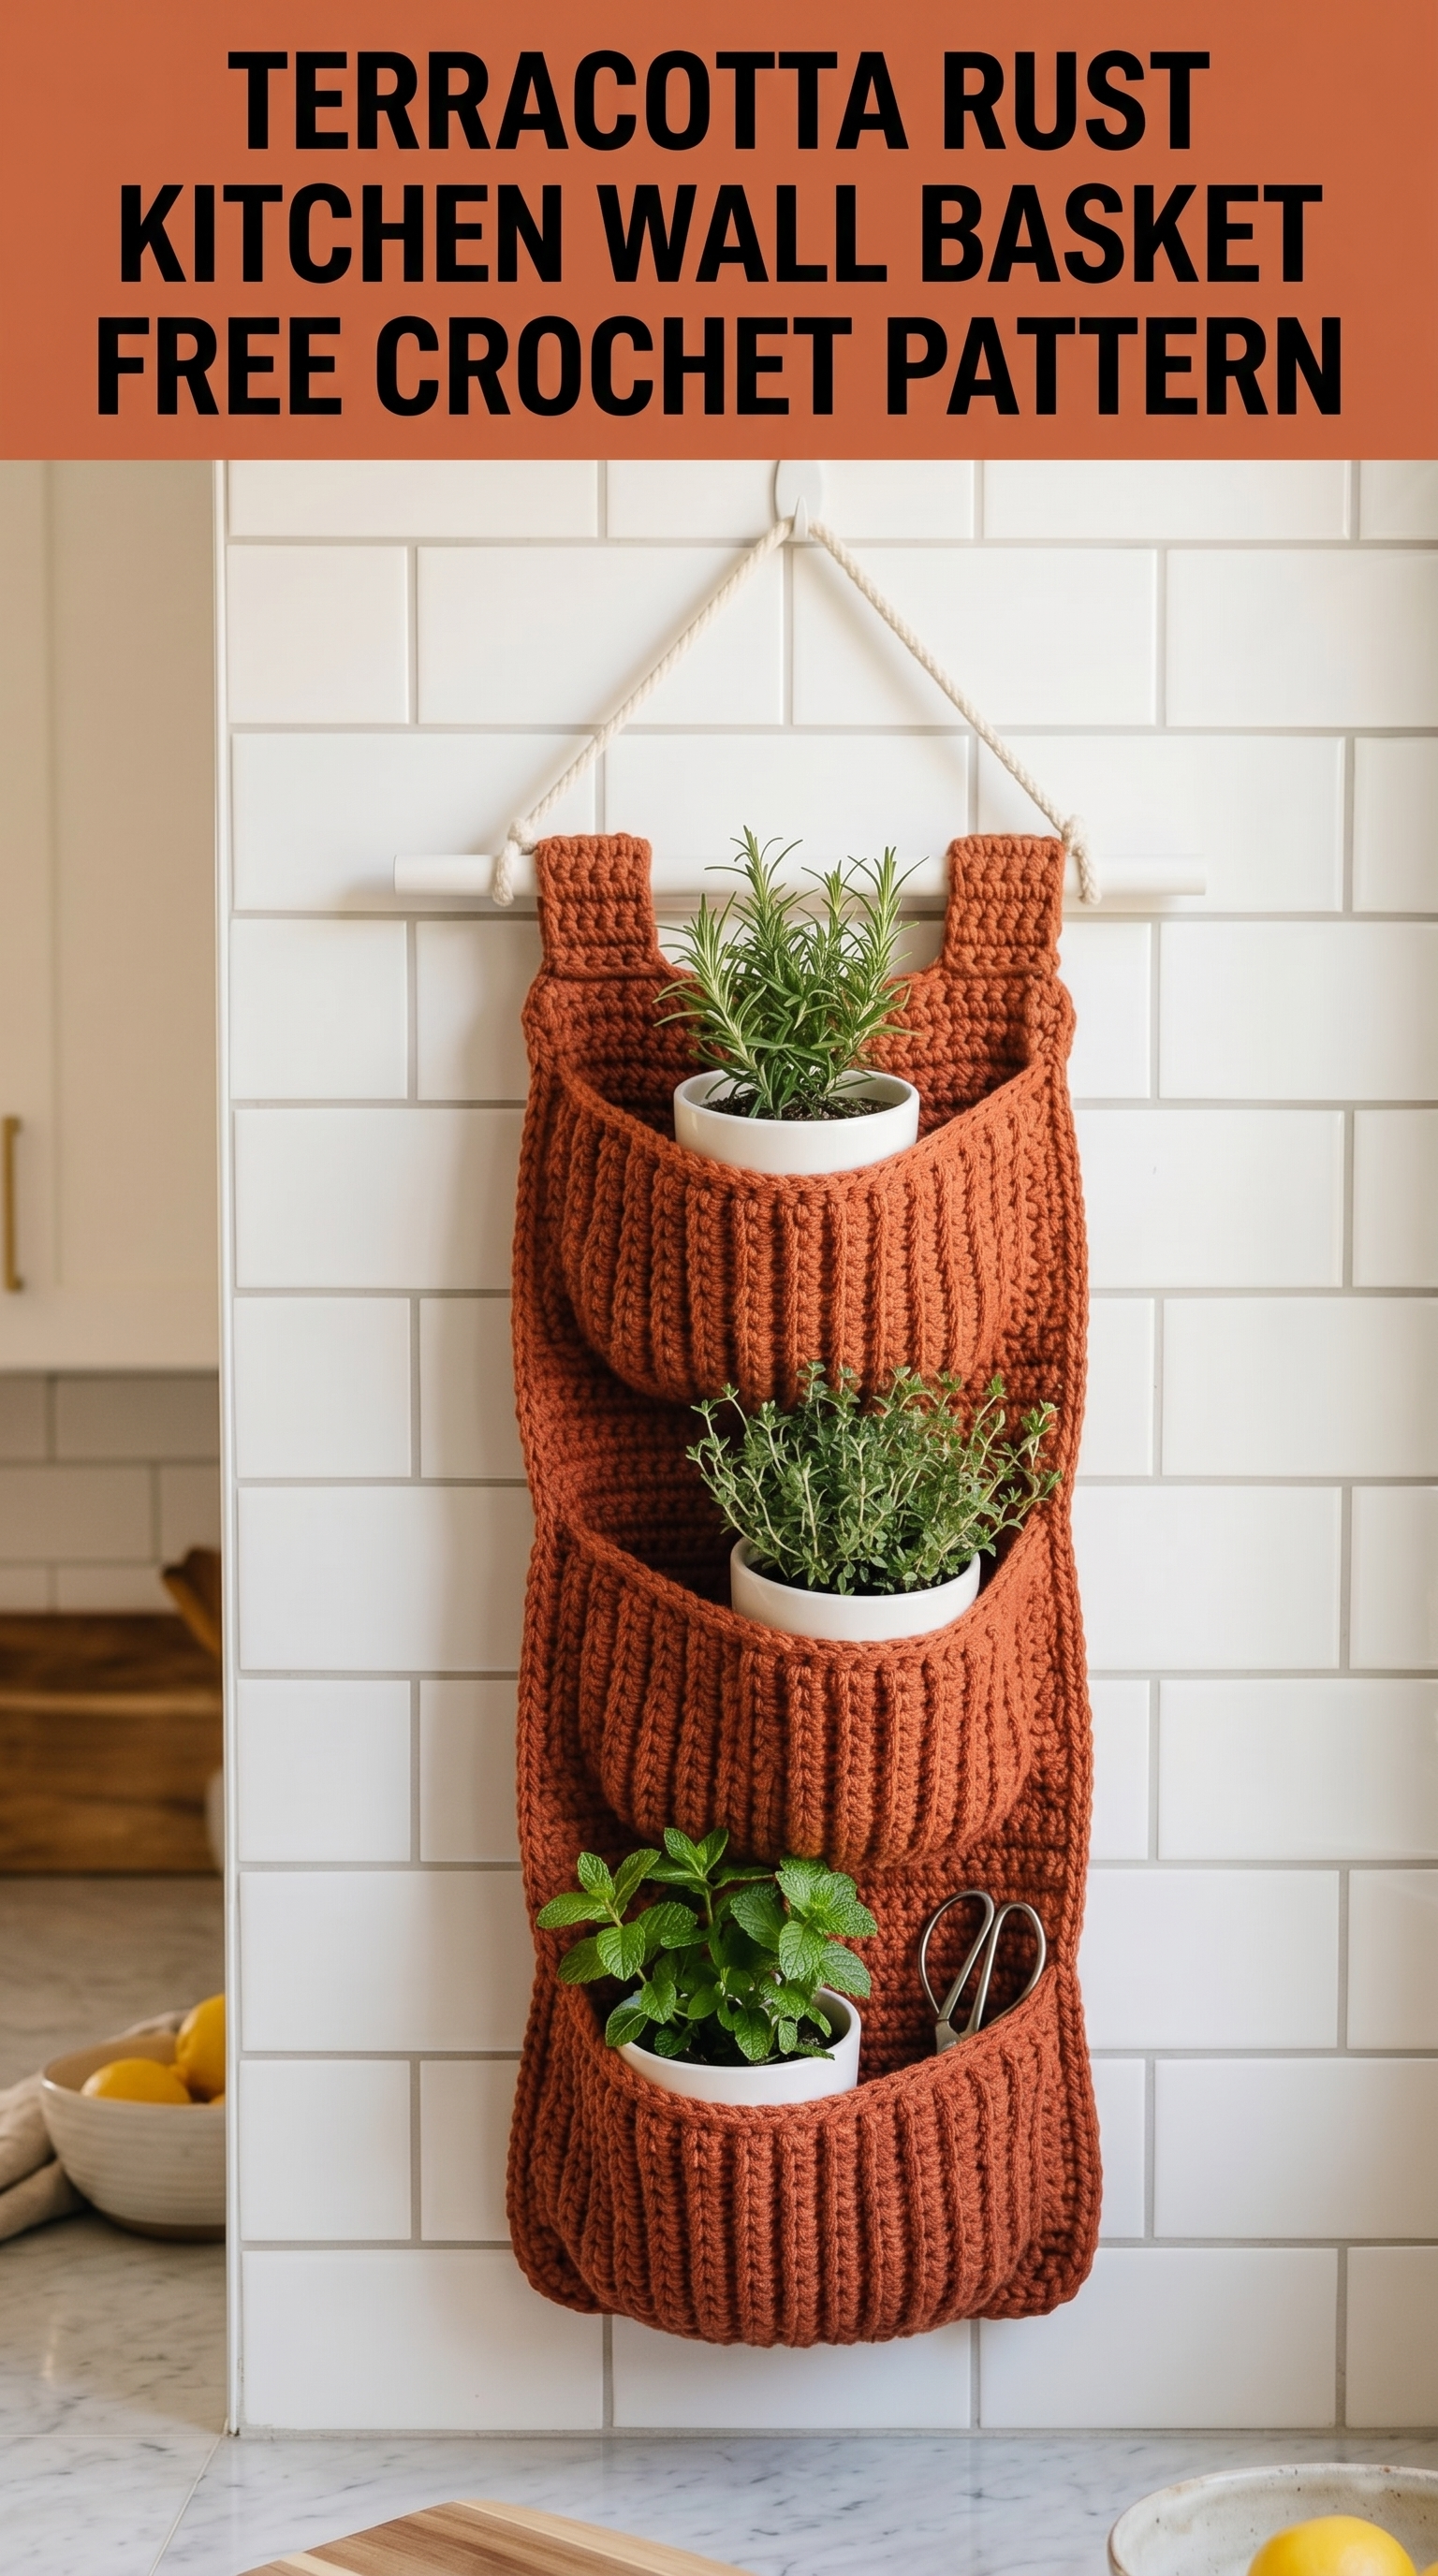
This three-pocket wall organizer works up faster than you might think. The ribbed texture gives it a modern farmhouse feel, and the sturdy construction means it can actually hold the weight of small potted plants, kitchen scissors, or whatever else you need to corral. If you can crochet basic stitches and work in rows, you can absolutely make this.
Let me walk you through everything step by step.
Why This Kitchen Wall Basket Pattern Works So Well
The beauty of this crochet tutorial is in the details. That gorgeous ribbed texture you see comes from working in the back loop only, which creates vertical ridges that look almost knitted. It is a simple technique that gives you a high-end result without any complicated stitch work.
The terracotta rust color is perfect for kitchens because it complements wooden shelving, white tile, and natural materials. But honestly, this pattern looks stunning in any earthy neutral or bold accent color you love.
Each pocket is worked flat and then sewn onto the main backing panel. This construction method keeps things simple and gives you sturdy pockets that hold their shape even when weighted down.
Skill Level
Confident Beginner to Intermediate
You should be comfortable with:
If any of those feel unfamiliar, do not worry. I explain every technique as we go.
Finished Measurements
Materials Needed
Yarn
Cotton yarn is ideal here because it does not stretch under weight like acrylic can. Your pockets will hold their shape beautifully over time.
Hook
Adjust if needed to match gauge. A slightly smaller hook creates a denser fabric, which helps with structure.
Notions
Gauge
18 stitches and 20 rows = 4 inches in single crochet back loop only
Take a few minutes to check your gauge. This pattern relies on a firm, sturdy fabric. If your gauge is too loose, your pockets will stretch and sag.
Abbreviations and Stitch Definitions
Let me break down every abbreviation you will see in this pattern.
Pattern Notes Before You Begin
Take a breath. This is going to be fun.
Step By Step Crochet Pattern
Main Backing Panel
This is the foundation of your wall basket. It is a simple rectangle worked in ribbed single crochet.
Ch 46.
Row 1: Sc in second ch from hook and in each ch across. (45 sts)
Row 2: Ch 1, turn. Sc-blo in each st across. (45 sts)
Rows 3 through 110: Repeat Row 2.
You should have a rectangle measuring approximately 10 inches wide by 22 inches long.
FO and weave in ends.
That ribbed texture should be running vertically when you hold the panel upright. If your ribs are running horizontally, you may have worked in both loops instead of just the back loop.
Pockets (Make 3)
Each pocket has a curved shape that allows it to hold items securely. We create this by working some shaping at the bottom.
Ch 42.
Row 1: Sc in second ch from hook and in each ch across. (41 sts)
Row 2: Ch 1, turn. Sc-blo in each st across. (41 sts)
Rows 3 through 6: Repeat Row 2. (41 sts)
Now we begin shaping the bottom curve.
Row 7: Ch 1, turn. Dec, sc-blo in each st across until 2 sts remain, dec. (39 sts)
Row 8: Ch 1, turn. Sc-blo in each st across. (39 sts)
Row 9: Ch 1, turn. Dec, sc-blo in each st across until 2 sts remain, dec. (37 sts)
Row 10: Ch 1, turn. Sc-blo in each st across. (37 sts)
Row 11: Ch 1, turn. Dec, sc-blo in each st across until 2 sts remain, dec. (35 sts)
Row 12: Ch 1, turn. Sc-blo in each st across. (35 sts)
Row 13: Ch 1, turn. Dec, sc-blo in each st across until 2 sts remain, dec. (33 sts)
Row 14: Ch 1, turn. Sc-blo in each st across. (33 sts)
Row 15: Ch 1, turn. Dec, sc-blo in each st across until 2 sts remain, dec. (31 sts)
Rows 16 through 22: Ch 1, turn. Sc-blo in each st across. (31 sts)
FO, leaving a long tail for seaming (approximately 36 inches).
Repeat to make three identical pockets.
Hanging Loops (Make 2)
These sturdy loops slide over your dowel rod.
Ch 8.
Row 1: Sc in second ch from hook and in each ch across. (7 sts)
Row 2: Ch 1, turn. Sc-blo in each st across. (7 sts)
Rows 3 through 20: Repeat Row 2. (7 sts)
FO, leaving a long tail for seaming.
Repeat to make two loops.
Assembly Instructions
This is where your wall basket comes together. Take your time with seaming. Neat stitches here make a big difference in the finished look.
Attaching the Pockets
1. Lay your main backing panel flat with the right side facing up.
2. Position your first pocket near the bottom of the panel, leaving approximately 1 inch of the backing visible below it. The curved bottom of the pocket should face down.
3. Pin or clip the pocket in place along the two side edges and bottom curve. The top of the pocket stays open.
4. Using your tapestry needle and the long tail from the pocket, whip stitch the sides and bottom curve of the pocket to the backing panel. Keep your stitches small and even.
5. Position your second pocket approximately 1.5 inches above the first pocket. Repeat the seaming process.
6. Position your third pocket approximately 1.5 inches above the second pocket. Seam in place.
Attaching the Hanging Loops
1. Fold each hanging loop in half lengthwise to form a tube shape with an opening.
2. Position one loop at the top left corner of your backing panel, about 1 inch from the edge. The fold should face upward.
3. Whip stitch both ends of the loop securely to the back of the main panel.
4. Repeat with the second loop at the top right corner.
Adding the Dowel and Hanging Rope
1. Slide your wooden dowel through both hanging loops.
2. Cut your rope or macramé cord to your desired length. Tie one end securely to each end of the dowel rod.
3. Your wall basket is ready to hang.
Tips for Success
Blocking is optional but helpful. If your edges are curling slightly, wet blocking can relax the fabric. Simply dampen your pieces, pin them flat to a blocking mat, and let them dry completely before assembly.
Reinforce your seams if you plan to hold heavier items. You can run a second line of stitching along the bottom curve of each pocket for extra durability.
Consider a fabric liner for the pockets if you want to protect plant pots from moisture. A simple piece of plastic inside each pocket works well.
Adjust pocket spacing based on what you plan to store. If you are using larger pots, increase the spacing between pockets.
Alternative Uses for This Wall Basket
This crochet pattern is incredibly versatile. Beyond kitchen herbs, consider using it for:
The three-pocket design works beautifully in any room where you need vertical storage.
Customization Ideas
Add more pockets by extending the length of your backing panel and creating additional pocket pieces.
Try different colors for each pocket to create a gradient or color-blocked effect.
Use thicker yarn and a larger hook for an oversized version that can hold bigger items.
Experiment with different edging by adding a round of single crochet or crab stitch around each pocket opening for a finished look.
Final Thoughts on This Kitchen Wall Basket Crochet Pattern
Making this terracotta rust kitchen wall basket has been one of my favorite practical crochet projects. It is satisfying to create something beautiful that also solves a real problem in your home. Every time I snip fresh herbs for dinner, I smile at this little piece of handmade organization hanging on my wall.
I hope this step by step crochet tutorial gives you everything you need to make your own. Remember, your first attempt does not have to be perfect. The texture of this stitch pattern is very forgiving, and the assembly process allows you to adjust as you go.
Thank you so much for choosing this pattern. I genuinely appreciate you being here.
If you make this wall basket, I would absolutely love to see it. Tag me on Instagram or share a photo in our Facebook group. Seeing your creations honestly makes my whole week.
Happy crocheting, friend. You have got this.
