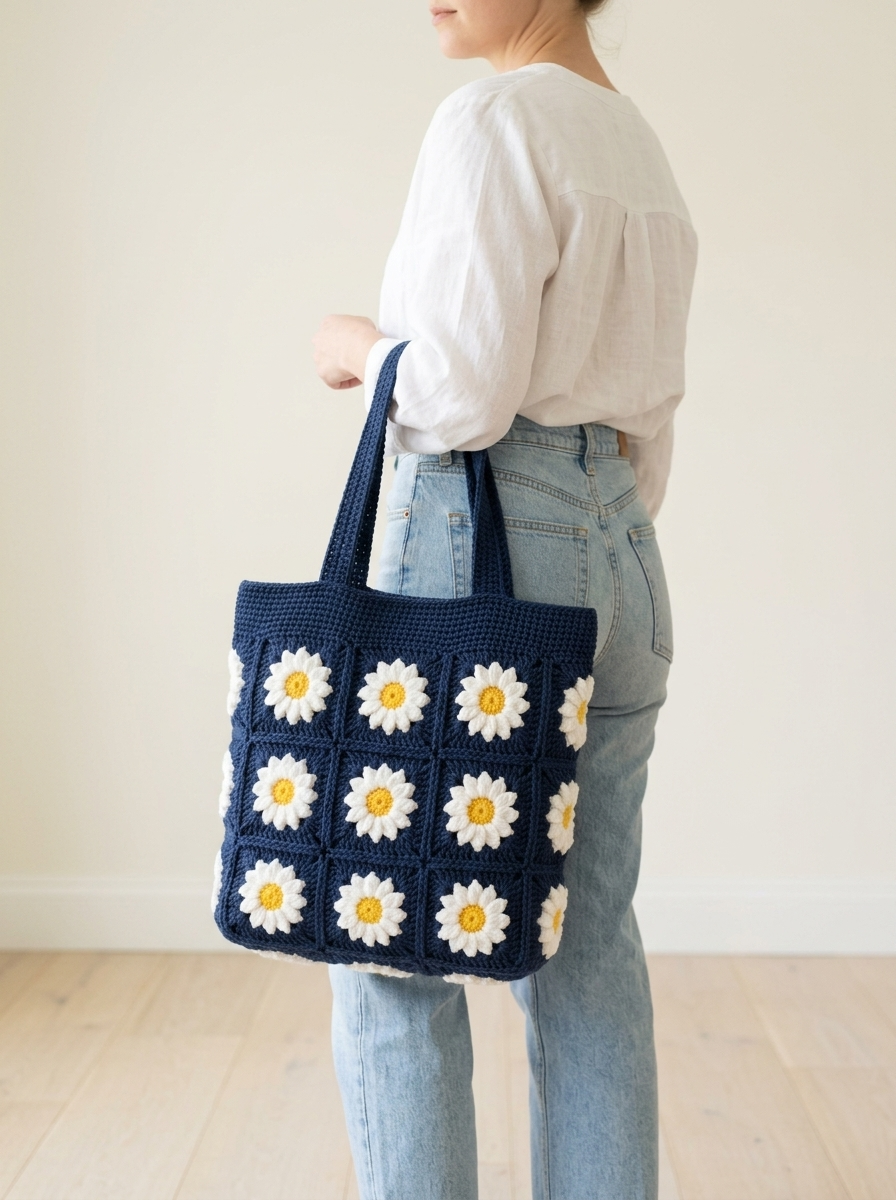
There’s something magical about a tote bag covered in cheerful daisies. This Navy Daisy Granny Square Tote combines classic granny square construction with beautiful dimensional flowers that pop against the deep navy background. If you can crochet a basic granny square and work in the round, you can absolutely make this bag.
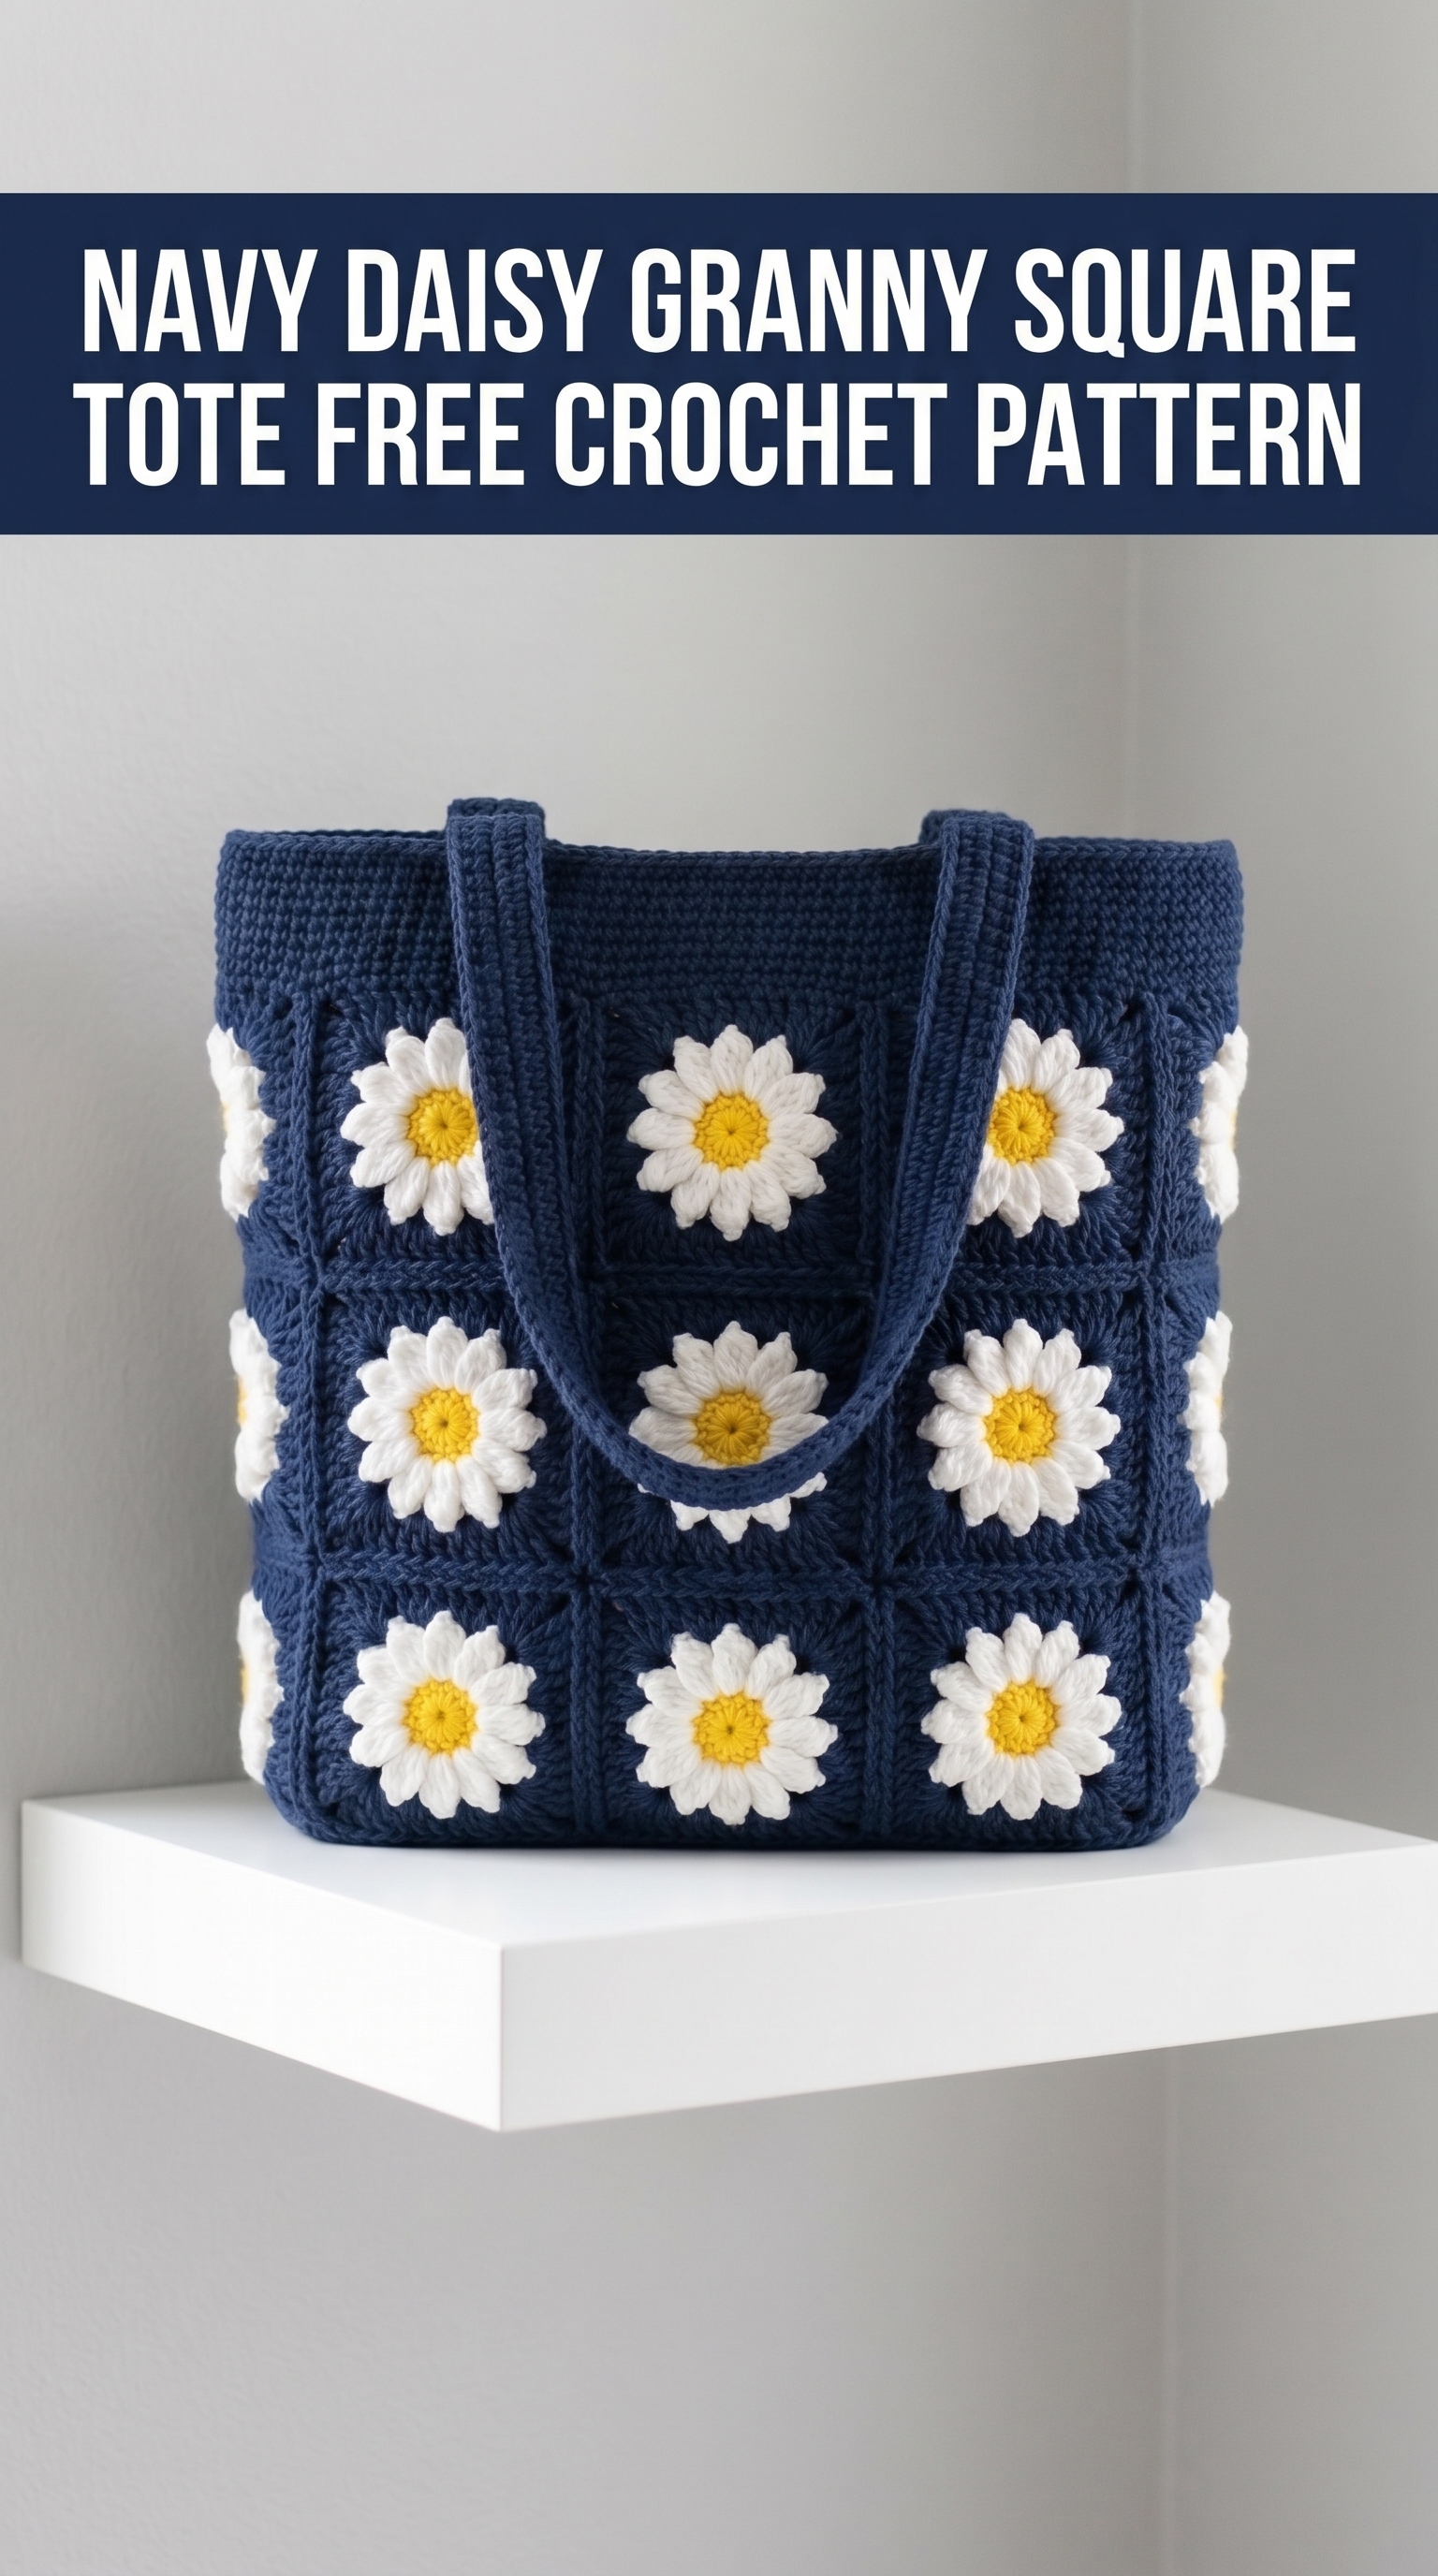
The finished tote measures approximately 13 inches wide by 14 inches tall, not including the handles. It’s the perfect size for farmers market runs, beach days, or carrying your current crochet project. I designed this pattern using worsted weight cotton yarn because it holds its shape beautifully and gets softer with every wash.
Don’t let the flowers intimidate you. The daisy centers use a simple puff stitch technique, and the petals are just chain loops worked around the center. Once you make your first square, the rest will fly by. This crochet pattern walks you through every step from the first magic ring to the final handle stitch.
Why This Daisy Granny Square Tote Pattern Works
This bag uses 18 identical daisy granny squares for the front and back panels. You’ll arrange them in a 3 by 3 grid for each side. The construction is straightforward because you make all your squares first, then join them, then add the top border and handles.
I chose navy blue for the background because it makes the white petals and yellow centers really stand out. But this crochet tutorial works with any color combination. Imagine mint green backgrounds with pink daisies, or a rainbow of different colored squares joined together.
The granny square technique means you’re working in the round, which many crocheters find easier than working back and forth in rows. No turning chains to count. No right side versus wrong side confusion until assembly.
Materials You’ll Need
Yarn:
I recommend 100% cotton or a cotton blend for structure. Acrylic works but may stretch over time with heavy use.
Hook:
Notions:
Gauge:
Each finished daisy granny square measures approximately 4.5 inches by 4.5 inches after blocking. Your gauge may vary slightly based on your tension.
Abbreviations and Stitch Definitions
Let me explain every stitch before we begin. Reference this section anytime you get stuck.
ch = chain: Yarn over, pull through loop on hook. This creates the foundation links.
sl st = slip stitch: Insert hook, yarn over, pull through both loops at once. Used for joining rounds.
sc = single crochet: Insert hook, yarn over, pull up a loop (2 loops on hook), yarn over, pull through both loops.
dc = double crochet: Yarn over, insert hook, yarn over, pull up a loop (3 loops on hook), yarn over, pull through 2 loops (2 loops remain), yarn over, pull through remaining 2 loops. This creates a taller stitch.
hdc = half double crochet: Yarn over, insert hook, yarn over, pull up a loop (3 loops on hook), yarn over, pull through all 3 loops at once.
puff stitch = (Yarn over, insert hook, pull up a loop) 4 times in the same stitch (9 loops on hook), yarn over, pull through all 9 loops. This creates a puffy dimensional bump.
magic ring = An adjustable starting loop that can be pulled tight to close the center hole.
Step by Step Crochet Pattern for Daisy Granny Squares
You’ll make 18 squares total. Each square has three parts: the yellow center, the white petals, and the navy border rounds.

Part 1: Yellow Flower Center
With yellow yarn:
Round 1: Make a magic ring. Ch 2 (does not count as a stitch). Work 1 puff stitch into the ring, ch 1. *Work 1 puff stitch into the ring, ch 1.* Repeat from * 4 more times. You now have 6 puff stitches with ch-1 spaces between them. Sl st to the top of the first puff stitch to join. (6 puff stitches)
Pull the magic ring tail tight to close the center hole completely.
Fasten off yellow. Weave in the tail now or later.
The center should look like a little yellow button with six bumps arranged in a circle.
Part 2: White Daisy Petals
Join white yarn with a sl st in any ch-1 space between puff stitches.
Round 2: Ch 1. In the same ch-1 space, work: sc, hdc, 3 dc, hdc, sc. This creates one petal. *In the next ch-1 space, work: sc, hdc, 3 dc, hdc, sc.* Repeat from * around all remaining ch-1 spaces. Sl st to the first sc to join. (6 petals, 42 stitches total)
Each petal has 7 stitches that fan out from the center. The petals should curve slightly and overlap each other naturally.
Fasten off white. Your daisy flower is complete.
Part 3: Navy Granny Square Border
Now we turn the flower into a square. This is where the magic happens.
Join navy yarn with a sl st between any two petals. You’ll work into the small gap where two petals meet, right at the base.
Round 3: Ch 3 (counts as first dc here and throughout). Work 2 dc in the same space between petals. Ch 1. *3 dc in the next space between petals, ch 1.* Repeat from * around. Sl st to the top of the ch-3 to join. (18 dc total, 6 ch-1 spaces)
This round creates a hexagon shape around your flower.
Round 4: Sl st into the next 2 dc and into the ch-1 space. Ch 3 (counts as dc). In the same ch-1 space, work 2 dc, ch 2, 3 dc. This is your first corner.
*Ch 1. Skip the next ch-1 space. In the following ch-1 space, work 3 dc, ch 2, 3 dc (corner made). Ch 1.* Repeat from * twice more.
You’re working corners in every other ch-1 space, which transforms the hexagon into a square.
Sl st to the top of the ch-3 to join. (4 corners with ch-2 spaces, 4 sides)
Round 5: Sl st into the next 2 dc and into the corner ch-2 space. Ch 3 (counts as dc). In the same corner space, work 2 dc, ch 2, 3 dc.
*Ch 1. In the next ch-1 space along the side, work 3 dc. Ch 1. In the corner ch-2 space, work 3 dc, ch 2, 3 dc.* Repeat from * around all four corners.
Sl st to the top of the ch-3 to join.
Each side now has two 3-dc clusters plus a corner cluster.
Fasten off navy. Weave in ends.
Your finished square should measure approximately 4.5 inches.
Repeat this entire process to make 18 daisy granny squares.
How to Join Your Granny Squares
Lay out your squares in two panels of 9 squares each (3 squares wide by 3 squares tall). Make sure all daisies face the same direction.
Joining Method: Whip Stitch
Thread your yarn needle with a long length of navy yarn (about 24 inches).
Hold two squares together with right sides facing. Working through the back loops only of both squares, whip stitch along one edge from corner to corner. Keep your tension even but not too tight.
Join order:
1. Join squares into vertical strips of 3
2. Join the 3 strips together horizontally
Repeat for the second panel.
Alternative Joining Method
If you prefer, you can use a slip stitch join or single crochet join through both layers. Some crocheters find this faster. The visible seam becomes a design feature.
Assembling the Tote Bag
Now you have two panels of joined squares. Time to make it a bag.
Step 1: Join Side Seams
Place both panels together with right sides facing (daisies touching). Using navy yarn and your hook, single crochet along each side edge to join. Start at the bottom corner and work up to the top. Repeat on the other side.
Step 2: Join Bottom Seam
With panels still together, single crochet across the entire bottom edge. Your bag is now a pouch.
Turn right side out. The daisies should face outward.
Crocheting the Top Border
The top border adds structure and creates a base for the handles.
With right side facing, join navy yarn at one side seam at the top edge.
Round 1: Ch 1. Sc evenly around the entire top opening. Work approximately 3 sc per square (about 54 sc total around). Sl st to the first sc to join. (54 sc)
Rounds 2-4: Ch 1. Sc in each sc around. Sl st to join. (54 sc)
Do not fasten off. Continue to handles.
Making the Tote Handles
The handles are worked as extensions of the top border.
Handle 1:
Starting at the front center of the bag, count 6 stitches to the right. Mark this stitch. Count 12 stitches to the left from center. Mark this stitch.
Row 1: Ch 1. Sc in each of the next 6 stitches only. Turn. (6 sc)
Rows 2-50: Ch 1. Sc in each sc across. Turn. (6 sc)
This creates a handle approximately 18 inches long. Adjust the row count for longer or shorter handles.
Attach Handle:
Fold the handle across to meet the corresponding 6 stitches on the opposite side of that bag face. Slip stitch or whip stitch the end of the handle to those stitches securely.
Fasten off.
Handle 2:
Join navy yarn at the back center of the bag. Repeat the handle instructions, attaching it symmetrically on the back panel.
Finishing Your Daisy Tote
Weave in all remaining yarn tails. For cotton yarn, weave through at least 2 inches of stitches in different directions to secure.
Blocking (Optional but Recommended):
Wet the entire bag with cool water. Gently squeeze out excess water without wringing. Lay flat on a towel and shape the squares so they’re even. Let dry completely.
Blocking relaxes the stitches and helps everything lay flat and even.
Beginner Friendly Tips for This Crochet Pattern
If your daisy center holes won’t close: Pull the magic ring tail firmly before weaving it in. You can also use a yarn needle to cinch it tighter from the back.
If your squares are different sizes: Check your tension. Nervous crocheters often work tighter as the project progresses. Try to stay relaxed and consistent.
If the petals don’t lay flat: This is normal. The petals should cup slightly. They flatten during the border rounds and blocking.
If joining feels overwhelming: Join squares as you go. Every time you finish 3 squares, join them into a strip. This breaks the project into smaller wins.
Customization Ideas
This beginner friendly crochet pattern adapts easily:
You Did It
Making this Navy Daisy Granny Square Tote takes time, but every square brings you closer to a bag you’ll reach for constantly. There’s real satisfaction in watching those cheerful flowers multiply on your table.
Thank you for trusting this crochet tutorial with your time and yarn. I genuinely hope this step by step guide gave you everything you needed.
When you finish your tote, I’d love to see it. Tag me on Instagram or share in our Facebook group. Seeing your versions makes my whole week.
Happy crocheting, friend. You’ve got this.
