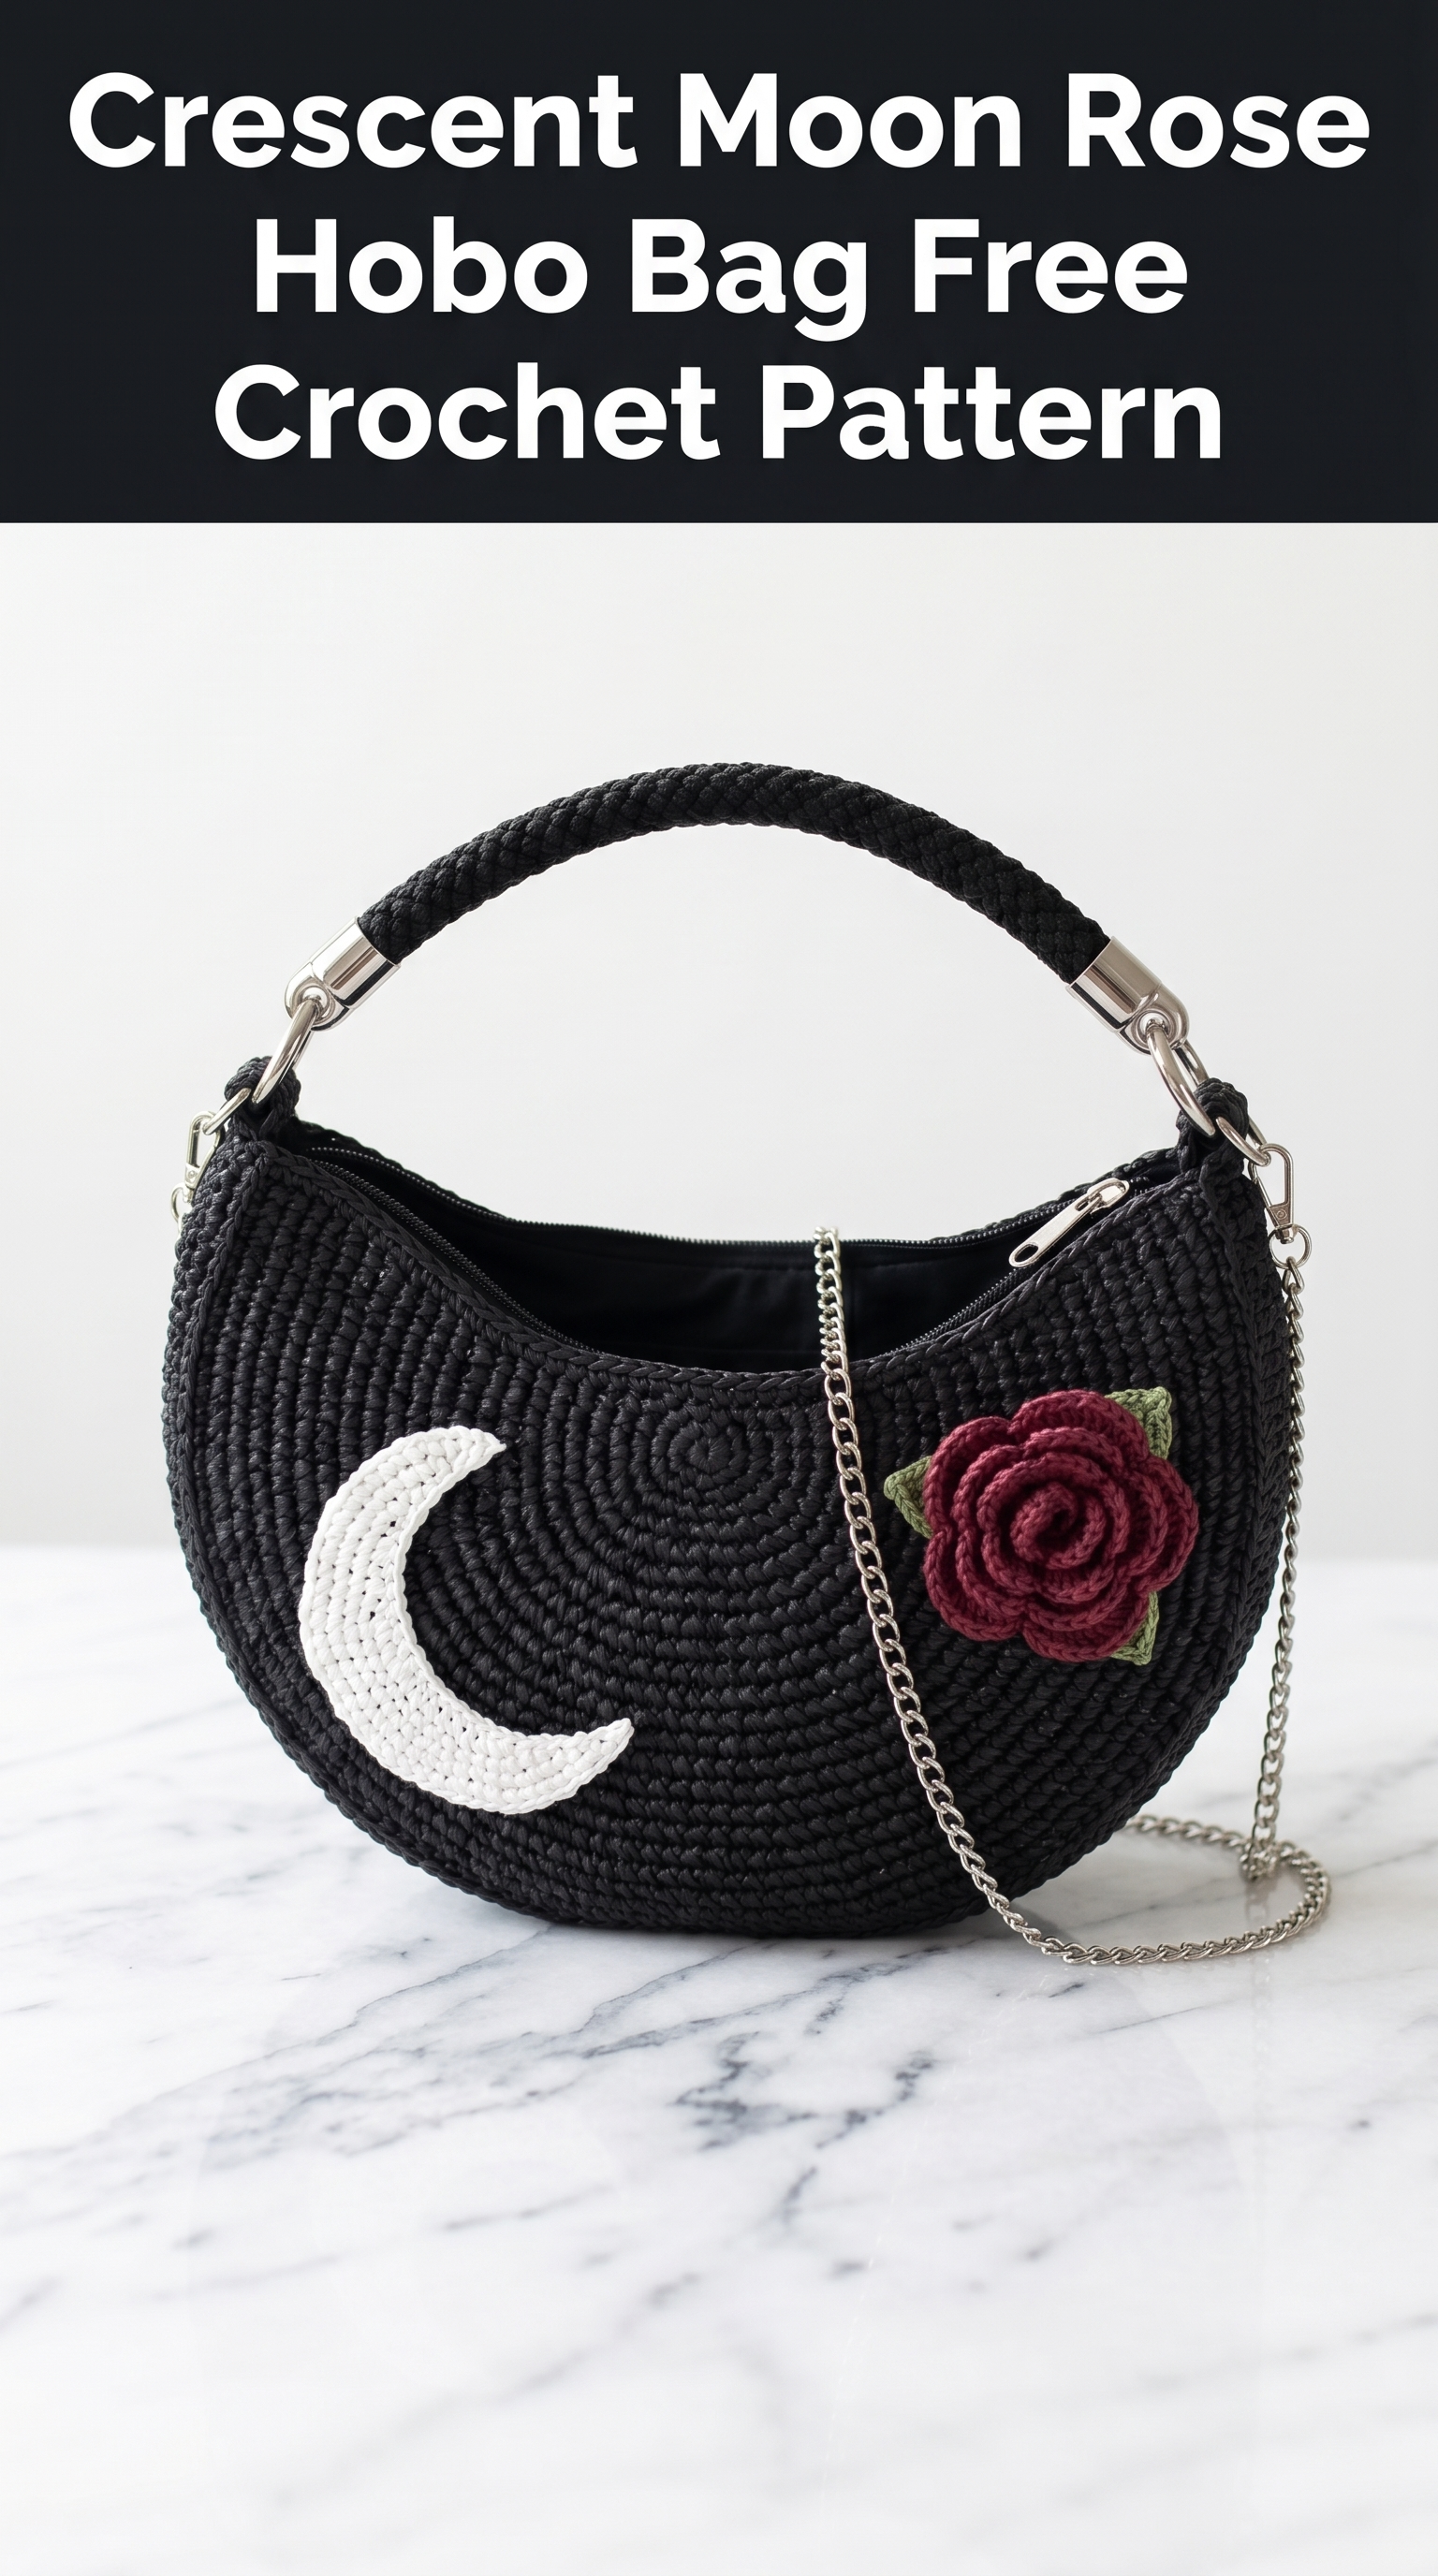
This gorgeous crescent moon rose hobo bag combines gothic elegance with romantic floral charm. I fell in love with the contrast of that crisp white moon against the deep black body. And that burgundy rose? Absolutely stunning. If you have been searching for a statement crochet bag pattern that stands out from the usual market totes, you found it.
Do not let the professional finish intimidate you. This crochet tutorial breaks everything down into manageable pieces. You will work the bag body in simple spiraling rounds. The appliqués are separate small projects. Then you assemble everything at the end. Intermediate crocheters will feel right at home. Confident beginners who have made a few amigurumi or bags can absolutely tackle this step by step.
Let me walk you through exactly how to recreate this beauty from scratch.
Why This Crochet Pattern Works So Well
The hobo bag silhouette is incredibly flattering and practical. That curved bottom sits naturally against your hip. The structured top edge keeps everything secure. You get both a wrapped handle for hand carrying and a chain strap for crossbody wear.
What makes this crochet bag pattern special is the appliqué combination. The crescent moon gives it a witchy, celestial vibe. The dimensional rose softens everything with vintage romance. Together they create something you genuinely cannot find in stores.
The single crochet (sc) construction creates a dense, sturdy fabric that holds its shape beautifully. No sagging. No stretching. This bag will last for years.
Materials You Will Need
Yarn:
Recommended Yarn Weight: Light worsted to worsted weight. Raffia paper yarn creates that beautiful matte texture you see in the photos. Cotton cord works as a substitute for a slightly different look.
Hook Size: 4.0mm (G/6) or size needed to achieve a tight, sturdy gauge
Notions:
Gauge and Finished Dimensions
Gauge: 16 sc x 18 rows = 4 inches in single crochet worked in continuous rounds
Finished Bag Size: Approximately 10 inches wide x 8 inches tall (not including handle)
Gauge matters here because you need a tight, structured fabric. If your work looks loose or floppy, go down a hook size. The fabric should feel almost stiff. That is exactly what you want for a bag that holds its shape.
Abbreviations and Stitch Definitions
Let me define every stitch before we begin. Reference back here anytime you need a refresher.
ch = chain: Yarn over, pull through loop on hook. Creates foundation or adds height.
sl st = slip stitch: Insert hook, yarn over, pull through both loops at once. Used for joining or invisible movement.
sc = single crochet: Insert hook into stitch, yarn over and pull up a loop (2 loops on hook), yarn over and pull through both loops. Your workhorse stitch for this entire project.
inc = increase: Work 2 single crochet stitches into the same stitch. This adds one stitch to your count.
sc2tog = single crochet two together (decrease): Insert hook into first stitch, pull up loop, insert hook into next stitch, pull up loop (3 loops on hook), yarn over and pull through all 3 loops. Reduces stitch count by one.
hdc = half double crochet: Yarn over, insert hook, yarn over and pull up loop (3 loops), yarn over and pull through all 3 loops. Slightly taller than sc.
dc = double crochet: Yarn over, insert hook, yarn over and pull up loop, yarn over and pull through 2 loops, yarn over and pull through remaining 2 loops. Used in the rose petals.
BLO = back loop only: Work into only the back loop of the stitch instead of both loops. Creates a ridge texture.
The Bag Body Pattern (Make 2 Panels)
You will create two identical circular panels, then join them together. This is much easier than trying to work a 3D shape from the start. Trust me on this.
Work in continuous spiral rounds. Do not join rounds with a slip stitch. Use a stitch marker to track your round beginnings. Move the marker up as you complete each round.
Round 1: With black yarn, create a magic ring. Work 6 sc into ring. Pull ring closed. (6 sts)
A magic ring is simply an adjustable loop. Wrap yarn around your finger, insert hook, pull up a loop, chain one to secure it, then work your stitches into the ring. Pull the tail to close the center hole completely.
Round 2: Inc in each st around. (12 sts)
Round 3: *Sc 1, inc* repeat around. (18 sts)
Round 4: *Sc 2, inc* repeat around. (24 sts)
Round 5: *Sc 3, inc* repeat around. (30 sts)
Round 6: *Sc 4, inc* repeat around. (36 sts)
Round 7: *Sc 5, inc* repeat around. (42 sts)
Round 8: *Sc 6, inc* repeat around. (48 sts)
Round 9: *Sc 7, inc* repeat around. (54 sts)
Round 10: *Sc 8, inc* repeat around. (60 sts)
Round 11: *Sc 9, inc* repeat around. (66 sts)
Round 12: *Sc 10, inc* repeat around. (72 sts)
Round 13: *Sc 11, inc* repeat around. (78 sts)
Round 14: *Sc 12, inc* repeat around. (84 sts)
Rounds 15 through 20: Sc in each st around. (84 sts)
These final even rounds create the slight curve at the top of the hobo shape. Do not continue increasing.
Fasten off the first panel. Leave a long tail on the second panel for joining later.
Your panels should measure approximately 8 inches in diameter. If they are significantly smaller or larger, check your gauge.
Crescent Moon Appliqué Pattern
The moon is worked flat in rows, creating that gorgeous curved shape.
Row 1: With white yarn, ch 22. Sc in 2nd ch from hook and each ch across. Turn. (21 sts)
Row 2: Ch 1, sc2tog, sc 17, sc2tog. Turn. (19 sts)
Row 3: Ch 1, sc2tog, sc 15, sc2tog. Turn. (17 sts)
Row 4: Ch 1, sc2tog, sc 13, sc2tog. Turn. (15 sts)
Row 5: Ch 1, sc2tog, sc 11, sc2tog. Turn. (13 sts)
Row 6: Ch 1, sc2tog, sc 9, sc2tog. Turn. (11 sts)
Row 7: Ch 1, sc in each st across. Turn. (11 sts)
Now you will work the inner curve of the crescent. This creates the characteristic moon shape.
Row 8: Ch 1, sc2tog, sc 7, sc2tog. Turn. (9 sts)
Row 9: Ch 1, sc2tog, sc 5, sc2tog. Turn. (7 sts)
Row 10: Ch 1, sc2tog, sc 3, sc2tog. Turn. (5 sts)
Row 11: Ch 1, sc2tog, sc 1, sc2tog. (3 sts)
Fasten off, leaving a long tail for sewing.
Border (optional but recommended): Join white yarn at any point on the outer edge. Sl st evenly around the entire moon shape to create a clean finished edge. This hides any uneven edges and makes the moon look polished.
Rose Appliqué Pattern
This dimensional rose is worked as a long strip, then rolled and secured. The technique is simpler than it looks. I promise.
Foundation: With burgundy yarn, ch 42.
Row 1: Sc in 2nd ch from hook. *Skip 1 ch, 5 dc in next ch (shell made), skip 1 ch, sc in next ch.* Repeat from * across. You should have approximately 10 shell sections.
The shells naturally want to curl. This is correct. Do not try to flatten them.
Finishing the Rose: Starting from one end, roll the strip tightly. The shells will fan out and create petal layers. Use your tapestry needle and matching yarn to stitch through the bottom of the roll every few turns. Secure firmly at the base when finished rolling.
The rose should measure approximately 2 inches across when finished.
Leaf Appliqué Pattern (Make 2)
Row 1: With olive green yarn, ch 8. Sc in 2nd ch from hook, hdc in next, dc in next 2, hdc in next, sc in next, 3 sc in last ch.
Working along the opposite side of the foundation chain: sc in first st, hdc in next, dc in next 2, hdc in next, sc in last st.
Sl st to first sc to join. Fasten off, leaving a tail.
Each leaf should measure approximately 1.5 inches long. Make two leaves and position them behind and slightly to the side of the rose.
Wrapped Handle Pattern
The handle shown has a wrapped cord construction with metal end caps.
Method 1 (easiest): Purchase a pre-made wrapped handle from a purse hardware supplier. Attach using D rings sewn to the bag top.
Method 2 (crochet your own): Ch 4, join to form ring. Work sc in continuous rounds around the ring for approximately 50 rounds or until handle measures 8 inches. The tube will be narrow. Insert a cord or rope through the center for structure. Fasten off and attach end caps.
I recommend Method 1 for a polished finish like the photo shows.
Assembly Instructions
This is where everything comes together. Take your time here.
Step 1: Attach Appliqués
Position the crescent moon on the left side of one bag panel. Pin in place. Using white yarn and whip stitch, sew around the entire moon edge. Keep stitches small and close together.
Position the rose and leaves on the right side of the same panel. Stitch the rose base firmly with several passes of thread. Tuck leaves underneath and secure.
Step 2: Join Panels
Hold both panels with wrong sides together. Using black yarn, sc through both layers around approximately 80 percent of the circumference. Leave the top edge open. This creates the bag opening.
Step 3: Add Zipper
Hand sew the zipper along the inside of the bag opening using matching thread. The zipper tape should sit just below the top edge. This step takes patience but makes the bag so much more functional.
Step 4: Add Lining (Recommended)
Cut two lining pieces the same shape as your bag panels, adding half inch seam allowance. Sew lining pieces together, leaving top open. Insert lining into bag with wrong sides together. Hand stitch lining to zipper tape.
Step 5: Attach Hardware
Sew D rings to the top corners of the bag, positioned where the handle attachments will sit. Attach lobster clasps to handle ends and clip onto D rings. Attach chain strap to the same D rings for crossbody wear.
Tips for Success
Blocking: Lightly steam block your panels before assembly to even out stitches. Do not press flat or you will lose the structure.
Tension: Keep consistent tension throughout. Raffia yarn can be slippery. If you struggle, try a hook with a more tapered throat.
Substitutions: Regular cotton yarn works beautifully if you cannot find raffia. The finish will be slightly different but equally lovely. Choose a yarn with minimal stretch.
Color Variations: This pattern looks stunning in so many combinations. Try navy with gold moon and pink rose. Or cream with silver moon and red rose. Make it yours.
Final Thoughts on This Crochet Bag Pattern
Creating this crescent moon rose hobo bag gave me so much joy. Every time I carry it, someone asks where I got it. There is nothing quite like saying you made it yourself.
This crochet pattern works beautifully for gifts too. The gothic romantic aesthetic appeals to so many people. Consider making one for the witchy friend in your life or anyone who appreciates unique handmade accessories.
Thank you so much for choosing this pattern. I genuinely appreciate you trusting me to guide you through this project.
When you finish your bag, I would absolutely love to see it. Share your creation on Instagram or Facebook and tag me. Seeing your versions of my patterns is honestly the best part of this whole journey.
Happy hooking, friend. You have got this.
