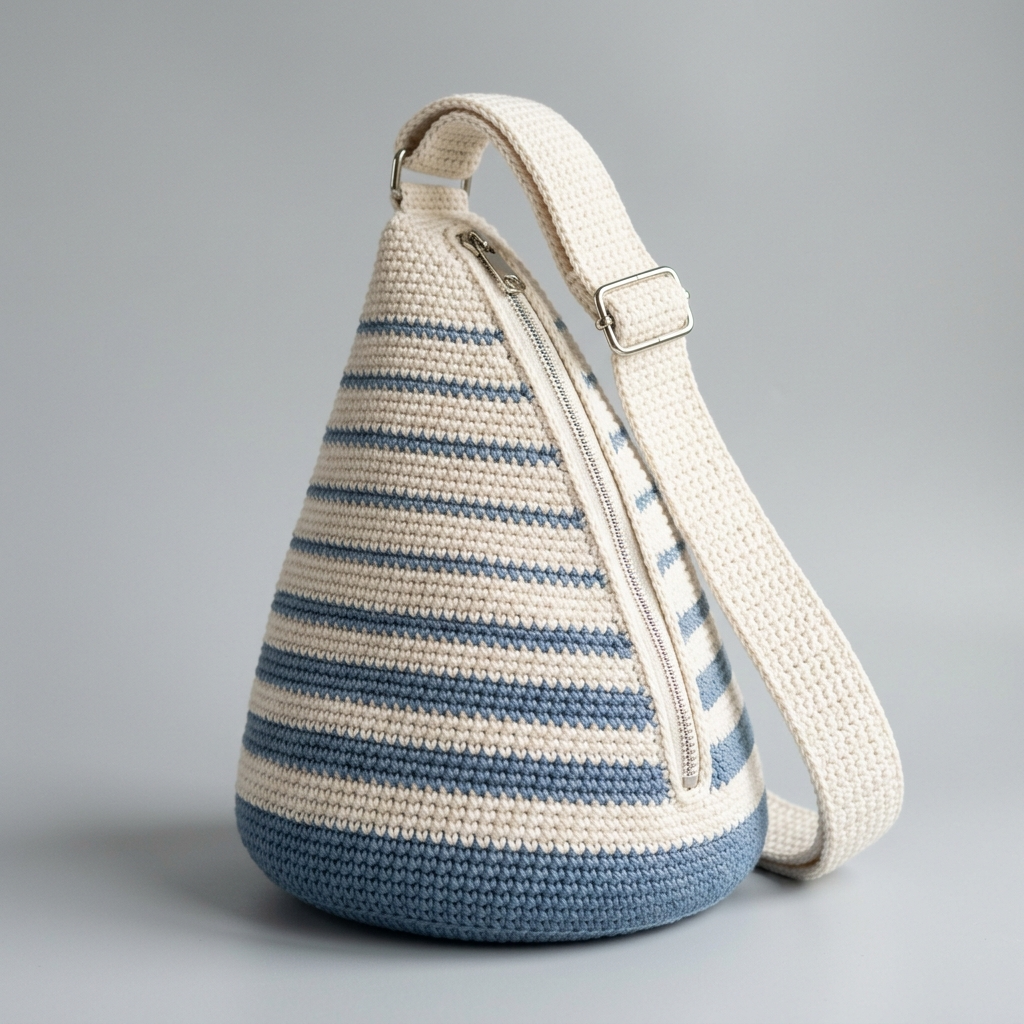
There is something incredibly satisfying about crocheting a bag you will actually use every single day. This Nautical Striped Sling Bag is exactly that kind of project. It is stylish enough for weekend errands, sturdy enough to hold your essentials, and has that effortless coastal vibe that works year round.
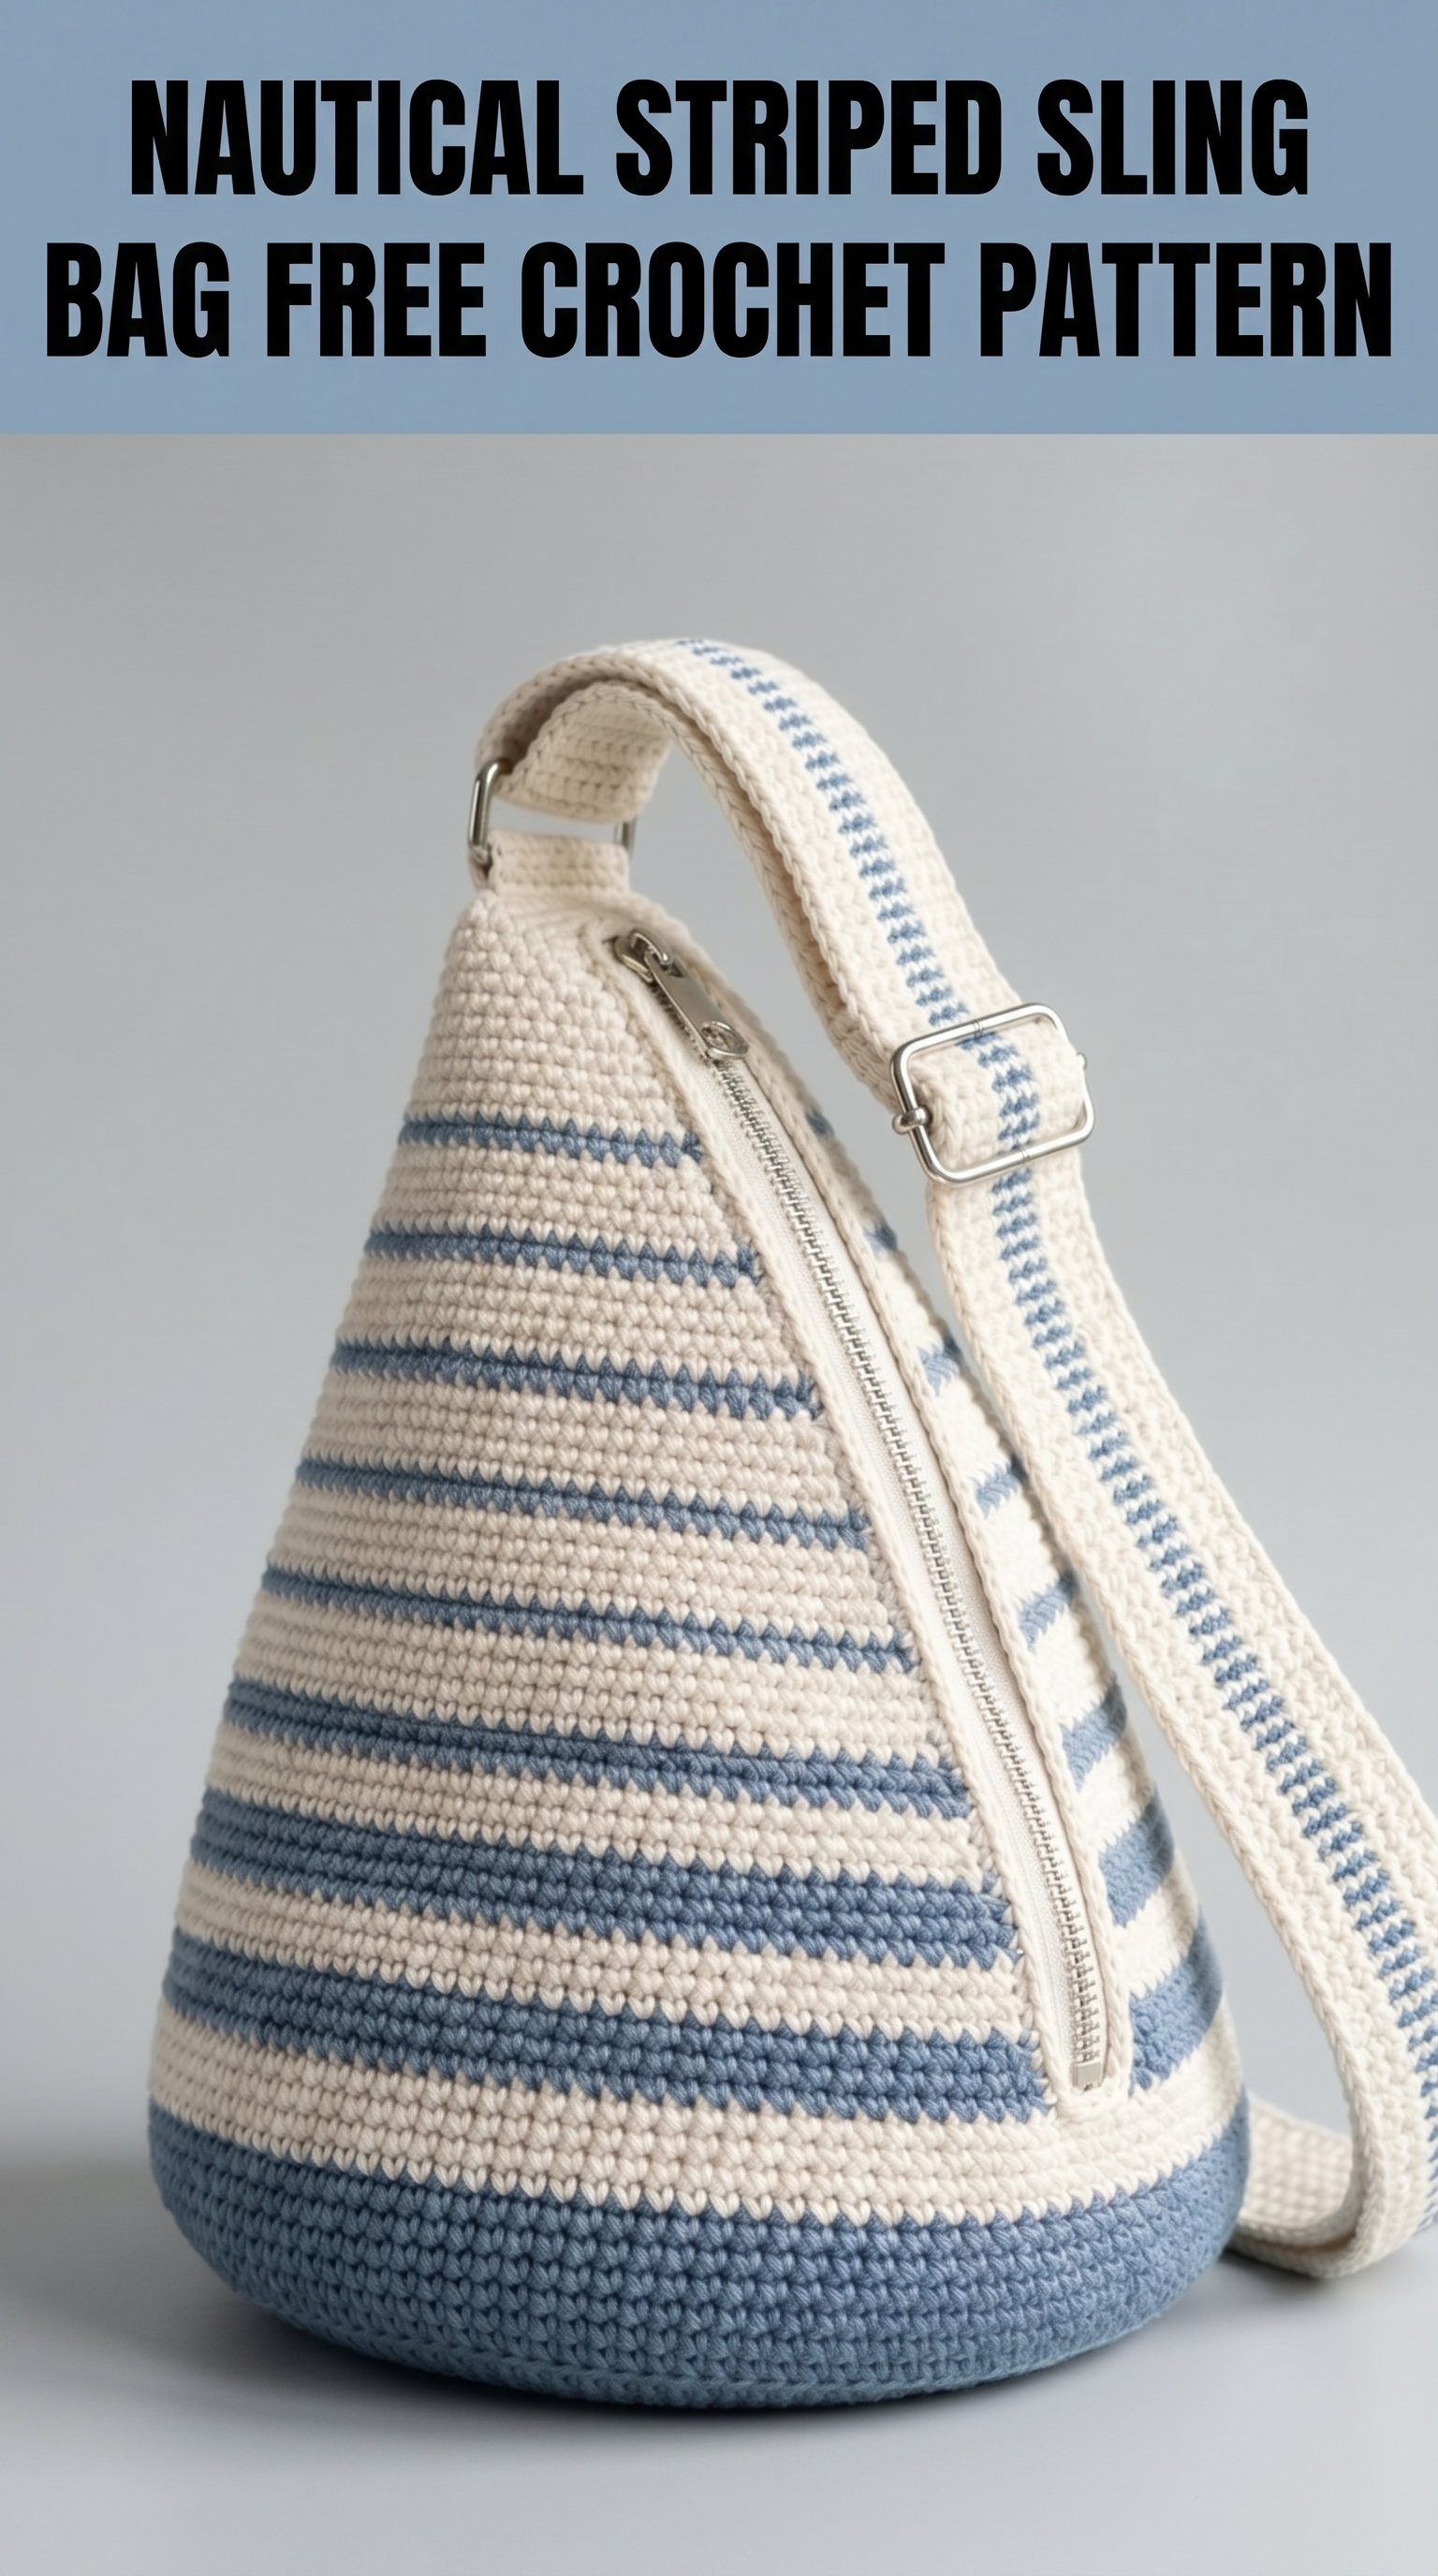
I designed this crochet pattern to be approachable for confident beginners while still keeping experienced makers engaged. If you can work single crochet in the round and change colors cleanly, you can absolutely make this bag. The teardrop silhouette looks impressive, but the construction is more straightforward than you might think.
Let me walk you through everything you need to recreate this nautical sling bag from scratch.
Why You Will Love This Crochet Sling Bag Pattern
This bag hits that sweet spot between form and function. The single crochet construction creates a dense, sturdy fabric that holds its shape beautifully. No need for a lining unless you want one. The diagonal zipper placement is not just cute. It actually makes getting into your bag so much easier when you are wearing it.
The striped colorwork is beginner friendly because you are only changing colors at the end of rounds. No carrying yarn behind your work. No complicated charts. Just clean horizontal stripes that create that classic nautical look.
And that adjustable strap? It is worked separately and attached with hardware, which means you can customize the length to fit your body perfectly.
Materials Needed for This Crochet Pattern
Before you start, gather these supplies. I have listed exactly what I used, plus some alternatives if you need to substitute.
Yarn
I highly recommend 100% cotton or a cotton blend for this project. Cotton gives the bag structure, wears well, and will not stretch out over time like acrylic might. Brands like Lily Sugar’n Cream, Drops Paris, or Paintbox Cotton work beautifully here.
Hook
Notions
Gauge Information
Getting gauge matters here because it affects both the size and the sturdiness of your bag.
Gauge: 18 stitches and 20 rows = 4 inches in single crochet, worked in the round
Take time to make a small swatch. If your stitches are too loose, your bag will be floppy and larger than intended. Go down a hook size. If your stitches are too tight, the fabric will be stiff and smaller. Go up a hook size.
Finished Dimensions
Skill Level
Confident Beginner to Intermediate
You should be comfortable with:
If you have never worked in the round before, I recommend practicing on a simple coaster or flat circle first. It will make this project much more enjoyable.
Abbreviations and Stitch Definitions
Let me define every stitch and abbreviation before we begin. Even if you are experienced, a quick review never hurts.
ch = chain: Wrap yarn over hook, pull through loop on hook. This creates a foundation or adds height.
sl st = slip stitch: Insert hook, yarn over, pull through both loops at once. Used for joining or moving across stitches invisibly.
sc = single crochet: Insert hook into stitch, yarn over and pull up a loop (2 loops on hook), yarn over and pull through both loops. This is the main stitch for the entire bag.
inc = increase: Work 2 single crochet stitches into the same stitch. This adds one stitch to your total.
dec = decrease (invisible decrease preferred): Insert hook through front loops only of the next 2 stitches, yarn over, pull through both front loops, yarn over, pull through both loops on hook. This removes one stitch from your total.
BLO = back loop only: Work into only the back loop of the stitch, leaving the front loop unworked. Creates a subtle ridge.
Construction Overview
This bag is worked in several pieces and then assembled:
1. Base (worked flat, then joined to work in the round)
2. Body (worked in continuous rounds with shaping and stripes)
3. Zipper Panel (worked separately, attached during finishing)
4. Strap (worked flat)
5. D-ring Tabs (small pieces for hardware attachment)
Do not let the multiple pieces intimidate you. Each one is simple on its own, and I will walk you through assembly step by step.
Step by Step Crochet Pattern Instructions
Part 1: The Oval Base
The base of this sling bag is an elongated oval. We work it flat first, then begin building up the sides.
Using Color B (blue) and your 4.0mm hook:
Foundation: Ch 21.
Round 1: Sc in 2nd ch from hook, sc in next 18 ch, 3 sc in last ch (this turns the corner). Working along the opposite side of the foundation chain, sc in next 18 ch, 2 sc in last ch. Do not join. Place stitch marker in first sc and move it up each round. (42 sts)
Round 2: Inc in first st, sc in next 18 sts, inc in next 3 sts, sc in next 18 sts, inc in next 2 sts. (48 sts)
Round 3: Sc in first st, inc, sc in next 18 sts, (sc, inc) 3 times, sc in next 18 sts, (sc, inc) twice. (54 sts)
Round 4: Sc in next 2 sts, inc, sc in next 18 sts, (sc in next 2 sts, inc) 3 times, sc in next 18 sts, (sc in next 2 sts, inc) twice. (60 sts)
Round 5: Sc in next 3 sts, inc, sc in next 18 sts, (sc in next 3 sts, inc) 3 times, sc in next 18 sts, (sc in next 3 sts, inc) twice. (66 sts)
Your base should now measure approximately 8 inches long and 4 inches wide. If it is significantly off, check your gauge.
Part 2: Building the Body
Now we build the sides of the bag. This is where the magic happens.
Round 6: Working in BLO only for this round only, sc in each st around. (66 sts)
This back loop only round creates a crisp edge where the base meets the sides. From here forward, work through both loops as normal.
Rounds 7 to 14: Sc in each st around. (66 sts) — 8 rounds total in Color B
You now have a solid blue base section. Time for the stripe pattern.
Part 3: Stripe Pattern Section
Change to Color A (cream) at the end of Round 14. To change colors cleanly: work the last sc of the round until you have 2 loops on your hook, then yarn over with the new color and pull through.
Stripe Sequence:
Repeat this sequence throughout the body section.
Rounds 15 to 16: With Color A, sc in each st around. (66 sts)
Rounds 17 to 18: With Color B, sc in each st around. (66 sts)
Continue the stripe pattern, working 2 rounds of each color.
Rounds 19 to 44: Continue in stripe pattern as established, maintaining 66 sts per round. (66 sts each round)
At this point you should have approximately 13 sets of stripes visible, and your bag body should measure about 8 inches tall from the base.
Part 4: Shaping the Top
Now we create the distinctive teardrop shape by decreasing on one side only.
Continue your stripe pattern while following the shaping below. I will indicate which side to decrease on. Mark one end of your oval as the “front” (where the zipper will go).
Round 45: Sc in next 20 sts, dec, sc in next 10 sts, dec, sc to end of round. (64 sts)
Round 46: Sc in each st around. (64 sts)
Round 47: Sc in next 19 sts, dec, sc in next 9 sts, dec, sc to end of round. (62 sts)
Round 48: Sc in each st around. (62 sts)
Continue decreasing every other round, placing decreases on the same side (the narrowing side), reducing by 2 sts each decrease round.
Rounds 49 to 70: Continue pattern, decreasing on alternate rounds and maintaining stripe sequence.
By Round 70, you should have approximately 38 sts remaining, and the bag should taper noticeably toward the top.
Rounds 71 to 76: Continue decreasing more aggressively:
Final Rounds: When you reach approximately 20 sts, work 2 more even rounds, then fasten off leaving a long tail.
The top opening should be approximately 4 inches across. Do not close it completely. This is where your zipper will attach.
Part 5: Zipper Panel
This panel runs diagonally across the front of the bag, giving it that sporty sling bag look.
Using Color A (cream):
Foundation: Ch 7.
Row 1: Sc in 2nd ch from hook, sc in each ch across. Ch 1, turn. (6 sts)
Rows 2 to 80: Sc in each st across. Ch 1, turn. (6 sts)
Fasten off. Your panel should be approximately 16 inches long and 1.5 inches wide.
This panel will be sewn along both sides of the zipper, then the entire unit is attached diagonally across the bag front.
Part 6: Adjustable Strap
The strap is worked flat and finished with hardware for adjustability.
Using Color A (cream):
Foundation: Ch 7.
Row 1: Sc in 2nd ch from hook, sc in each ch across. Ch 1, turn. (6 sts)
Rows 2 to 200: Sc in each st across. Ch 1, turn. (6 sts)
Fasten off. Your strap should be approximately 40 inches long and 1.5 inches wide.
This length allows for adjustability with your hardware. You can make it longer if you prefer a true crossbody length.
Part 7: D-Ring Tabs (Make 2)
These small tabs attach the strap hardware to the bag.
Using Color A (cream):
Foundation: Ch 5.
Row 1: Sc in 2nd ch from hook, sc in each ch across. Ch 1, turn. (4 sts)
Rows 2 to 10: Sc in each st across. Ch 1, turn. (4 sts)
Fasten off leaving a long tail for sewing.
Assembly and Finishing
This is where your bag comes together. Take your time here.
Installing the Zipper
1. Pin your zipper centered along the zipper panel, with the fabric flanking both sides of the zipper teeth.
2. Using matching thread and a sewing needle, whipstitch the crocheted panel to the zipper tape on both sides.
3. Position the completed zipper panel diagonally across the bag front, from the lower left toward the upper right.
4. Pin in place and sew securely using yarn and a tapestry needle, working small stitches through both the panel edge and the bag body.
Tip: If this is your first time sewing in a zipper, go slowly. It does not need to be perfect. The stitches will blend into the crochet texture.
Attaching the D-Ring Tabs
1. Thread one D-ring onto each tab.
2. Fold the tab in half around the ring.
3. Sew one tab to each side of the bag opening at the top, securing firmly.
Threading the Strap
1. Thread one end of your strap through the slider buckle.
2. Fold back about 2 inches and sew in place.
3. Thread the opposite end through one D-ring, then back through the slider buckle, then through the other D-ring.
4. Fold back and sew in place.
Test the adjustment to make sure the strap slides smoothly.
Pattern Notes and Tips
Carrying yarn: When changing colors, you can either cut the yarn and weave in ends, or carry the unused color loosely up the inside of the bag. Carrying is faster but may show slightly on the inside.
Reinforcing: Consider adding a fabric lining if you plan to carry heavy items or want to prevent small things from poking through the stitches.
Customizing: This crochet tutorial works beautifully in solid colors too. Try a rich terracotta, sage green, or classic black for a different vibe.
You Did It
Seriously, congratulations. You just crocheted a fully functional, genuinely stylish sling bag from scratch. That is no small thing.
I would absolutely love to see your finished bag. Tag me on Instagram or share in my Facebook group. Seeing your makes is genuinely the best part of sharing these patterns.
Thank you for trusting me with your time and your yarn stash. Now go show off that beautiful nautical sling bag.
Happy crocheting, friend.
