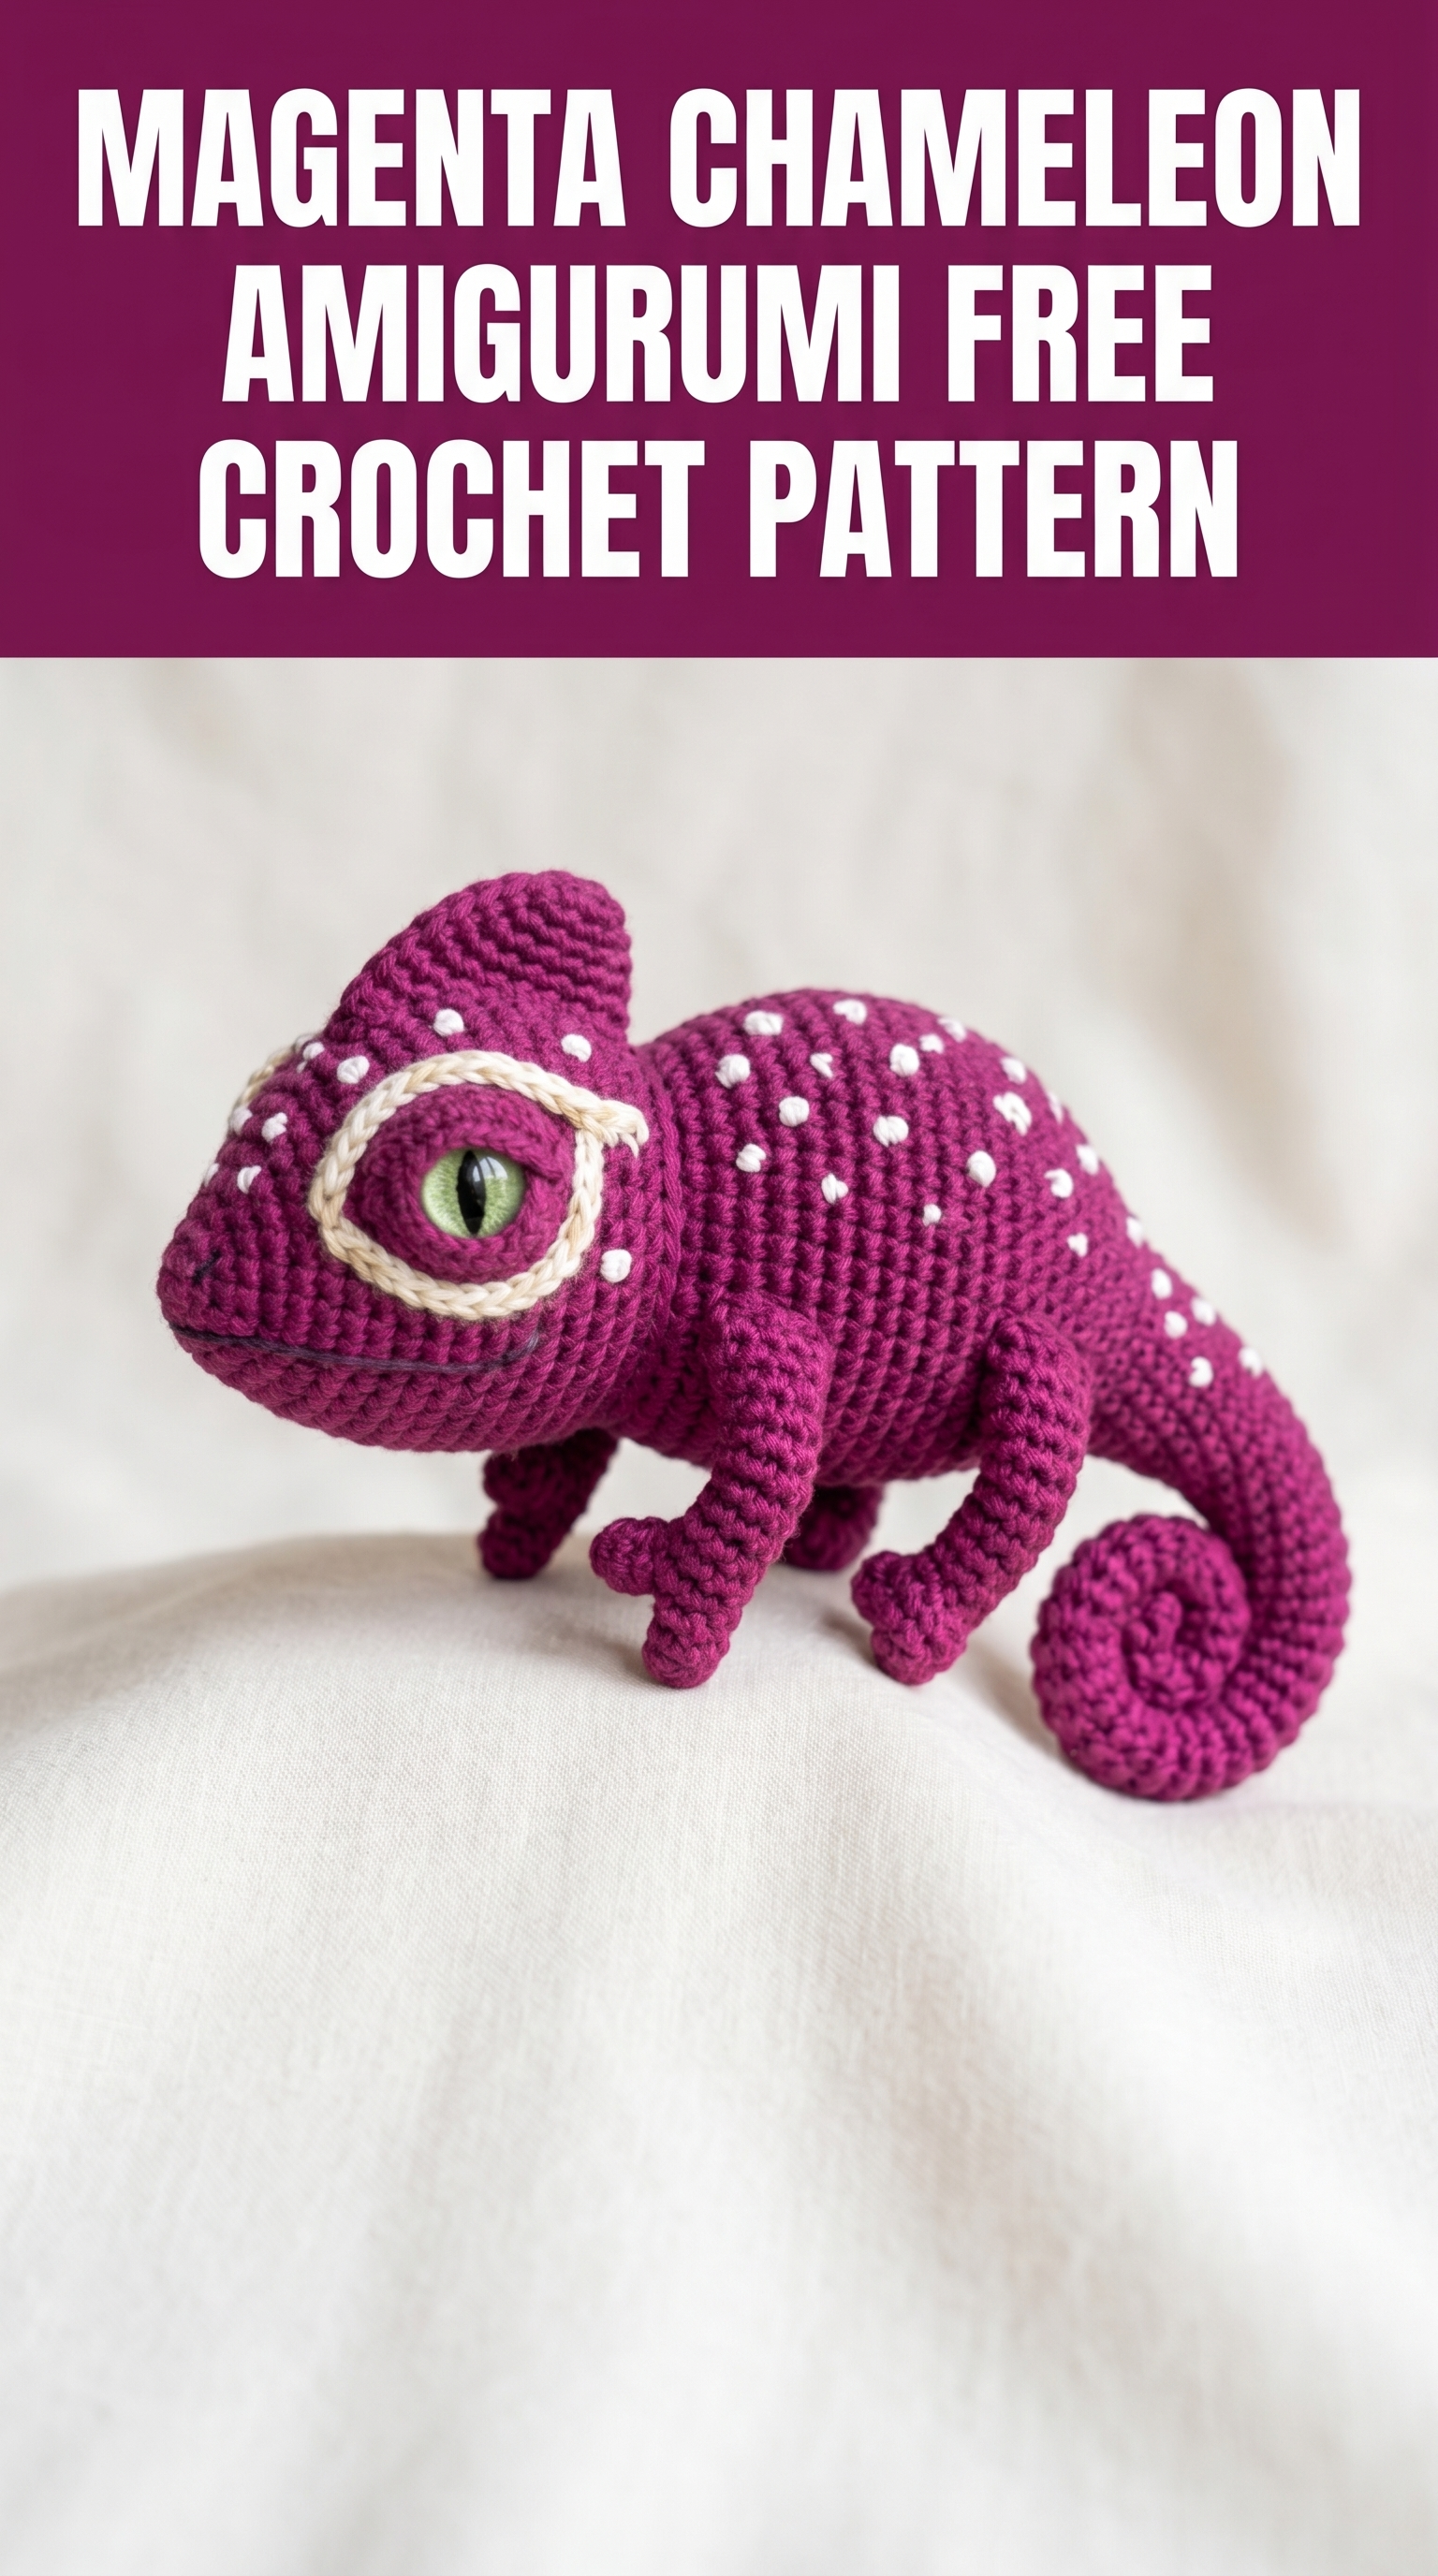
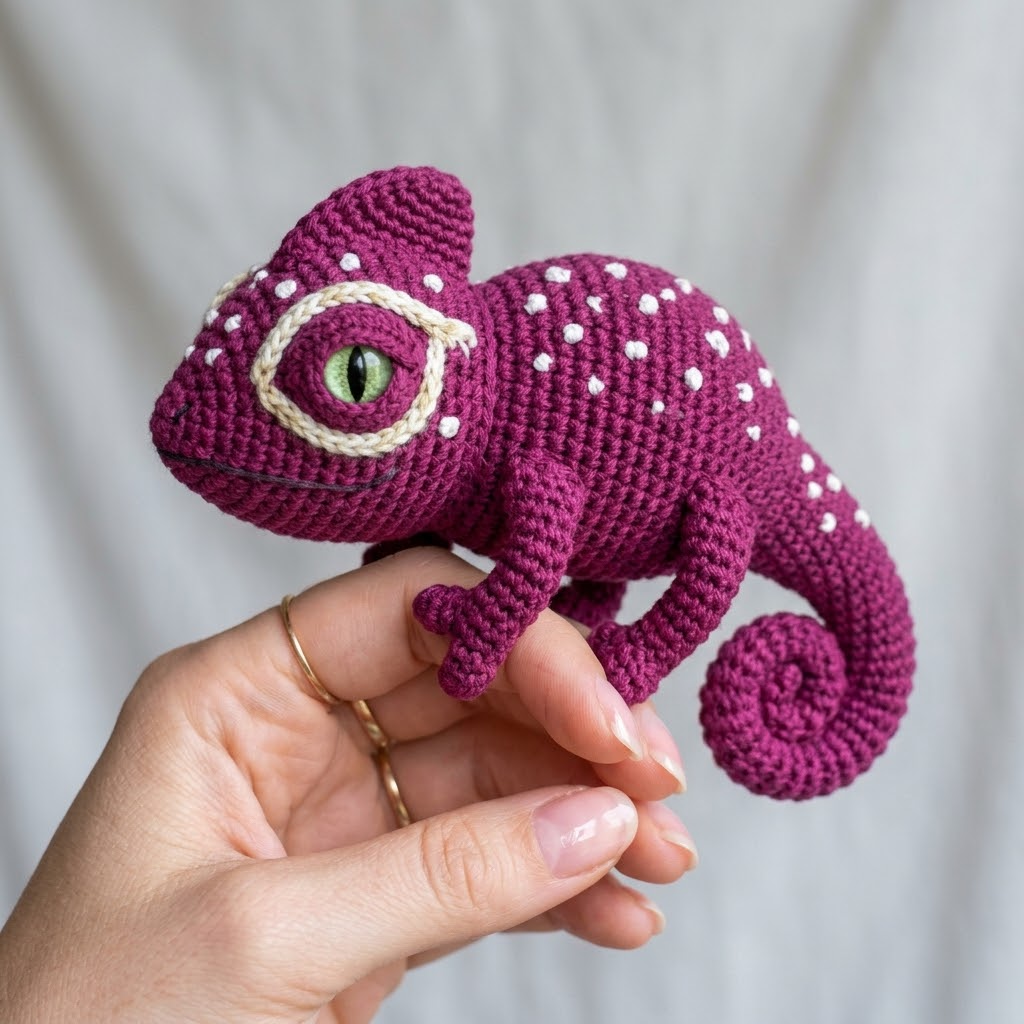
Oh, this little guy is going to steal your heart. This magenta chameleon amigurumi is one of those projects that looks incredibly impressive on your shelf but is actually built from simple stitches worked in the round. If you can single crochet, you can absolutely make this charming reptile friend.
I designed this crochet pattern with intermediate crocheters in mind, but adventurous beginners who have completed a few basic amigurumi projects will do just fine here. The shaping is all about increases and decreases you probably already know. The magic happens in the assembly and those sweet little details like the spiral tail and expressive eyes.
Let me walk you through everything you need to recreate this adorable chameleon from scratch.
Why You Will Love This Chameleon Crochet Pattern
This is not your average round ball amigurumi. The chameleon has personality. That curled tail, those gripping feet, the distinctive ridge along the head, and those big beautiful eyes give this project real character.
The finished chameleon measures approximately 5 inches long from nose to tail tip when curled, and about 3 inches tall. It fits perfectly in your palm, which makes it an ideal desk buddy, nursery decoration, or gift for the reptile lover in your life.
The white polka dot embroidery and cream eye ring are optional embellishments, but I highly recommend them. They take this project from cute to absolutely stunning.
Materials You Will Need
Gather these supplies before you start. Having everything ready makes the process so much smoother.
Yarn:
I used a smooth acrylic yarn with tight twist. Avoid fuzzy or boucle yarns for amigurumi because they hide your stitches and make counting difficult.
Hook:
Notions:
Stitches and Abbreviations Used
Let me define every stitch before we begin. Refer back to this section whenever you need a refresher.
Magic Ring (MR): An adjustable starting loop that closes completely with no hole in the center. You wrap yarn around your fingers, pull up a loop, chain one, then work your first round into that ring before pulling it tight.
Chain (ch): The foundation stitch. Yarn over, pull through the loop on your hook. One chain made.
Slip Stitch (sl st): Insert hook, yarn over, pull through both the stitch and the loop on your hook in one motion. Used for joining or creating a flat surface.
Single Crochet (sc): Insert hook into stitch, yarn over and pull up a loop (two loops on hook), yarn over and pull through both loops. This is your main stitch for the entire pattern.
Increase (inc): Work two single crochet stitches into the same stitch. This adds one stitch to your count.
Invisible Decrease (dec): Insert hook through the front loops only of the next two stitches, yarn over, pull through both front loops, yarn over, pull through both loops on hook. This creates a neater decrease than the standard method.
Front Loop Only (FLO): Work into only the loop closest to you, leaving the back loop unworked. Creates a ridge on the fabric.
Back Loop Only (BLO): Work into only the loop farthest from you.
Gauge and Important Notes
Gauge: Exact gauge is not critical for amigurumi, but your fabric must be tight enough that stuffing does not show through. If you see white peeking between stitches, go down a hook size.
Working in continuous rounds: This pattern is worked in continuous spirals without joining at the end of each round. Use a stitch marker to track the beginning of each round. Move it up as you go.
Stuffing as you go: Add fiberfill before openings become too small. Stuff firmly but not so tight that the fabric stretches and shows gaps.
Crochet Pattern Instructions
Head and Body (Worked as One Piece)
The head and body are crocheted together in one continuous section. This eliminates a seam and creates smooth shaping.
Round 1: MR, 6 sc into ring. (6 sts)
Round 2: Inc in each st around. (12 sts)
Round 3: *Sc 1, inc* repeat around. (18 sts)
Round 4: *Sc 2, inc* repeat around. (24 sts)
Round 5: *Sc 3, inc* repeat around. (30 sts)
Round 6: *Sc 4, inc* repeat around. (36 sts)
Rounds 7 to 10: Sc in each st around. (36 sts) This creates the widest part of the head.
Round 11: *Sc 4, dec* repeat around. (30 sts)
Round 12: Sc in each st around. (30 sts)
Round 13: *Sc 3, dec* repeat around. (24 sts)
Insert safety eyes between rounds 9 and 10, approximately 8 stitches apart. The chameleon has prominent eyes that sit high on the head.
Rounds 14 to 16: Sc in each st around. (24 sts)
Round 17: *Sc 2, dec* repeat around. (18 sts)
Begin stuffing the head firmly now.
Rounds 18 to 22: Sc in each st around. (18 sts) This section forms the neck transitioning to body.
Round 23: *Sc 2, inc* repeat around. (24 sts)
Round 24: *Sc 3, inc* repeat around. (30 sts)
Rounds 25 to 32: Sc in each st around. (30 sts) This is the body section.
Round 33: *Sc 3, dec* repeat around. (24 sts)
Round 34: *Sc 2, dec* repeat around. (18 sts)
Stuff the body firmly.
Round 35: *Sc 1, dec* repeat around. (12 sts)
Round 36: Dec around. (6 sts)
Fasten off, leaving a tail. Use your yarn needle to weave through the front loops of the remaining 6 stitches, pull tight to close, and secure.
Head Ridge
This distinctive crest runs along the top of the chameleon’s head.
Row 1: Ch 10, sc in second ch from hook and across. (9 sts)
Row 2: Ch 1, turn, sc across. (9 sts)
Fasten off, leaving a long tail for sewing. Fold slightly to create a curved ridge shape and sew along the center top of the head from the nose area toward the back.
Tail
The spiral tail is such a fun element. It curls naturally as you work.
Round 1: MR, 6 sc into ring. (6 sts)
Rounds 2 to 4: Sc in each st around. (6 sts)
Round 5: *Sc 1, inc* repeat around. (9 sts)
Rounds 6 to 25: Sc in each st around. (9 sts)
Do not stuff the tail, or stuff very lightly only at the base. The unstuffed tube will curl naturally into that signature chameleon spiral.
Fasten off with a long tail. Sew to the back of the body, curving the tail into position as you attach it.
Front Legs (Make 2)
Round 1: MR, 6 sc into ring. (6 sts)
Rounds 2 to 8: Sc in each st around. (6 sts)
Do not stuff. The legs should be slightly floppy so they can grip.
Fasten off with a long tail. Flatten the opening and sew to the sides of the body near the neck transition area.
Back Legs (Make 2)
Round 1: MR, 6 sc into ring. (6 sts)
Round 2: Inc in each st around. (12 sts)
Round 3: Sc in each st around. (12 sts)
Round 4: Dec 6 times. (6 sts)
Rounds 5 to 10: Sc in each st around. (6 sts)
Stuff the foot portion lightly. Fasten off with a long tail and sew to the lower sides of the body.
Eye Rings (Make 2)
Using cream yarn:
Round 1: MR, 6 sc into ring. (6 sts)
Round 2: Inc in each st around. (12 sts)
Round 3: *Sc 1, inc* repeat around. (18 sts)
Sl st to first sc, fasten off with a long tail. Sew around each safety eye, framing them beautifully.
Assembly and Finishing
Sewing amigurumi pieces together is where patience pays off. Use the long tails you left and a yarn needle. Pin pieces in place before sewing to check positioning.
Order of assembly:
1. Sew the head ridge along the top center of the head
2. Attach eye rings around each safety eye
3. Sew front legs to the body sides
4. Sew back legs to the lower body
5. Attach the tail, curving it as you sew
Embroidery details:
For the white polka dots, use white yarn and a yarn needle. Make small straight stitches or French knots scattered across the body. Space them randomly for a natural look.
For the mouth line, use black yarn and embroider a small curved line beneath the nose area using a backstitch.
Tips for Success With This Amigurumi Pattern
Tight stitches matter. If your fabric feels loose or you can see stuffing, switch to a smaller hook immediately.
Count every round. Use that stitch marker religiously. Losing count in amigurumi leads to wonky shapes.
Stuff strategically. The head should be very firm. The body should be firm. The tail should be empty or nearly empty to curl properly.
Embroidery is optional but recommended. Those white dots and the eye rings really make this chameleon pop. If embroidery intimidates you, skip the dots and just do the eye rings.
Customization Ideas
This crochet tutorial works beautifully in any color. Imagine a bright green chameleon, a rainbow gradient version, or a soft pastel for a nursery. Chameleons change color after all, so you have creative permission to go wild.
You could also adjust the size by using different yarn weights. Bulky yarn and a 5mm hook would give you a much larger chameleon. Fingering weight yarn and a 2.5mm hook would create a tiny miniature version.

Wrapping Up Your Chameleon Project
You did it. You now have everything you need to crochet this step by step magenta chameleon amigurumi pattern from start to finish. Every stitch, every piece, every assembly instruction is right here.
This beginner friendly project builds skills you will use in countless future amigurumi. The shaping techniques, the continuous rounds, the embroidery details, and the assembly process all translate to other creatures and characters.
Thank you so much for choosing this pattern. I genuinely hope you enjoy making your chameleon as much as I enjoyed designing it. When you finish, I would absolutely love to see your creation. Tag me on Instagram or share in my Facebook group. Seeing your finished projects is the best part of this whole thing.
Happy crocheting, friend. Your chameleon is going to be adorable.
