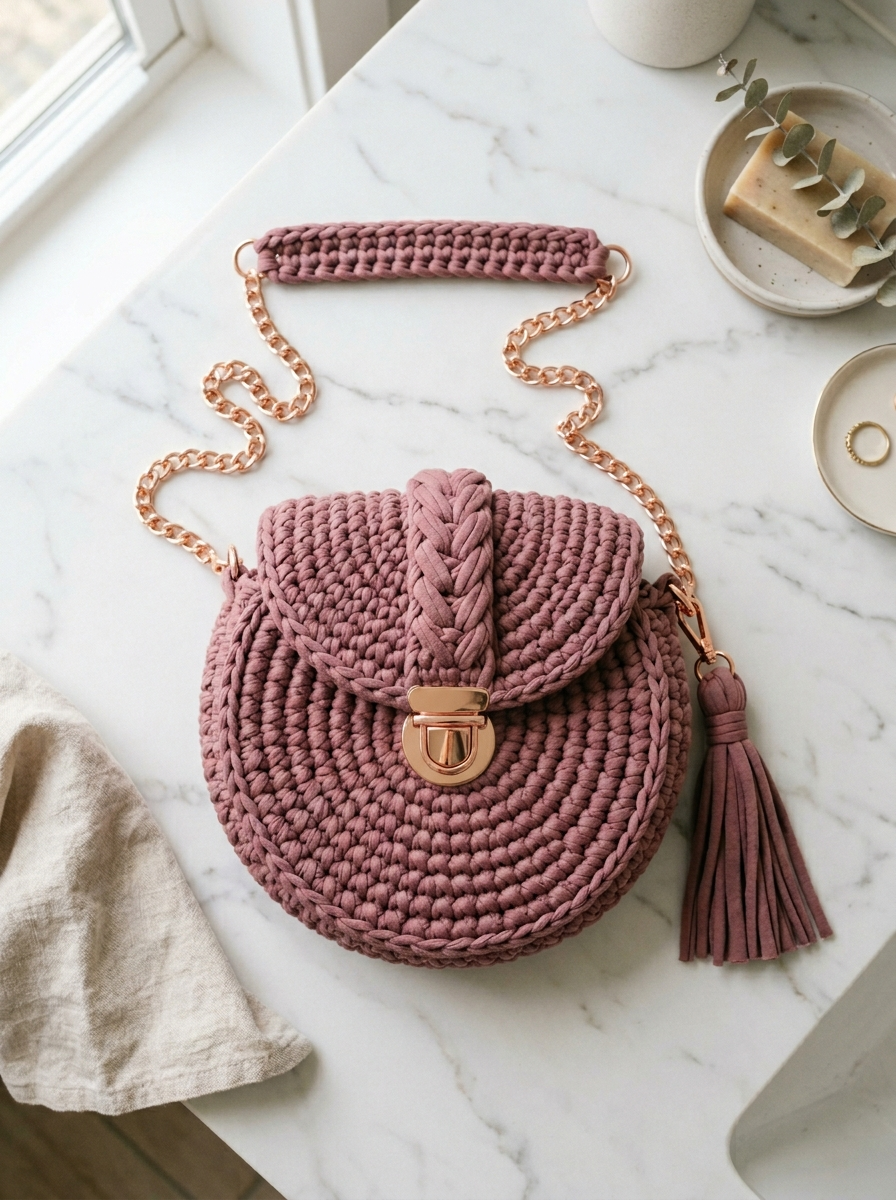
This gorgeous dusty rose round crossbody bag is the kind of project that looks like it belongs in a boutique window. But here is the thing. You can absolutely make this yourself. The construction is straightforward, the stitches are basic, and the result is stunning.
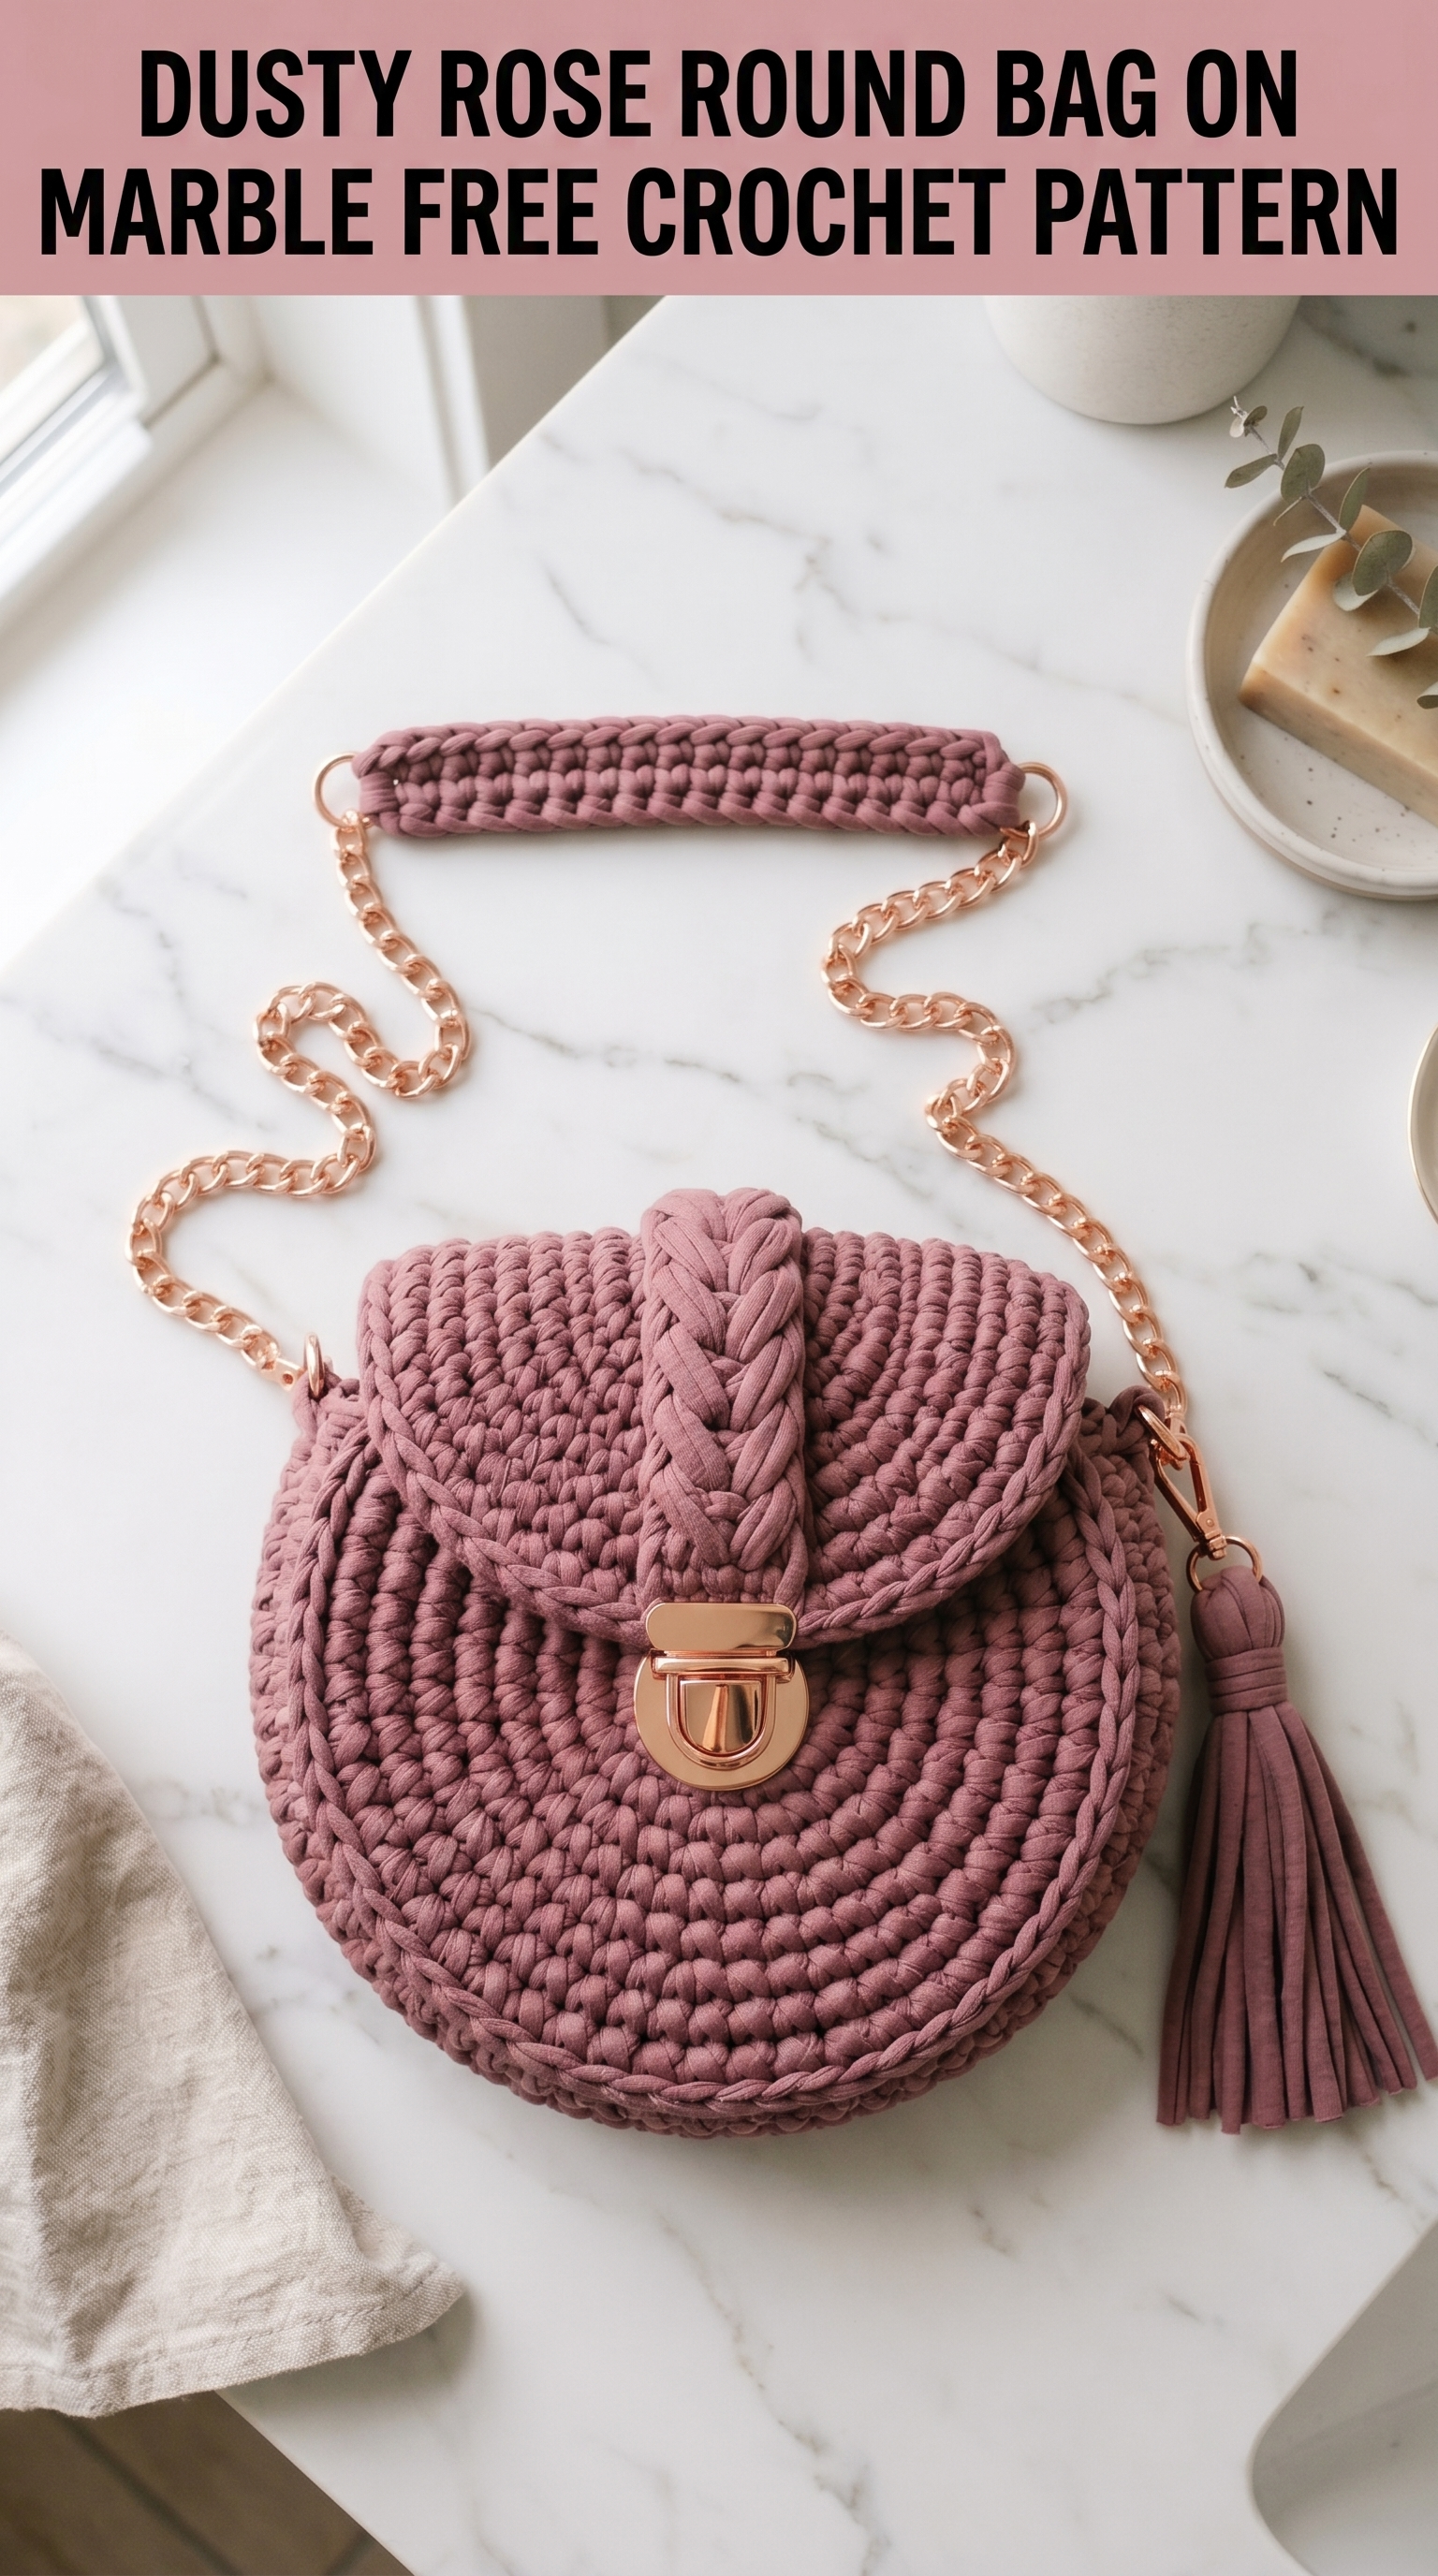
I designed this crochet pattern to create a structured, professional-looking bag using t-shirt yarn and simple single crochet stitches. The round base builds outward in a spiral, the sides grow upward seamlessly, and the curved flap adds that elegant finishing touch. Add some rose gold hardware and a matching tassel, and you have got yourself a statement piece.
Whether you are an intermediate crocheter looking for your first bag project or someone who has made a few amigurumi and wants to try something new, this step by step crochet tutorial will guide you through every round.
Let us make something beautiful together.
Why This Crochet Bag Pattern Works So Well
Round bags have a timeless appeal. They are compact but surprisingly roomy, and the shape holds up beautifully when you use the right yarn and technique.
This design uses continuous spiral rounds for the base and sides. That means no joining at the end of each round and no visible seam running up the side of your bag. The result is clean and polished.
The dusty rose color shown here is sophisticated without being boring. It pairs beautifully with rose gold chain hardware, but you could easily swap for silver, gold, or antique brass depending on your style.
Materials You Will Need
Before you start, gather everything so you can work uninterrupted.
Yarn:
Hook:
Hardware:
Tools:
Gauge and Finished Dimensions
Gauge: 7 single crochet stitches and 7 rows equals approximately 10cm (4 inches) square using 9mm hook and t-shirt yarn.
Gauge matters here because it affects the final bag size. If your stitches are too loose, the bag will be floppy. Too tight, and you will struggle to crochet and the bag will be stiff and small.
Finished dimensions:
Abbreviations and Stitch Definitions
Let me define every stitch before we begin. No guessing required.
Skill Level
Intermediate beginner. If you can chain, single crochet, and count your stitches, you can make this bag. The spiral construction might be new to you, but I will walk you through it.
Pattern Notes Before You Begin
1. This bag is worked in continuous spiral rounds. You will not join at the end of each round. Use a stitch marker in the first stitch of each round and move it up as you go.
2. T-shirt yarn has stretch. Pull your stitches snug but not painfully tight. Consistency matters more than perfection.
3. The base is crocheted flat as a circle, then the sides are built upward.
4. The flap is worked separately and attached.
5. Read through the entire pattern once before starting. Trust me on this one.
Dusty Rose Round Bag Crochet Pattern Instructions
Part 1: The Circular Base
You will work the base flat in spiral rounds. Place your stitch marker in the first stitch of each round.
Magic ring: Create a magic ring (adjustable loop). If you are not comfortable with magic rings, chain 4 and slip stitch to form a ring instead.
Round 1: Work 6 sc into the magic ring. Pull the tail to close the ring. Place stitch marker in the first sc. (6 sts)
Round 2: Inc in each st around. (12 sts)
Round 3: *Sc 1, inc* repeat around. (18 sts)
Round 4: *Sc 2, inc* repeat around. (24 sts)
Round 5: *Sc 3, inc* repeat around. (30 sts)
Round 6: *Sc 4, inc* repeat around. (36 sts)
Round 7: *Sc 5, inc* repeat around. (42 sts)
Round 8: *Sc 6, inc* repeat around. (48 sts)
Your base should measure approximately 18 to 20cm (7 to 8 inches) across. If it is significantly smaller, check your gauge.
Do not fasten off. You will continue directly into the sides.
Part 2: The Bag Sides
Now we build the walls upward. This is where the magic happens.
Round 9: Working in BLO (back loop only), sc in each st around. (48 sts)
This BLO round creates a distinct ridge at the base of the bag, giving it that structured bottom edge you see in the photo.
Rounds 10 to 22: Sc in each st around (work through both loops as normal). (48 sts each round)
That is 13 rounds of straight single crochet. Simple, rhythmic, meditative.
After Round 22, your bag walls should measure approximately 12 to 14cm (5 to 5.5 inches) tall.
Part 3: Shaping the Top Curve
The top of the bag curves inward slightly before the flap. This creates that rounded saddle bag shape.
Round 23: *Sc 6, sc2tog* repeat around. (42 sts)
Round 24: Sc in each st around. (42 sts)
Round 25: *Sc 5, sc2tog* repeat around. (36 sts)
Round 26: Sc in each st around. (36 sts)
Sl st to next st. Fasten off. Weave in your end.
Part 4: The Curved Flap
The flap is worked flat in rows, then attached to the back of the bag.
Chain 19.
Row 1: Sc in 2nd ch from hook and each ch across. Turn. (18 sts)
Rows 2 to 8: Ch 1 (does not count as stitch), sc in each st across. Turn. (18 sts)
Now we shape the curve.
Row 9: Ch 1, sc2tog, sc 14, sc2tog. Turn. (16 sts)
Row 10: Ch 1, sc2tog, sc 12, sc2tog. Turn. (14 sts)
Row 11: Ch 1, sc2tog, sc 10, sc2tog. Turn. (12 sts)
Row 12: Ch 1, sc2tog, sc 8, sc2tog. Turn. (10 sts)
Row 13: Ch 1, sc2tog, sc 6, sc2tog. Turn. (8 sts)
Row 14: Ch 1, sc2tog, sc 4, sc2tog. (6 sts)
Do not turn. Instead, work a border around the entire flap.
Border: Ch 1, then sc evenly around the entire edge of the flap, working approximately 2 sc per row along the sides and 1 sc per stitch along the top and bottom. Work 3 sc in each corner to keep it flat. Sl st to first sc to join.
Fasten off, leaving a long tail for sewing.
Part 5: The Braided Tab (Flap Accent)
That decorative braid on top of the flap is actually a simple 3-strand braid made from t-shirt yarn strips.
To create:
1. Cut three strips of t-shirt yarn, each approximately 30cm (12 inches) long.
2. Hold them together and tie a knot at one end.
3. Braid the three strands together.
4. Tie off the other end with a knot.
5. Trim the ends and tuck the knots underneath when you attach the braid to the flap.
Position the braid horizontally across the flap, about 2cm (1 inch) down from the curved top edge. Sew in place using matching yarn and a tapestry needle.
Part 6: Assembly and Hardware
Attaching the flap:
Position the flap against the back of the bag. The straight edge (Row 1) should align with the top edge of the bag back. Pin in place and whip stitch securely using a tapestry needle and matching yarn.
Installing the push lock clasp:
1. Position the clasp base plate on the front center of the bag, about 3 to 4cm (1.5 inches) down from the top edge.
2. Mark where the prongs will go.
3. Use small scissors or an awl to create tiny holes for the prongs.
4. Push prongs through, place the backing plate inside the bag, and bend prongs flat.
Repeat with the catch plate on the flap, positioning it so the clasp closes neatly.
Tip: Test the placement before making holes. Close the flap and mark where everything lines up.
Attaching D-rings for the strap:
1. Cut two small strips of t-shirt yarn, approximately 8cm (3 inches) long.
2. Fold each strip through a D-ring.
3. Position the D-ring tabs at the top sides of the bag, one on each side.
4. Sew the folded tabs securely to the inside of the bag opening.
Clip your chain strap to the D-rings.
Adding the shoulder pad (optional):
That crocheted piece covering part of the chain in the photo is a simple rectangular strip.
Chain 31.
Rows 1 to 5: Sc in each st across. Turn. (30 sts)
Fasten off. Fold the strip around the chain where it will rest on your shoulder. Sew the long edges together, encasing the chain.
Attaching the tassel:
Use a swivel clasp to attach your tassel to one of the D-rings. Easy on, easy off.
Helpful Tips for Success
Yarn substitution: If you cannot find t-shirt yarn, you can hold two or three strands of worsted weight cotton together. It will change the drape slightly, but it works.
Tight stitches in spiral rounds: Counting can get tricky. Move that stitch marker every round. I promise you will thank yourself.
Hardware quality matters: Cheap clasps break. Invest in decent hardware, especially if you plan to use this bag daily.
Care Instructions
T-shirt yarn is cotton, so the bag is washable. Spot clean when possible. For deeper cleaning, hand wash in cool water with mild detergent, reshape, and lay flat to dry. Remove hardware first if possible.
Make It Your Own
This crochet bag pattern is wonderfully adaptable. Try it in black with silver hardware for a chic evening look. Make it in cream or white for summer. Add a fabric lining for extra polish. Embroider initials on the flap. The base design is yours to customize.

You Did It
If you have made it this far, you are well on your way to creating something truly special. This dusty rose round bag is the kind of handmade piece that gets compliments everywhere you go. People will ask where you bought it. You get to say you made it yourself.
Thank you so much for choosing this pattern and trusting me to guide you through it. I genuinely appreciate every maker who takes the time to create something with their hands.
When you finish your bag, I would absolutely love to see it. Share your photos on Instagram or Facebook and tag me so I can celebrate with you. Seeing your creations is honestly the best part of my day.
Happy crocheting, friend. Now go make something gorgeous.
