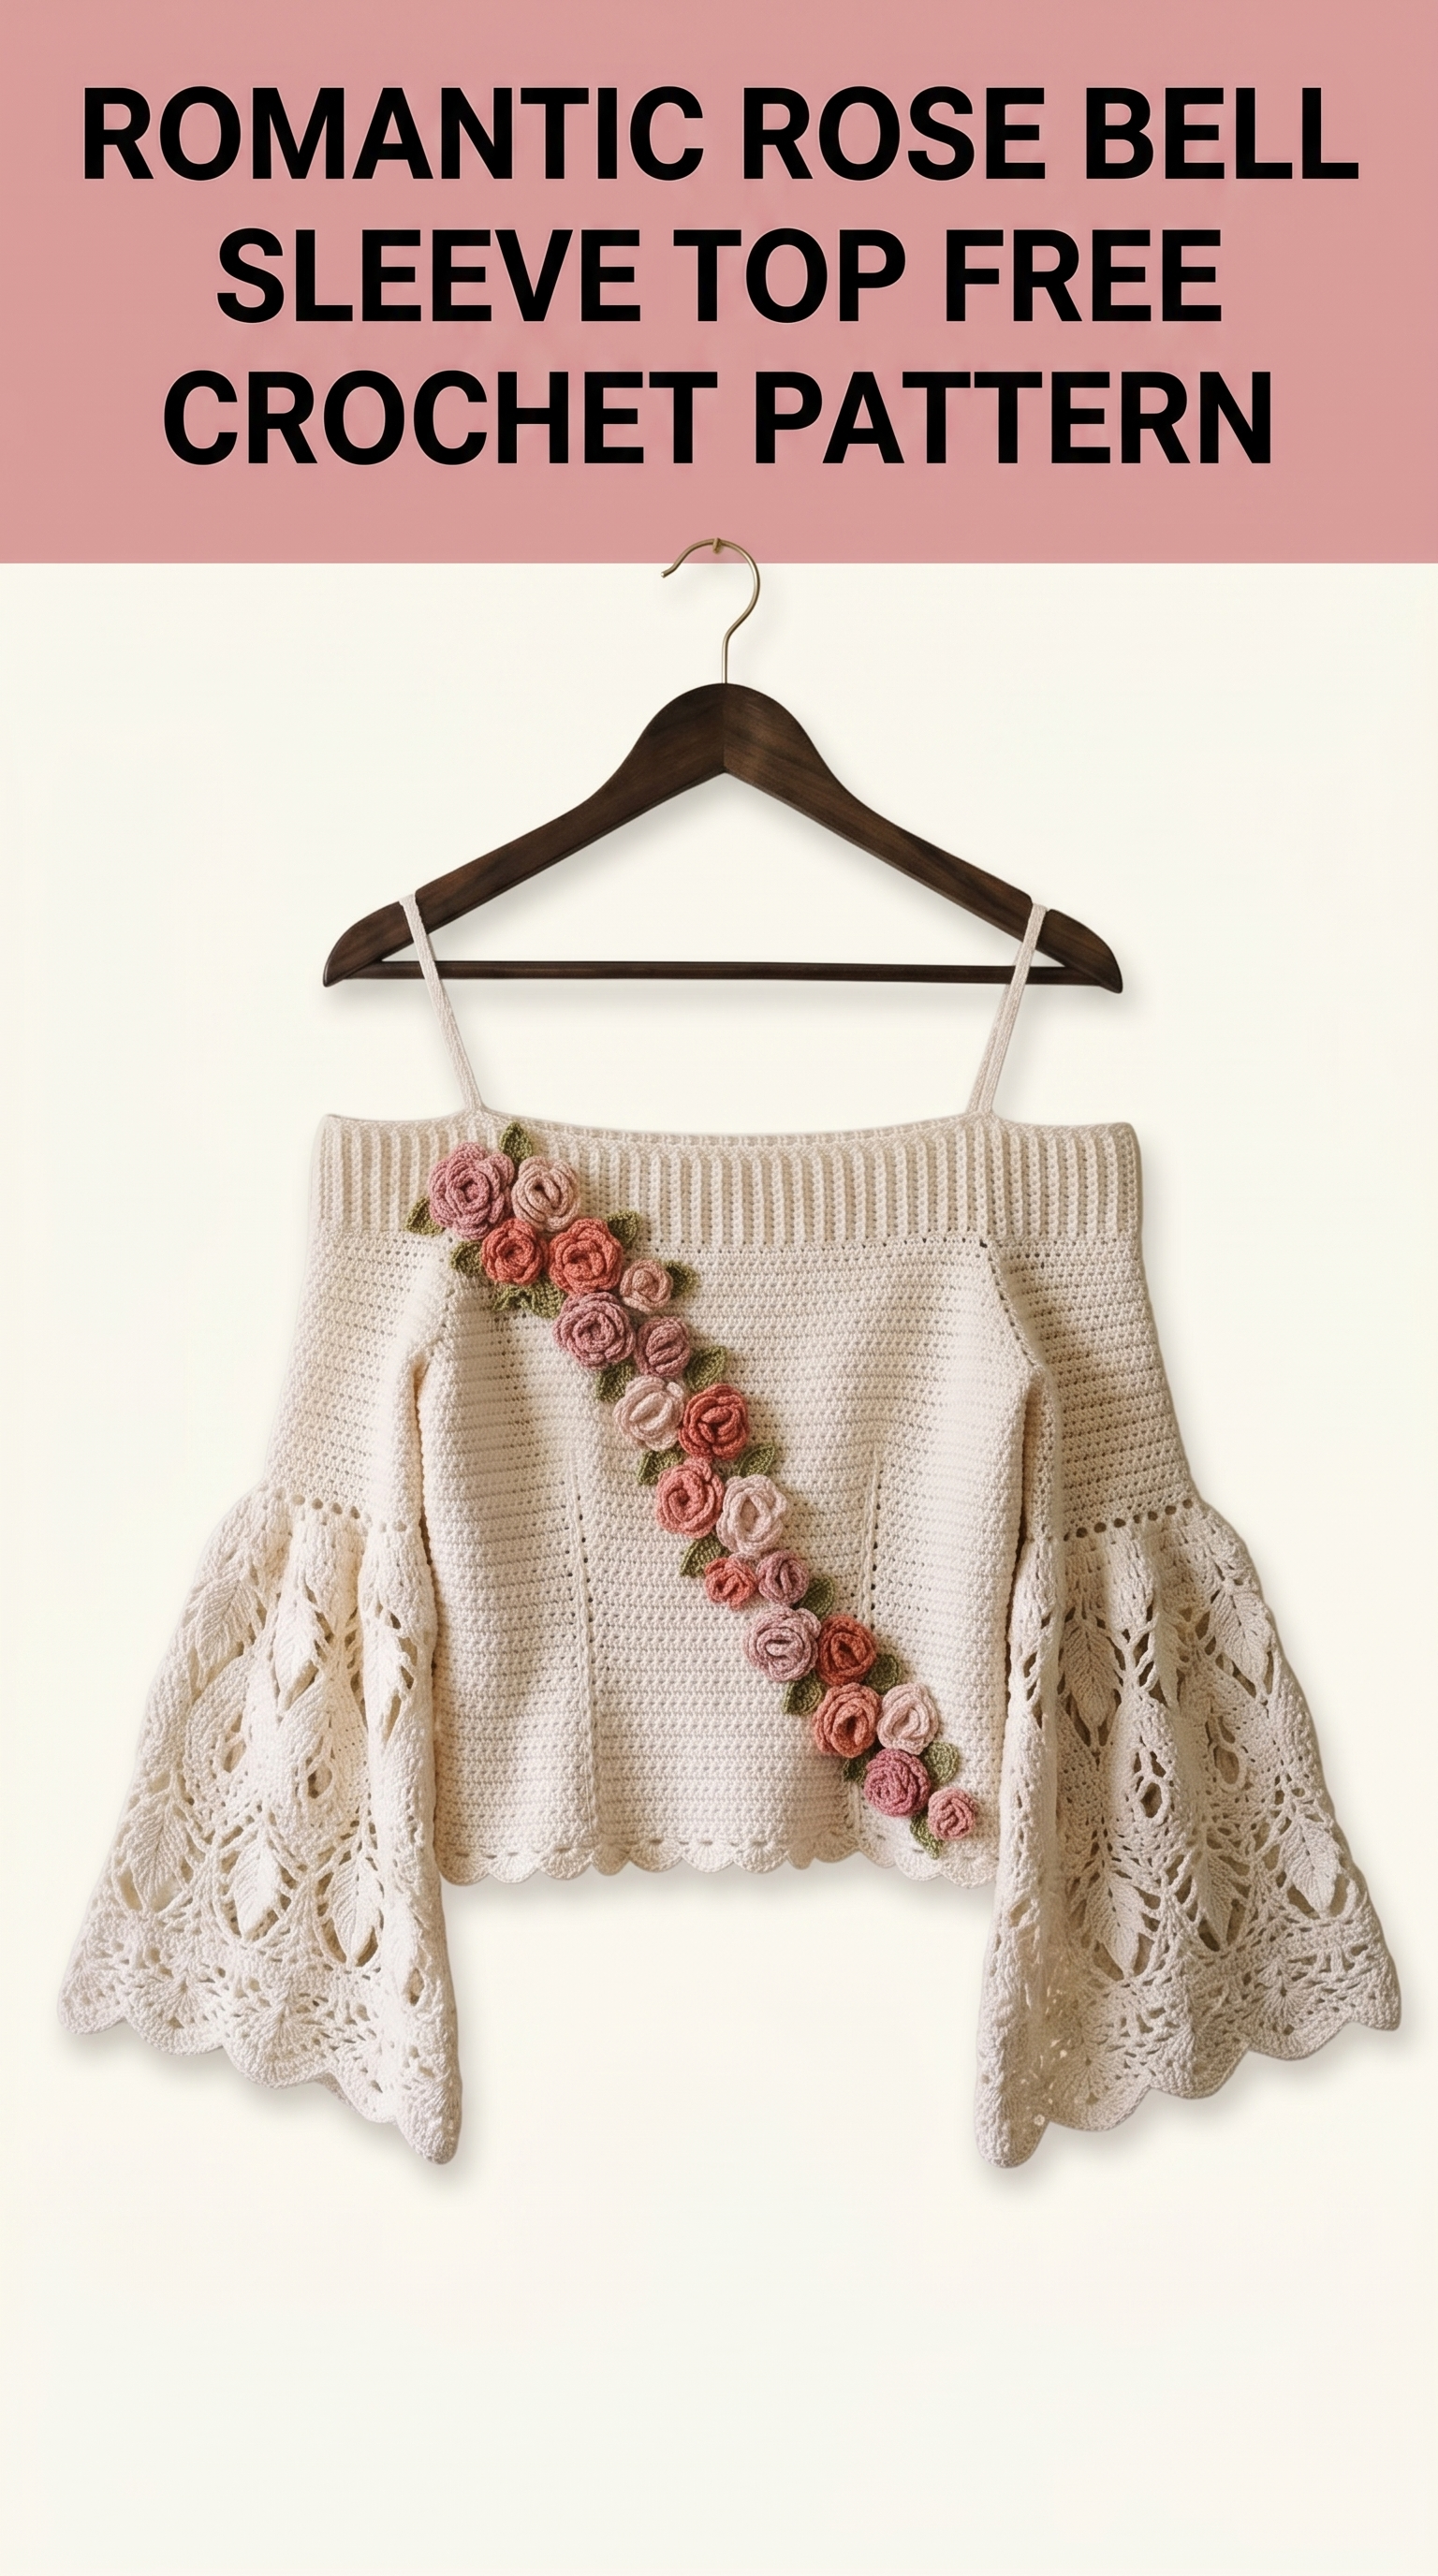
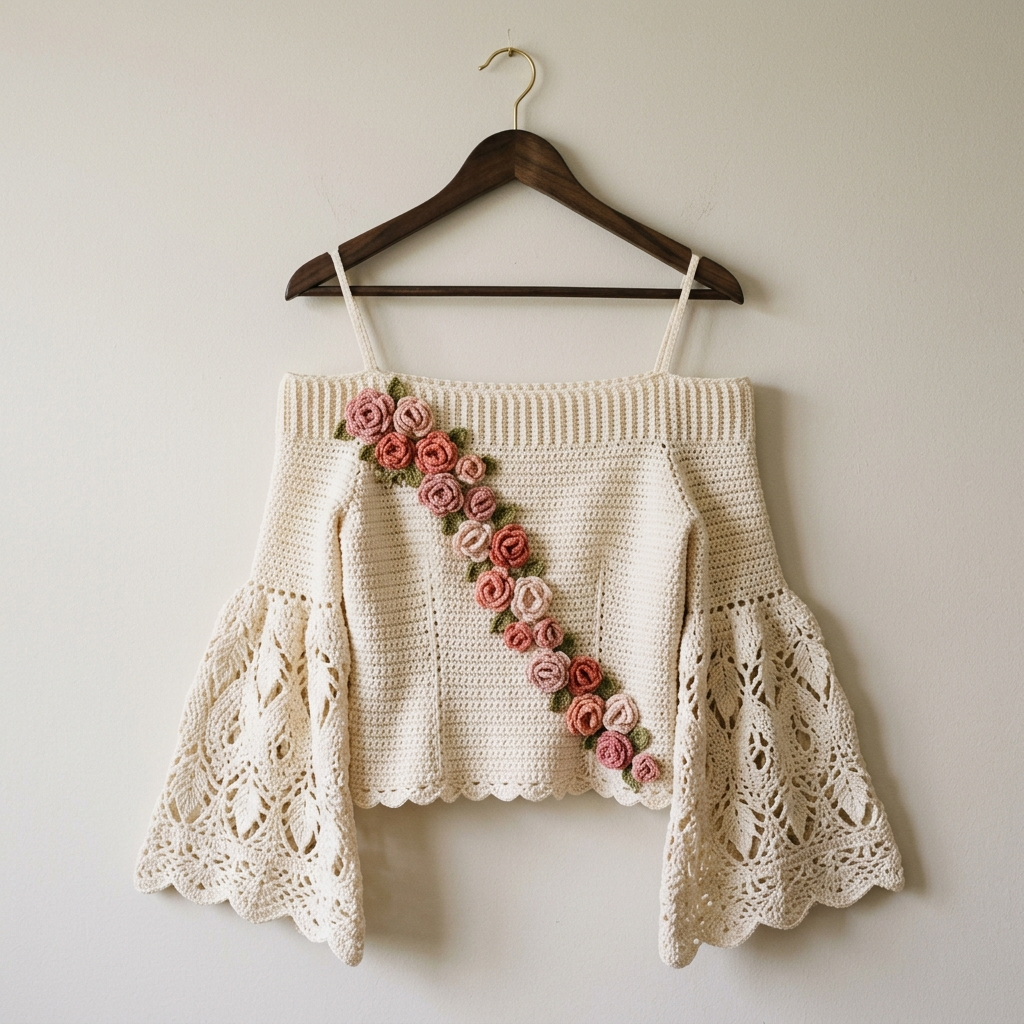
There is something utterly dreamy about a crochet top that feels like it belongs in a garden party or a vintage photograph. This Romantic Rose Bell Sleeve Top is exactly that kind of piece. The moment I finished it, I knew it was special. The dramatic bell sleeves with their delicate lace pattern. The cascade of dimensional roses trailing diagonally across the bodice. The sweet scalloped hem. It all comes together into something that looks far more complicated than it actually is.
If you have made a few garments before, you can absolutely make this. I would call it an intermediate level crochet pattern, but a confident adventurous beginner could tackle it too. We will work through every section together, and I will explain the trickier bits as we go.
Let me show you how to create this beautiful top from start to finish.
What Makes This Crochet Top So Special
This is not just another boxy cropped top. The construction combines several techniques that elevate it into something truly romantic and feminine.
The main body uses simple single crochet and half double crochet in a clean, classic stitch pattern. Nothing scary there. The ribbed neckline creates that lovely gathered effect at the top and gives the off-shoulder silhouette its structure.
But the real magic happens in two places. First, those dramatic bell sleeves feature an openwork lace pattern with leaf-like motifs that flutter beautifully with movement. Second, the three-dimensional roses with tiny leaves create a garden-fresh embellishment that makes this top absolutely unforgettable.
The scalloped edging along the hem and sleeves ties everything together with a soft, finished look.
Materials You Will Need
Gather these supplies before you begin. Having everything ready makes the process so much more enjoyable.
Yarn:
- Main color (cream/off-white): Approximately 400-500 yards of DK weight yarn (light worsted also works). I recommend a cotton or cotton blend for the best drape. Think Drops Safran, Paintbox Cotton DK, or Lion Brand 24/7 Cotton.
- Rose colors: Small amounts (25-50 yards each) of DK weight yarn in 3-4 shades of pink. Dusty rose, blush, coral, and mauve create that romantic ombre effect.
- Leaf color: Approximately 30 yards of DK weight yarn in olive green or sage.
Hook:
- 4.0mm (G/6) crochet hook for the main body
- 3.5mm (E/4) crochet hook for the roses and leaves (slightly smaller creates tighter, more defined flowers)
Notions:
- Yarn needle for weaving ends and assembly
- Stitch markers (at least 6)
- Measuring tape
- Scissors
- Rust-proof pins for blocking
Gauge (Please Do Not Skip This)
I know gauge swatches feel tedious. But this is a garment that needs to fit your body. Ten minutes spent on gauge saves hours of frustration later.
Target gauge: 18 stitches and 20 rows = 4 inches (10cm) in single crochet using 4.0mm hook
Make a swatch at least 5 inches square. Measure the center section, not the edges. If you have too many stitches per inch, go up a hook size. Too few? Go down.
Sizes and Measurements
This pattern is written for size Small with a finished bust measurement of approximately 34-36 inches. The cropped length hits at the natural waist, roughly 14-15 inches from underarm to hem.
To adjust sizes:
- Add or subtract stitches in multiples of 4 for the body panels
- Increase sleeve width by adding chains to the foundation
- The roses and leaves remain the same size regardless of garment size
Abbreviations and Stitch Definitions
Let me explain every stitch we will use. Even if you know these, a quick refresher never hurts.
ch = chain: Yarn over, pull through loop on hook. The foundation of most crochet.
sl st = slip stitch: Insert hook, yarn over, pull through both loops at once. Used for joining and invisible movement.
sc = single crochet: Insert hook, yarn over and pull up a loop (2 loops on hook), yarn over and pull through both loops. Creates a tight, dense fabric.
hdc = half double crochet: Yarn over, insert hook, pull up a loop (3 loops on hook), yarn over and pull through all 3 loops. Slightly taller than sc with nice drape.
dc = double crochet: Yarn over, insert hook, pull up a loop, yarn over and pull through 2 loops, yarn over and pull through remaining 2 loops. Creates an open, drapey fabric.
tr = treble crochet (also called triple crochet): Yarn over twice, insert hook, pull up a loop, (yarn over, pull through 2 loops) three times. Very tall stitch used in lace patterns.
sc2tog = single crochet two together (decrease): Insert hook in first stitch, pull up a loop, insert hook in next stitch, pull up a loop (3 loops on hook), yarn over and pull through all 3. Reduces stitch count by one.
ch-sp = chain space: The gap created by chains in the previous row. You work into this space, not into the chain stitches themselves.
BLO = back loop only: Work into only the back loop of the stitch, leaving the front loop unworked. Creates ribbing texture.
Pattern Instructions
Ribbed Neckband
The neckband is worked first as a long strip, then the body hangs from it. This construction creates that lovely gathered effect.
Foundation: Ch 11
Row 1: Sc in 2nd ch from hook and in each ch across. Turn. (10 sts)
Rows 2-120: Ch 1, sc in BLO of each st across. Turn. (10 sts)
This creates a stretchy ribbed band approximately 24-26 inches long. The ribbing should stretch to fit around your shoulders and upper chest.
Do not fasten off. We will work directly into the long edge.
Front and Back Body Panels
Turn the ribbed band so you are working along the long edge (the row ends, not the short foundation edge).
Setup Row: Ch 1, work 120 sc evenly along the long edge of the ribband. This means roughly 1 sc per row end. Turn. (120 sts)
Row 1: Ch 1, sc in each st across. Turn. (120 sts)
Rows 2-15: Repeat Row 1. (120 sts each row)
Shape for Armholes:
We will now divide for front and back.
Row 16 (divide): Ch 1, sc in first 55 sts. Stop. Leave remaining sts unworked for now. Turn. (55 sts – this is your front panel)
Rows 17-40: Ch 1, sc in each st across. Turn. (55 sts)
Place a stitch marker in this section. Set aside.
Back Panel:
Join yarn to the 66th stitch of Row 15 (skipping 10 sts for the first armhole).
Row 16: Ch 1, sc in same st and next 54 sts. Leave remaining 10 sts unworked for second armhole. Turn. (55 sts)
Rows 17-40: Ch 1, sc in each st across. Turn. (55 sts)
Joining Side Seams
Fold the piece so front and back panels align at the sides. Using your yarn needle and a length of cream yarn, whip stitch or mattress stitch the side seams from the bottom hem up to the armhole opening.
Leave approximately 8-9 inches open for each armhole.
Scalloped Hem Border
Join yarn at any side seam along the bottom edge.
Round 1: Ch 1, sc evenly around entire bottom edge, placing approximately 110 sc across front and 110 sc across back. Sl st to first sc to join. (220 sts approximately)
Round 2 (scallop round): Ch 1, *sc in first st, skip 1 st, 5 dc in next st (shell made), skip 1 st*. Repeat from * around. Sl st to first sc. Fasten off.
The shells create those beautiful scallops you see along the hem.
Bell Sleeves (Make 2)
The sleeves are worked from the shoulder down, increasing gradually to create the dramatic bell shape. The lace section begins partway down.
Foundation: Ch 50. Join with sl st to form a ring, being careful not to twist.
Rounds 1-8: Ch 1, sc in each st around. Sl st to join. (50 sts)
Round 9 (increase): Ch 1, *sc in next 4 sts, 2 sc in next st*. Repeat from * around. Sl st to join. (60 sts)
Rounds 10-14: Ch 1, sc in each st around. Sl st to join. (60 sts)
Round 15 (increase): Ch 1, *sc in next 5 sts, 2 sc in next st*. Repeat from * around. Sl st to join. (70 sts)
Begin Lace Section:
Round 16: Ch 4 (counts as dc + ch 1), skip next st, *dc in next st, ch 1, skip next st*. Repeat from * around. Sl st to 3rd ch of beginning ch-4. (35 dc, 35 ch-1 spaces)
Round 17: Sl st into first ch-sp, ch 3 (counts as dc), 2 dc in same ch-sp, ch 1, *3 dc in next ch-sp, ch 1*. Repeat from * around. Sl st to top of ch-3.
Round 18: Sl st to center dc of first 3-dc group, ch 5 (counts as dc + ch 2), *dc in center dc of next 3-dc group, ch 2*. Repeat from * around. Sl st to 3rd ch of ch-5.
Round 19: Ch 3, 4 dc in first ch-2 sp (half shell), *sc in next ch-2 sp, 5 dc in next ch-2 sp (shell)*. Repeat from * around, ending with sc in last ch-2 sp. Sl st to top of ch-3.
Round 20: Ch 1, sc in each dc and sc around, placing 1 sc in each stitch. Sl st to join.
Round 21 (increase): Ch 1, *sc in next 6 sts, 2 sc in next st*. Repeat from * around. Sl st to join. (80 sts approximately)
Rounds 22-25: Repeat the lace pattern from Rounds 16-19, adjusting for increased stitch count.
Final Scallop Round: Ch 1, *sc in first st, skip 1 st, 5 dc in next st, skip 1 st*. Repeat from * around. Sl st to join. Fasten off.
Attach sleeves to armhole openings using whip stitch, matching the sleeve seam to the underarm.
Three-Dimensional Roses (Make 15-18)
These little roses are easier than they look. You work a ruffled strip, then roll it up. Seriously. That is the whole secret.
Using 3.5mm hook and one of your pink shades:
Foundation: Ch 30
Row 1: Sc in 2nd ch from hook, *ch 3, skip 2 ch, sc in next ch*. Repeat from * across. (10 ch-3 loops)
Row 2: Ch 1, turn, *work (sc, hdc, 3 dc, hdc, sc) in each ch-3 loop*. This creates petals.
Fasten off, leaving a 12-inch tail.
Starting from the beginning of the strip, roll the strip tightly to form the rose center, then more loosely as you work outward. Use the yarn tail to stitch through the bottom of the rose, securing all layers. Do not trim the tail yet.
Make roses in varying shades for a natural ombre effect. I made 6 coral, 5 dusty rose, and 5 blush.
Leaves (Make 20-24)
Using 3.5mm hook and olive green:
Foundation: Ch 10
Row 1: Sl st in 2nd ch from hook, sc in next ch, hdc in next ch, dc in next 2 ch, hdc in next ch, sc in next ch, sl st in next ch. Ch 1, rotate to work along other side of foundation chain. Sl st in first ch, sc in next ch, hdc in next ch, dc in next 2 ch, hdc in next ch, sc in next ch, sl st in last ch.
Fasten off, leaving a 6-inch tail.
This creates a symmetrical pointed leaf approximately 1.5 inches long.
Arranging and Attaching the Roses
This is the creative part. The roses cascade diagonally from the left shoulder area down toward the right hip, creating that gorgeous garden-fresh embellishment.
Lay your finished top flat. Arrange roses along a diagonal line, clustering them closer together at the shoulder and spacing them slightly further apart as they trail down. Tuck leaves between and behind roses.
When you are happy with the arrangement, pin everything in place. Using the yarn tails, stitch each rose and leaf securely to the bodice. Work on the wrong side when possible to keep stitches invisible.
I recommend stitching through each rose in at least 3 places to keep them from flopping.
Spaghetti Straps (Optional)
The straps help keep the top in place, especially if you want a more secure fit.
For each strap: Ch 80 (or desired length). Sl st in 2nd ch from hook and each ch across. Fasten off.
Attach one end of each strap to the inside front of the neckband, approximately 4-5 inches from center front. Attach the other end to the corresponding spot on the back.
Finishing Your Romantic Rose Bell Sleeve Top
Weave in all remaining ends. I know there are many. Put on a good podcast and work through them.
Blocking: Fill a basin with cool water and a drop of wool wash or gentle detergent. Submerge your top and let it soak for 20 minutes. Gently squeeze out water (never wring). Roll in a towel to remove excess moisture. Lay flat on a blocking mat or clean towel, shaping the bell sleeves and smoothing the body. Let dry completely.
Blocking makes an enormous difference in how professional your finished garment looks. The lace opens up beautifully, the hem lies flat, and everything just looks more polished.
Tips for Success with This Crochet Pattern
Yarn choice matters. Cotton and cotton blends give the best drape for this style. Acrylic can work but may feel stiffer. Avoid anything too fuzzy as it will obscure the lace detail.
Keep your rose tension consistent. Roll them all similarly so they look like a matched set, not a random collection.
Try it on as you go. After completing the body panels, hold the piece up to yourself. Is it long enough? Wide enough? Adjust before continuing.
The lace pattern has a rhythm. Once you work a few repeats, it becomes almost meditative. Trust the process.
Why You Will Love Making This Top
This Romantic Rose Bell Sleeve Top crochet pattern hits that sweet spot between impressive and achievable. The techniques are not wildly advanced, but the finished piece looks like something from a boutique. The combination of solid stitchwork, delicate lace, and dimensional embellishments creates visual interest that draws compliments.
It is perfect for summer weddings, garden parties, date nights, or just feeling beautiful on an ordinary Tuesday.
Thank You for Being Here
I genuinely appreciate you choosing to make this pattern. There is something so meaningful about knowing a piece I designed is being recreated in living rooms and craft corners around the world.
When you finish your Romantic Rose Bell Sleeve Top, I would absolutely love to see it. Share your photos on Instagram or Facebook and tag me. Seeing your color choices and styling brings me so much joy.
Happy crocheting, friend. You have got this.
