Last summer, my sister called me in a panic three days before her best friend’s birthday. She needed a gift that looked expensive but came from the heart. I happened to be finishing up a prototype of this exact bag, and the moment she saw it, she practically begged me to let her give it away. That bag now lives at a farmers market every Saturday morning, filled with fresh produce and getting compliments from strangers. I knew right then that this pattern had to be shared. If you want to make something that stops people in their tracks and asks "where did you get that?", this is the project for you.
Get the Ad-Free PDF Pattern
You can find the free pattern below, or you can purchase the ad-free printable PDF from my shop.
Get the Printable PDF →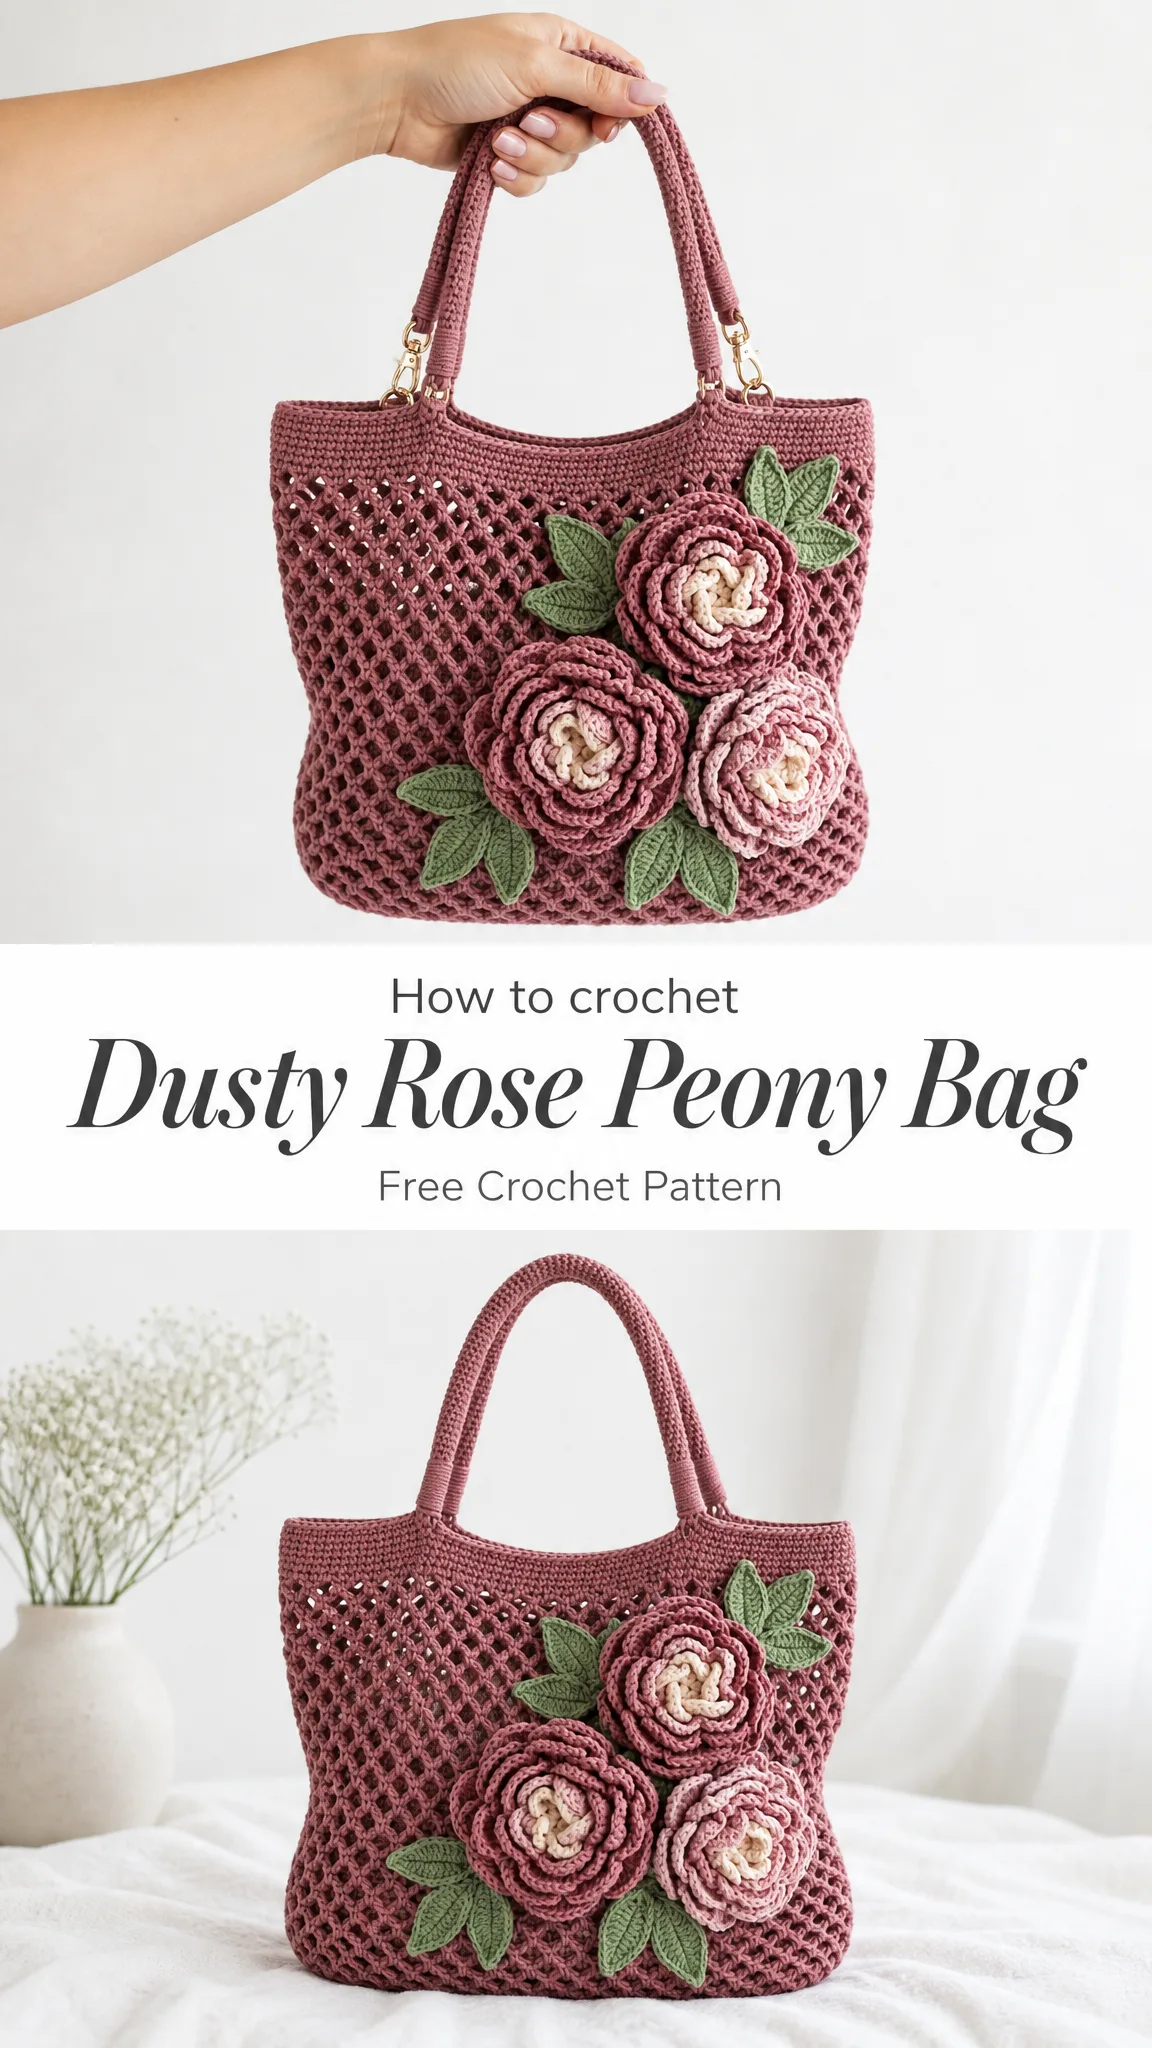
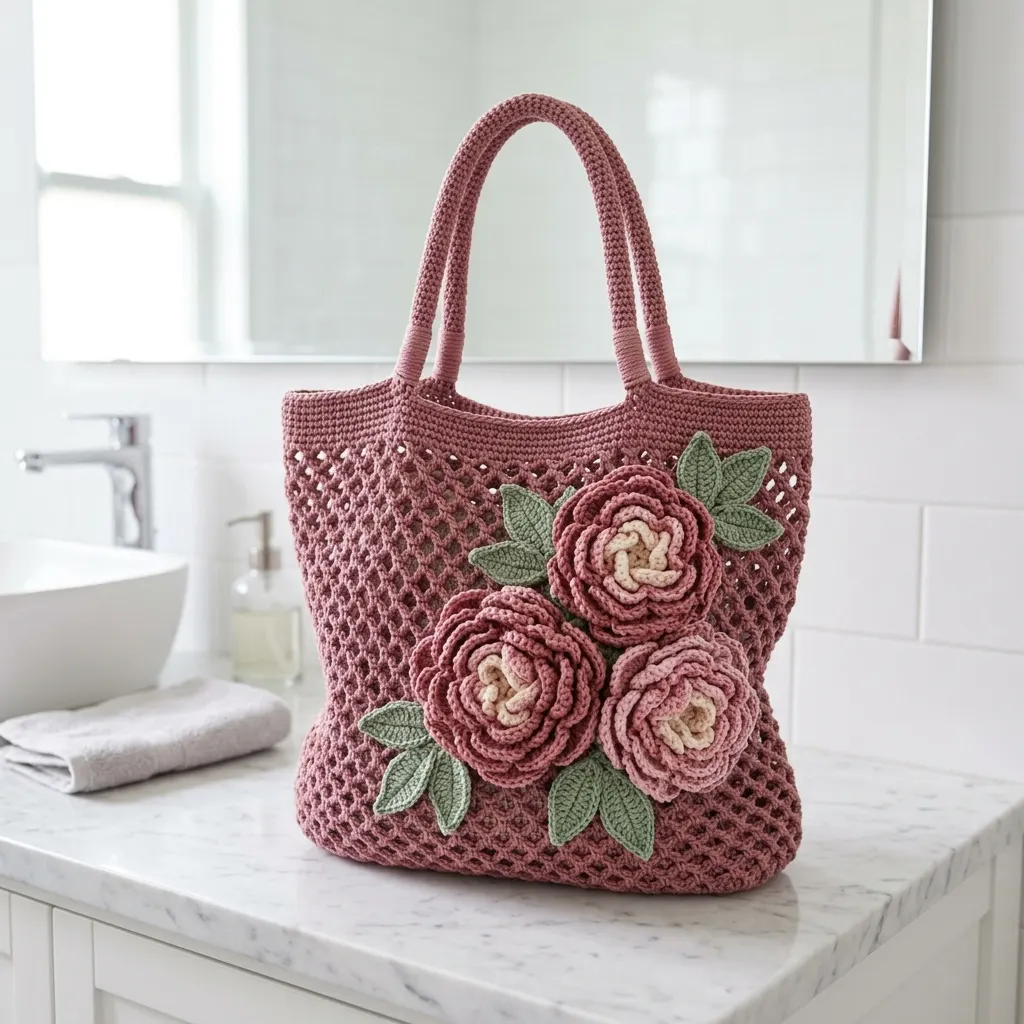
The Dusty Rose Peony Bag combines an open mesh body with sculptural flowers that look far more complicated than they actually are. The construction is straightforward once you understand the rhythm, and the finished piece has that artisan quality that makes handmade gifts truly special.
About This Crochet Pattern
This medium crochet shoulder bag features an oval base, an airy mesh body, a firm top band, two sturdy round handles, and a gorgeous layered peony applique. The bag is worked from the bottom up in the round, while the flowers and leaves are made separately and then stitched to the front.
Skill level: Intermediate. You will work an oval foundation, mesh rounds, sturdy edging, cord handles, layered flowers, leaves, and sewn placement.
Time estimate: 8 to 12 hours, including applique and finishing.
Finished size: 11 inches (28 cm) wide, 10.5 inches (26.5 cm) tall, 3 inches (7.5 cm) deep. Handle drop measures 7.5 inches (19 cm).
This pattern is designed to help you create a similar crochet project, but individual results may vary depending on your yarn, tension, hook size, and finishing technique. You may need to make small adjustments on your side to achieve the closest possible result to the finished project shown.
Materials You Will Need
Yarn: Worsted weight cotton or cotton-blend yarn in the following amounts:
Recommended yarn options:
You can substitute any worsted cotton that matches gauge and gives a firm fabric. For a softer yarn, consider lining the bag and adding a base insert.
Hook: US G-6 (4.0 mm) for the bag and applique. A US F-5 (3.75 mm) is optional for tighter flowers and leaves.
Additional supplies:
Gauge
Getting your gauge right ensures your bag turns out the correct size. Take time to swatch before diving in.
Solid single crochet (sc) gauge: 16 sc x 18 rounds = 4 inches (10 cm), worked in the round and lightly blocked.
Mesh gauge: 4 mesh repeats x 8 mesh rounds = 4 inches (10 cm).
Checkpoints to measure as you go:
Swatch the solid sc and mesh before starting. Match stitch gauge first, then adjust hook size if your bag is too wide or too narrow.
Abbreviations and Stitch Definitions
ch = chain: Yarn over, pull through the loop on your hook. This creates the foundation for most crochet projects.
sl st = slip stitch: Insert hook, yarn over, pull through both the stitch and the loop on your hook in one motion. Used for joining rounds.
sc = single crochet: Insert hook, yarn over, pull up a loop (2 loops on hook), yarn over, pull through both loops.
hdc = half double crochet: Yarn over, insert hook, pull up a loop (3 loops on hook), yarn over, pull through all 3 loops.
dc = double crochet: Yarn over, insert hook, pull up a loop, yarn over, pull through 2 loops, yarn over, pull through remaining 2 loops.
tr = treble crochet: Yarn over twice, insert hook, pull up a loop, (yarn over, pull through 2 loops) three times.
st/sts = stitch(es)
sp = space
rnd = round
BLO = back loop only: Work into only the back loop of the stitch instead of both loops.
rep = repeat
inc = increase: Work 2 sc in the indicated stitch.
RS = right side
UK crocheters note: US sc = UK dc; US dc = UK tr; US tr = UK dtr.
Special Techniques Explained
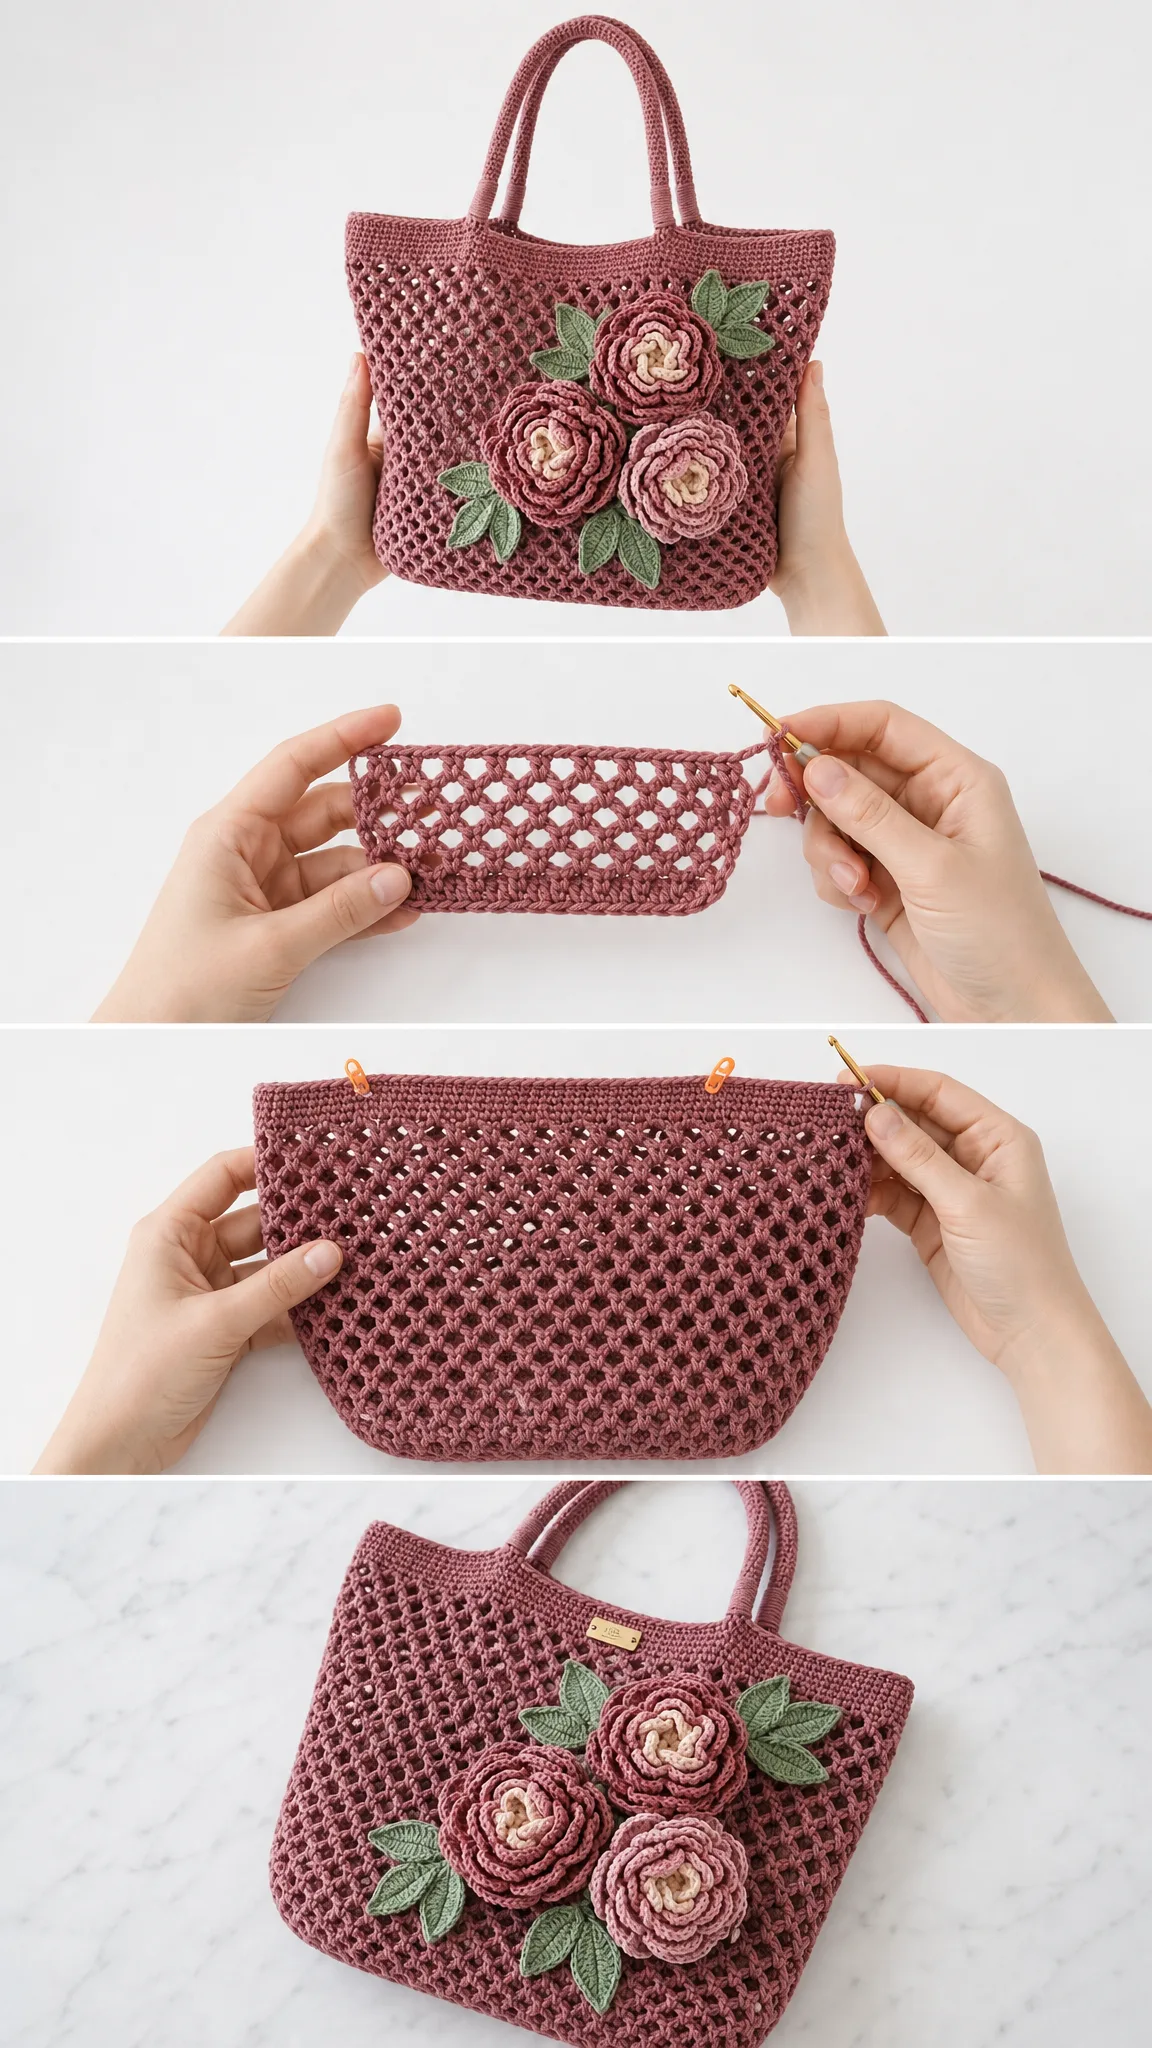
Oval foundation: Work into one side of the starting chain, place multiple stitches in the last chain to turn the end, then continue into the unused loops on the opposite side. This creates an oval shape for the bag base.
Mesh round: *Sc in next st or ch-sp, ch 1, skip next st or sc; rep from * around. Each mesh repeat uses 2 stitches or spaces and keeps the count even. This creates the open, airy texture of the bag body.
Standing sc: Make a slip knot on hook, insert hook in indicated stitch, yarn over and pull up a loop, yarn over and pull through both loops. This allows you to join yarn without a chain.
Crab stitch: Working left to right (opposite of normal), insert hook in previous stitch, yarn over, pull up a loop, yarn over and pull through both loops. Keep the edge relaxed. This creates a decorative twisted edge.
Romanian cord handle: Ch 2, sc in 2nd ch. Turn work clockwise, insert hook under the two side loops, yarn over and complete a sc. Continue turning clockwise after each stitch, always working under the side loops, until cord measures 22 inches (56 cm). This creates a sturdy, round cord.
Layered petal strip: Work a long chain, then create graduated shells into the chain. Roll from the small-petal end and stitch through the base to secure. This is how you create the beautiful peony flowers.
Left-handed crocheters: Work the bag rounds in your natural direction. Mirror the applique placement so the flower cluster sits on the lower right front when viewed from the outside.
Bag Base Instructions
Using dusty rose yarn and your 4.0 mm hook, begin with the oval base.
Round 1: Ch 37. Work 2 sc in 2nd ch from hook, sc in next 34 ch, 3 sc in last ch. Rotate your work. Sc in next 34 unused loops, sc in same first ch as beginning. Join. (74 sc)
Round 2: Work 2 sc in each of next 2 sts, sc 34, 2 sc in each of next 3 sts, sc 34, 2 sc in last st. (80 sc)
Round 3: (Sc 1, inc) twice, sc 34, (sc 1, inc) 3 times, sc 34, (sc 1, inc) once. (86 sc)
Round 4: (Sc 2, inc) twice, sc 34, (sc 2, inc) 3 times, sc 34, (sc 2, inc) once. (92 sc)
Round 5: (Sc 3, inc) twice, sc 34, (sc 3, inc) 3 times, sc 34, (sc 3, inc) once. (98 sc)
Round 6: Working BLO, sc in each st around to turn the base upward. (98 sc)
Rounds 7-8: Sc in each st around. (98 sc each round)
The BLO round creates a natural fold line that helps the base sit flat while the sides stand upright. This is a key structural element of the bag.
Mesh Body and Top Band
Now you will transition into the mesh pattern that gives this bag its signature open, breathable texture.
Round 9: *Sc in next st, ch 1, skip next st; rep from * around. Join to first sc. (49 sc, 49 ch-1 sps)
Rounds 10-28: *Sc in next ch-1 sp, ch 1, skip next sc; rep from * around. Join to first sc. (49 sc, 49 ch-1 sps each rnd)
Round 29: Sc in each sc and each ch-1 sp around. (98 sc)
Rounds 30-33: Sc in each st around. (98 sc each rnd)
Round 34: Crab stitch in each st around, or sl st loosely if you prefer a softer rim. Fasten off. (98 sts)
Checkpoint: Your finished bag body before handles should be about 10.5 inches (26.5 cm) tall from bottom center to top edge and about 11 inches (28 cm) wide when laid flat.
Handle Placement and Construction
Getting the handles positioned correctly ensures your bag hangs evenly when worn.
To mark handle placement:
1. Lay bag flat and mark the side folds
2. Each face has 49 top stitches
3. On the front face: from left side fold, count 9 sts, mark an 8-st attachment area, count 15 center sts, mark an 8-st attachment area, leaving 9 sts to the right side fold
4. Repeat the same placement on the back face
Making the handles:
Make 2 Romanian cords, each 22 inches (56 cm) long. Pin one handle to the front attachment areas and one handle to the back attachment areas.
Sew each cord end over 8 top-band stitches, stitching through the band several times for strength. Wrap the lower 1 inch (2.5 cm) of each handle end with dusty rose yarn and secure on the inside.
The wrapping step not only looks polished but also reinforces the attachment point where handles experience the most stress.
Peony Applique Instructions
The flowers are the showstopping element of this bag. Make 3 flowers: one large deep rose, one medium dusty rose, and one small blush. Work each as a petal strip, roll, then secure through the base.
Large Flower (Deep Rose)
Row 1: Ch 85. Sc in 2nd ch and across. (84 sc)
Row 2: Ch 1, turn; [sl st in next st, 5 dc in next st, sl st in next st] 12 times; [sl st in next st, 7 dc in next st, sl st in next st] 10 times; [sl st in next st, 9 tr in next st, sl st in next st] 6 times. Fasten off.
Medium Flower (Dusty Rose)
Row 1: Ch 73. Sc in 2nd ch and across. (72 sc)
Row 2: Ch 1, turn; [sl st in next st, 5 dc in next st, sl st in next st] 10 times; [sl st in next st, 7 dc in next st, sl st in next st] 8 times; [sl st in next st, 9 tr in next st, sl st in next st] 6 times. Fasten off.
Small Flower (Blush)
Row 1: Ch 61. Sc in 2nd ch and across. (60 sc)
Row 2: Ch 1, turn; [sl st in next st, 5 dc in next st, sl st in next st] 8 times; [sl st in next st, 7 dc in next st, sl st in next st] 7 times; [sl st in next st, 9 tr in next st, sl st in next st] 5 times. Fasten off.
Flower Centers
With cream yarn, ch 18, sl st in 2nd ch and each ch across. Coil into a small knot and stitch into the center of each flower.
The graduated petal sizes (5 dc to 7 dc to 9 tr) create the natural layered look of a peony. When rolling, start from the smaller petals so they form the tight center.
Leaf Instructions
Make 8 leaves using sage green yarn.
Ch 13. Sc in 2nd ch, hdc, dc in next 3 ch, tr in next 3 ch, dc in next 2 ch, hdc, 3 sc in last ch.
Working down opposite side: hdc, dc in next 2 loops, tr in next 3 loops, dc in next 3 loops, hdc, sc. Sl st to first sc. Fasten off, leaving a sewing tail.
The leaf shape naturally forms a point at the tip with a rounded base. The treble stitches create the widest part of the leaf.
Applique Placement
Arranging your flowers and leaves properly makes all the difference in the final look.
1. Pin the large flower slightly above center on the right front
2. Place the medium flower lower left and the small flower lower right so the cluster forms a soft triangle
3. Tuck 2-3 leaves behind each outer edge of the flower cluster
4. Keep the bottom leaves above the base curve so the bag can sit flat
Sewing order: Attach leaves first, then flowers. Stitch around each flower base and add a few hidden stitches through outer petals so the applique stays secure during use.
Finishing and Blocking Your Bag
Proper finishing transforms your project from homemade to handcrafted.
1. Weave in all ends on the inside
2. Steam lightly or wet block only if your yarn label allows it
3. Block the bag over a folded towel or small box so the base dries flat and the sides remain softly squared
4. For extra structure, cut plastic canvas to fit the base and cover it with fabric before inserting
Optional lining: Cut two rectangles and one base oval/rectangle to match the bag, sew together, then hand-stitch below the top band. A lining prevents small items from poking through the mesh and adds durability.
Size Customization Tips
Want to adjust the pattern to fit your needs? Here is how:
To make the bag wider: Add chains to the foundation in multiples of 2. Each 2 added chains adds 4 stitches to the final oval count after Round 5 and preserves the mesh repeat.
To make the bag taller: Add or remove mesh rounds before Round 29. Every 2 mesh rounds changes height by about 1 inch (2.5 cm).
To adjust handle drop: Change cord length. For each extra 1 inch (2.5 cm) of handle drop, add about 2 inches (5 cm) to the cord length.
Care Instructions
Your beautiful bag deserves proper care to last for years.
Spot clean when possible. For washable cotton, hand wash in cool water, roll in a towel, reshape, and dry flat. Do not hang while wet because the handles may stretch.
Troubleshooting Common Issues
Mesh leans or twists: Join each mesh round to the first sc and keep the ch-1 spaces relaxed.
Bag too floppy: Use a smaller hook, cotton yarn, firmer blocking, a base insert, or a fabric lining.
Top edge ruffles: Work Round 29 evenly into each sc and each ch-sp only. Do not add extra stitches.
Flowers droop: Sew through the flower base and add hidden stitches under outer petals.
Final Thoughts on the Dusty Rose Peony Bag Crochet Pattern
This bag is one of those projects that looks incredibly impressive on display but breaks down into manageable steps when you actually sit down to make it. The mesh body works up quickly once you find your rhythm, and the flowers are genuinely satisfying to roll and shape. Whether you keep it for yourself or gift it to someone special, this bag will get noticed.
I hope you enjoy making this Dusty Rose Peony Bag as much as I enjoyed designing it. Thank you for trusting me with your crafting time!
If you make this pattern, I would absolutely love to see your finished bag. Tag me on Instagram or share a photo on Facebook so I can cheer you on. Seeing your creations truly makes my day.
Save this pattern to your Pinterest boards so you can find it when you are ready to start, and drop a comment below if you give it a try. I always love hearing which color combinations you choose!
Want a Quick & Easy Printable Version?
Get a clean, beautifully formatted PDF of this pattern — easy to follow step by step, ready to print or save on any device. No scrolling, no distractions, just the pattern.
Get the Printable PDF →